News

Example: Sierpinski’s Turtles

Sierpinski’s Gasket

These routines use recursion (they repeatedly call themselves) to realise different Sierpinski algorithms. Logo’s recursion capabilities and relational turtle make it excellent for the task of rendering these algorithms! They’re also very pretty.

TO half_s :size :level
  if :level = 0 [fd :size stop]
  half_s :size :level - 1
  lt 45 fd :size * sqrt 2 lt 45
  half_s :size :level - 1
  rt 90 fd :size rt 90
  half_s :size :level - 1
  lt 45 fd :size * sqrt 2 lt 45
  half_s :size :level - 1
END

TO sierpinski :size :level
  repeat 2 [
    half_s :size :level
    rt 90 fd :size rt 90
  ]
END

TO sierp
  cs pu back 180 pd sierpinski 3 5
END

sierp

Instead of drawing lines, we can construct triangles out of ‘pins’ dropped at appropriate points:

TO half_s :size :level
  penup
  if :level = 0 [fd :size stop]

  pin
  ;pin marks a point for use with pinfrag

  half_s :size :level - 1
  lt 45 fd :size * sqrt 2 lt 45
  half_s :size :level - 1
  rt 90 fd :size rt 90
  half_s :size :level - 1
  lt 45 fd :size * sqrt 2 lt 45
  half_s :size :level - 1

  pinfrag
  ;creates a triangle out of the last three 'pins'

END

sierp

We could drop twice as many pins and then select a color for each ‘frag’ (fragment) triangle from a list:

TO half_s :size :level
pu
if :level = 0 [fd :size stop]

pin
;drop pin

half_s :size :level - 1
lt 45 fd :size * sqrt 2 lt 45
half_s :size :level - 1

pin 
;drop another pin

rt 90 fd :size rt 90
half_s :size :level - 1
lt 45 fd :size * sqrt 2 lt 45
half_s :size :level - 1

setfc item :level [9 8 1 13] pinfrag
;pick a color from a list based on the current level and create the fragment

END

sierp

Sierpinski’s Triangle

It’s triangles all the way down!

TO sierpinski :size :level
  if :level > 0 [
    rt 30
    repeat 3 [
      fd :size
      rt 120
    ]
    left 30
    sierpinski :size / 2 :level - 1
    rt 30
    fd :size / 2
    left 30
    sierpinski :size / 2 :level - 1
    rt 30
    back :size / 2
    left 30
    rt 90
    fd :size / 2
    left 90
    sierpinski :size / 2 :level - 1
    left 90
    fd :size / 2
    rt 90
  ]
END

TO sierpinskiexample
  sierpinski 500 8
END

sierpinskiexample

Neat but a bit plain. We could use frag to create filled triangles, but we need to avoid z-fighting by adding a little bit of code to change the elevation of each ‘level’:

TO sierpinski :size :level
  if :level > 0 [

    pu setz 0 lower 0.1 * :level
    ;add above line to avoid z-fighting

    rt 30
    repeat [
      fd :size
      rt 120
    ]

    setfc :level
    ;set the fill color to the current 'level'
    frag
    ;create a filled triangle from the last three points (triangle)

    left 30
    sierpinski :size / 2 :level - 1
    rt 30
    fd :size / 2
    left 30
    sierpinski :size / 2 :level - 1
    rt 30
    back :size / 2
    left 30
    rt 90
    fd :size / 2
    left 90
    sierpinski :size / 2 :level - 1
    left 90
    fd :size / 2
    rt 90
  ]
END

sierpinskiexample

If you seperate the layers more, and use shard instead of frag

Sierpinski’s Tree

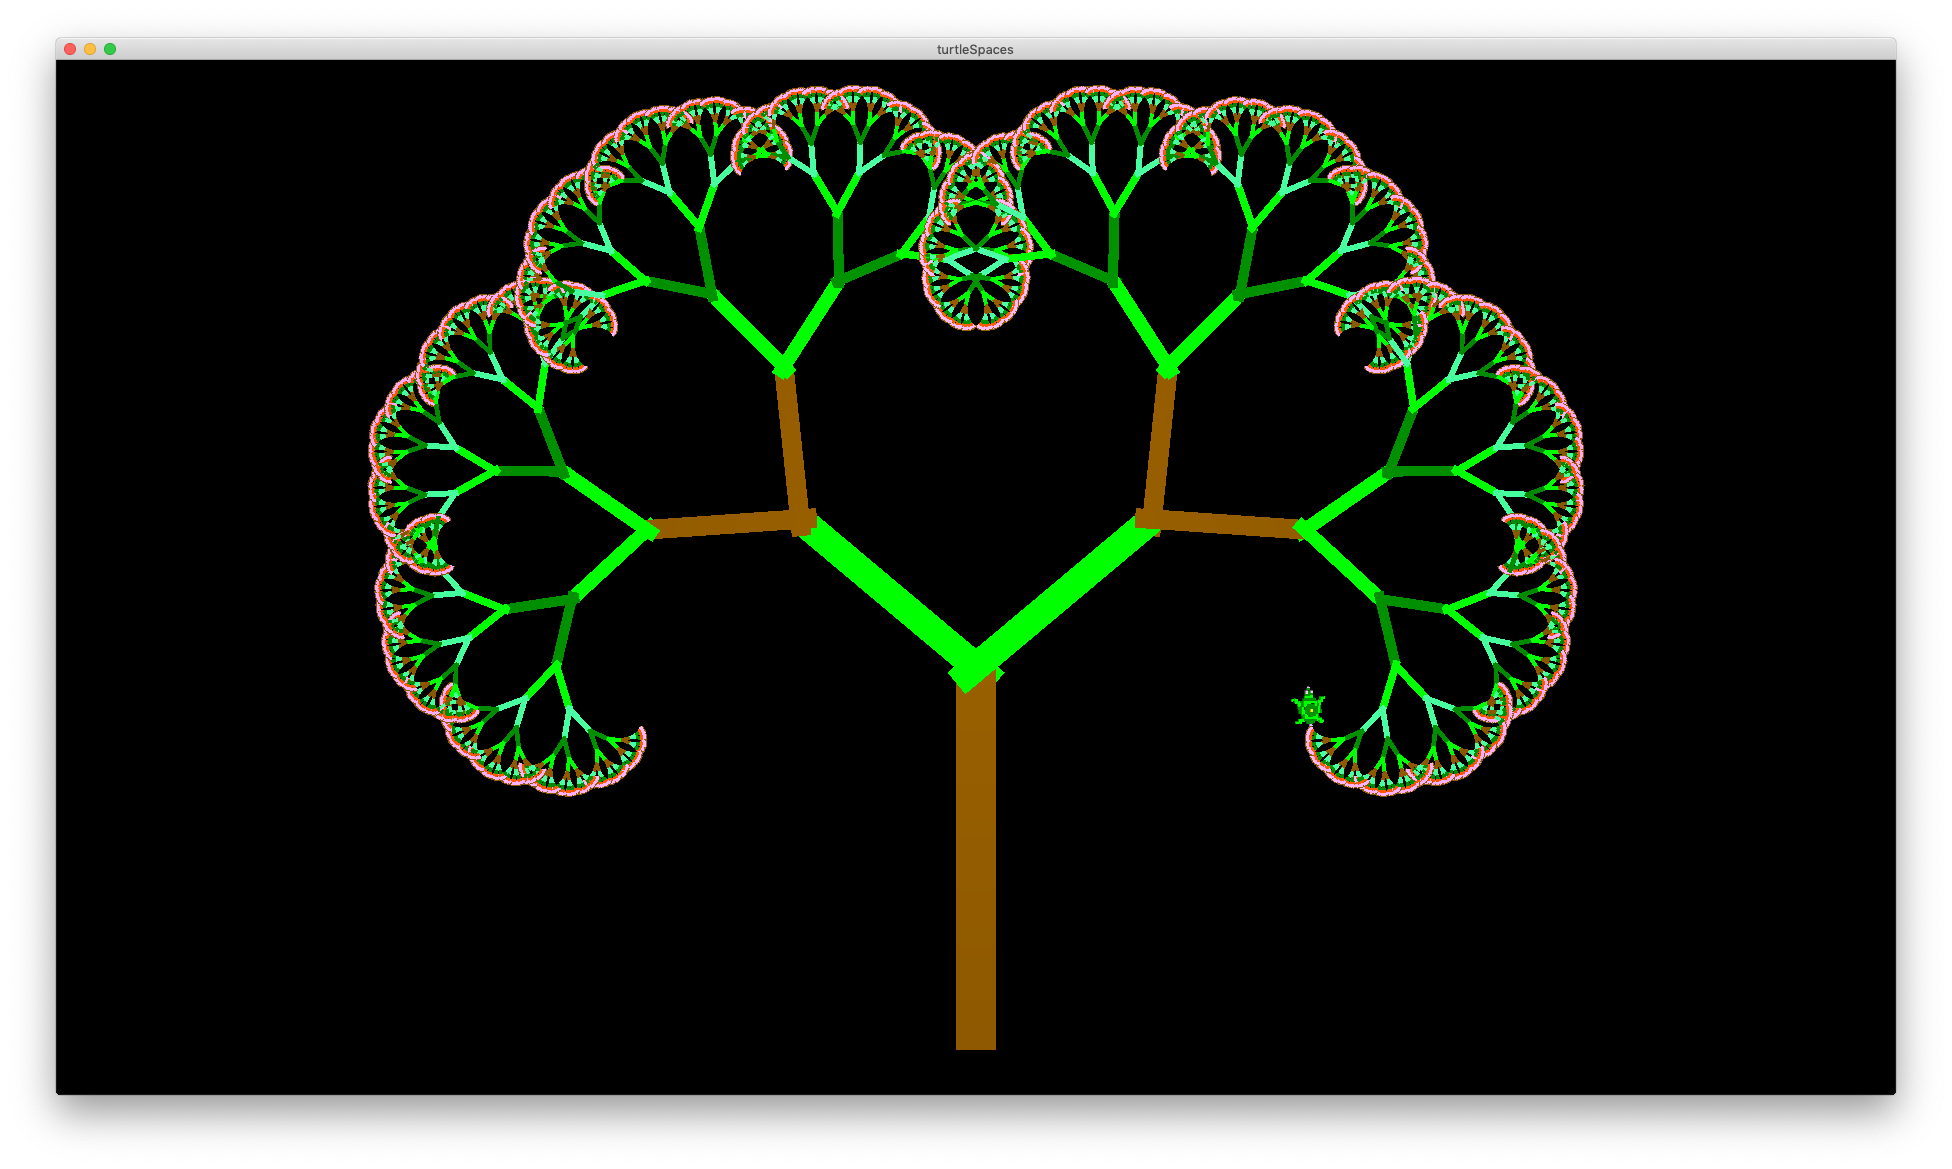
Trees are also a lot of fun, with the potential for so many variations!

TO tree :s :a :frac :depth
  fd :s / 2
  if :s >= 1 [
    local "p
    local "h
    make "p pos
    make "h heading
    left :a
    tree :s * 2 / 3 :frac * :a :frac :depth + 1
    pu setpos :p pd
    seth :h + :a
    tree :s * 2 / 3 :frac * :a :frac :depth + 1
  ]
END

TO drawtree
  reset
  cs pu bk 250 pd 
  tree 350 25 1.1 4
END

Note that this takes quite some time to render!

tree 350 60 1.1 4

TO tree :s :a :frac :depth
  fd :s / 2   
  if :s >= 1 [
     setpc :s
     ;set the pen color to the current 'size'
     ;which is fractional number truncated to an integer for use by setpc
     local "p
     local "h
     make "p pos
     make "h heading
     left :a     
     tree :s * 2 / 3 :frac * :a :frac :depth + 1
     pu setpos :p pd     
     seth :h + :a
     tree :s * 2 / 3 :frac * :a :frac :depth + 1
   ] 
END

tree 350 180 1.1 4

setpc 12 - :s

tree 350 280 1 4

Play with tree’s parameters and the colors and see what you can come up with! Logo is all about exploration, tweaking and tinkering. By seeing how altering the parameters can change the end result, you can learn to better understand the underlying mathematics.

You can also change how the trees are rendered, for example using mark instead of forward and by setting the width of the mark using setmarkerwidth depending on the current ‘size’ of the segment being rendered:

TO tree :s :a :frac :depth
   penup
   setpc item (remainder int :s 7) [11 9 4 12 14 8 13]
   if pencolor = 0 [setpc 8]
   setmarkerwidth 1 + :s / 20
   bk :s / 20
   mark :s / 2
   if :s >= 1 [
      local "p
      local "h
      make "p pos
      make "h heading
      left :a
      tree :s * 2 / 3 :frac * :a :frac :depth + 1
      pu setpos :p pd
      seth :h + :a
      tree :s * 2 / 3 :frac * :a :frac :depth + 1
   ]
END

cs tree 300 50 0.88 4

Et voila!

Tutorial #1: Simple Tree

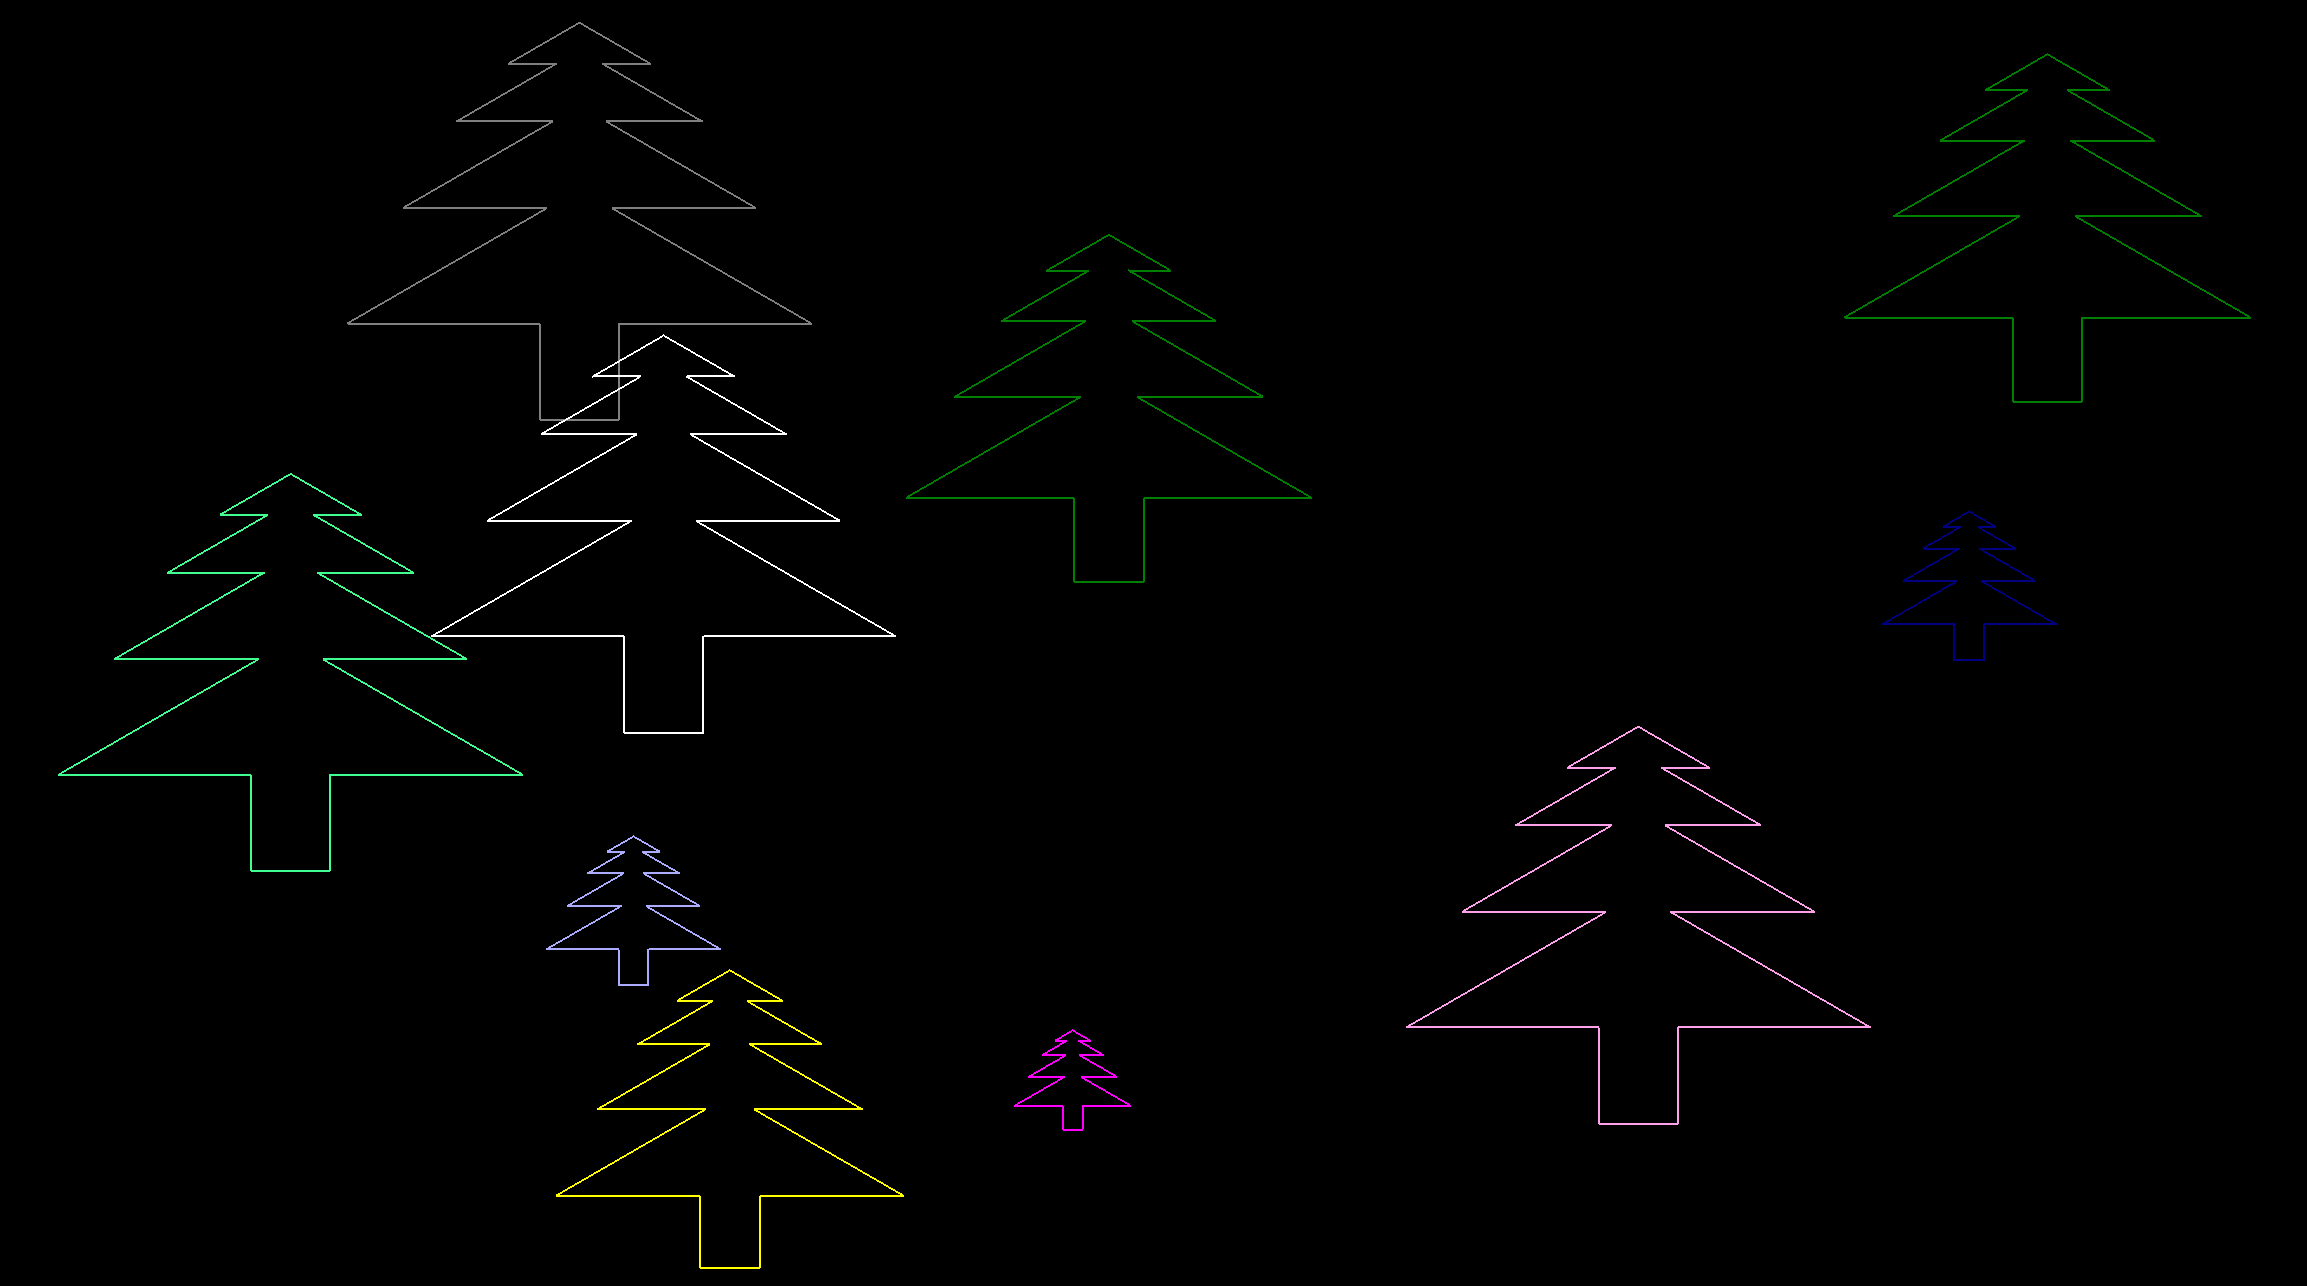
These procedures draw a simple tree in a classic Logo lined style, and a forest of these trees. First, let’s take a look at the tree procedure as a whole.

TO tree :scale
  slideleft 8.25 * :scale
  forward 20 * :scale
  repeat 4 [
    slideleft (10 * (5 - repcount)) * :scale
    left 30
    slideright (12 * (5 - repcount)) * :scale
    right 30
  ]
  left 30
  slideright 5 * :scale
  right 60
  slideright 5 * :scale
  left 30
  repeat 4 [
    right 30
    slideright (12 * repcount) * :scale
    left 30
    slideleft (10 * repcount) * :scale
  ]
  back 20 * :scale
  slideleft 8.25 * :scale
END

Now let’s go through it a line at a time. The procedure starts out with the procedure declaration TO, then the name of the procedure tree, then a single parameter, :scale

TO tree :scale

Remember that the colon indicates that scale is a container – but parameters are only containers inside of their procedures. This is important.

Notice that there is a companion END at the end of the procedure. Every TO must have an END.

slideleft 8.25 * :scale

slideleft is a movement primitive, it tells the selected turtle to shift its position to its left the given number of turtle-units, which correspond to OpenGL units. In this case, the number of turtle units to shift left is 8.25 * the value of :scale, which is given as a parameter when tree is called.

forward 20 * :scale

forward is another movement primitive, it tells the selected turtle to move forward the given number of turtle-units.

repeat 4 [

repeat is a loop primitive. It takes two parameters, the number of times to repeat the instruction list, and the instruction list itself, which is bookended by an open square bracket and a closed square bracket. repeat executes the instruction list the specified number of times. The contents of the instruction list can be spread across multiple lines, as it is here, and which follow:

slideleft (10 * (5 - repcount)) * :scale

slideleft is similar to slideright. The rounded brackets tell turtleSpaces which part of the supplied expression to evaluate first. If there are brackets inside brackets, the innermost ‘nest’ is evaluated first. turtleSpaces resolves mathematical expressions using the PEMDAS (BEDMAS) ordering, but often some clarity is required. In the case of the line above, we want to ensure that repcount (the current iteration of the repeat loop) is subtracted from 5 before it is multiplied by 10, and all of that needs to be done before it is multiplied by :scale

turtleSpaces parses right to left. This means that it evaluates expressions in the right of the instruction first. What this means for the statement above is that without brackets, repcount * :scale would be evaluated first. Then 10 * 5. Then the result of repcount  * :scale would be subtracted from 10 * 5. This is not what we want! So we need brackets.

left 30

left rotates the turtle to its left the specified number of degrees, in this case 30.

slideright (12 * (5 - repcount)) * :scale

The slideright instruction is similar to the slideleft instruction above, except in this case we are going to slide a bit more right than we did left.

right 30

Similarly to left, right turns the turtle to the right the given number of degrees, also 30 in this case.

]

The closing bracket finishes the instruction list. All of this is collected and given to repeat, which then repeats the instructions the given number of times (4).

left 30 
slideright 5 * :scale 
right 60 
slideright 5 * :scale 
left 30 
repeat 4 [ 
  right 30 
  slideright (12 * repcount) * :scale 
  left 30 slideleft (10 * repcount) * :scale 
]

The next four instructions draw the ‘peak’ of the tree, and the following repeat loop the opposite side of the tree.

back 20 * :scale 
slideleft 8.25 * :scale

back is similar to forward, except the turtle backs up. slideleft you already know!

END

end finishes the procedure.

Once the procedure is entered, you can call it by typing tree and then a scale ‘factor’.

tree 1

tree 0.5

tree 2

0.5 makes a tree half as large as one, and 2 twice as large.

TIP: To make the turtle move smoothly, use the fluid primitive.

fluid

Let’s make another procedure that draws a whole forest!

TO forest
  reset
  repeat 10 [
    penup
    home
    slideleft -150 + random 300
    forward -100 + random 150
    randompencolor
    pendown
    tree (2 + random 8) / 10
  ]
END

Again stepping through each instruction:

TO forest

This procedure declaration doesn’t take a parameter – all we need to know is inside it, and all it will take to call it is a single word: forest.

reset

reset causes the graphical workspace to return to its initial state, erasing any contents and moving all of the turtles to their home positions. It doesn’t erase any procedures but it does erase containers! Unlike other Logos (and like virtually every other programming language), in turtleSpaces all containers (variables) need to be declared by a procedure, they cannot exist on their own and are not otherwise saved in project files. While it seems like a good idea if they could be, it’s really not.

repeat 10 [

The following instructions will be repeated ten times. You can change that to whatever number you want. Or you could make it a parameter in the forest procedure definition, and then replace the number 10 with the container you specified there, such as :trees

penup

Turtles (except for Snappy the camera turtle) start with their pen down after a reset or when they are created. This means they draw lines whenever they move. You can stop them from drawing lines with the penup instruction.

home

home causes the turtle to move to its home position. In Myrtle’s case, her default position is [0 0 0], that is 0 horizontally (x), 0 vertically (y) and 0 in depth (z). All of these are ‘centered’ in their given axis (x y or z). With two-dimensional procedures and programs you don’t need to worry about depth (z). There are other primitives for positioning the turtle we will get into in another tutorial. But for now, we’ll stick with what we’ve learned so far.

slideleft -150 + random 300

random picks a random number between and including 0 and the number that is given to it, but not that number. So, random 300 will return a number between 0 and 299. Why? Because you might want 0 as a possible result. And you might want to pick from a range of however many numbers you specified (in this case 300). 300 numbers including 0 gives you a range from 0 to 299. I know it would be easier if it was a range from 0 to 300, but that would be 301 numbers in total, not 300!

We take the number chosen by random, and add it to -150. If the number is still negative, that means that the turtle will slide to the right rather than the left! 

forward -100 + random 150

Similarly, if the result of -100 + random 150 is negative, the turtle will move backwards, not forward. All of the movement primitives behave the same way. A negative value will cause it to move in the opposite direction indicated by the primitive. For example, a negative angle will cause left to turn right.

randompencolor

This ‘shorthand’ instruction causes the turtle to pick a random pen color, a value between 1 and 15. You could do the same if you wrote:

setpencolor 1 + random 15

but randompencolor gets straight to the point. To see a list of the turtle’s default colors, type showcolors. The colors are based on the default colors in the low resolution mode of the Apple II! They’re historical (and I’m maybe a little hysterical).

pendown

Similarly to penup, pendown puts the turtle’s pen down, and causes it to draw again.

tree (2 + random 8) / 10

And now that we’re in a random position, we’re going to draw a tree (the first procedure) providing a random :scale value. random cannot generate parts of numbers, only whole numbers, so to get a fraction we need to divide (/) our random result by 10. So, after calculating, the parameter passed to tree will be a value between 0.2 and 0.9

]

And that closing square bracket signals the end of the instruction list provided to the repeat above.

END

That’s the END of the forest procedure and our first (ahem) turtorial (ba-dum).

Let’s give it a go:

Because it’s completely random, it may take a few tries to get a distribution that you like.

Finally, set the title of your creation using the settitle primitive:

settitle "forest

and then save it using the save primitive:

save

And now you can visit your forest again whenever you like.

You’ve entered your first Logo program. Well done!
Introducing turtleSpaces, a Logo environment for everyone

After a year of work, we are pleased to make available to the public our new Logo interpreter, turtleSpaces.

turtleSpaces implements the Logo programming language inside of the OpenGL 3D graphics environment, allowing you to use turtles to construct 3D models and create animations, simulations and games.

We initially implemented a version of Apple Logo II in our microM8 Apple II emulator to make it easier to use for our younger users, and because microM8 itself uses OpenGL to render the Apple II’s graphics (also in 3D) we added some rudimentary 3D commands to it (up, down, rollleft, rollright, etc.)

We received positive feedback from our users and decided to seperate the Logo interpreter from microM8 and work to grow its potential more broadly.

Why Logo?

Logo’s benefits for learning how to code are many and varied, but before we explore them, it might be better to address the concerns many have with it first, and get them out of the way.

Why not Logo?

Logo’s problems are mainly historical. In the late 1970s there was great excitement among some quarters regarding the potential benefits of teaching children computer programming. Logo was designed around this time to be an as easily-accessible programming language as could be achieved given the technology of the era, which was not very advanced and led to extreme tradeoffs between usability and practicality. In short, Logo was still difficult to use, while not being useful for very much.

Despite this, evangelists (including and mainly Logo’s co-architect Seymour Papert) still made a big deal of Logo, and attempted (and for a time largely succeeded) to gain its widespread use in education, engaging in a great deal of publicity and the making of overstated promises about its potential to turn every child who used it into a little genius. To make matters worse, Papert’s constructivist philosophy dictated that children be allowed to ‘explore’ Logo at their own whim, which while valid on its face (and is something we encourage with turtleSpaces!) was impractical in the context of the crude interpreters that were made available at the time, which were slow, unforgiving, low-resolution and had limited built-in tools, resources and examples.

To make any use of it, you really had to read the manual, but since reading the manual ran counter to Papert’s philosophy, many kids just figured out how to move the turtle forward and turn, and that was about it. Studies were done that showed some initial tutorial-based hand-holding was required, and improvements needed to be made in the user interface, and while later versions of Logo did attempt to correct these shortcomings, by that time the initial enthusiasm for Logo amongst educators had died out, and they were somewhat jaded to the concept in general.

Logo appeared too early, and pushed too hard.

In response, ‘blocks’-based versions of Logo appeared such as Scratch, which attempted to make a subset of commands and their parameter requirements obvious to young coders, who could ‘snap’ them together in the correct order and change default parameters and witness their effects. While useful perhaps in the near-term (and to be clear, we are in the process of implementing a blocks-style mode in turtleSpaces, so we agree they are not without value as an early introduction to Logo), these reduced the very valuable concept of the Turtle to little more than a gimmick, and they nobbled the potential of the Logo language they were based on so much as to make greater exploration of the language largely impossible in the context of their environments.

They were, and are, ‘dead ends‘, and this causes some concern to parents and educators, many of whom are reluctant to use them.

That isn’t to say there weren’t and aren’t other full-Logo interpreters also out there. There were and are, but they have also faced difficulty. First, they’ve tended to rely heavily on the host operating system’s user interface, which was a popular direction to go in the late 1990s and early 2000s, but not so much recently. MicroWorlds Logo, for example, allowed the user to create buttons and load images, and so forth. But the programs users created were very much restricted to their environments, and those environments were still very much oriented towards children. And this trend continued, making for very limited experiences.

As a result, given today’s cross-platform, limited UI landscape these have not aged well. Other developers implemented variants of Logo (such as NetLogo) designed for simulations, such as ant colonies or viruses. But these are largely targeted toward college students, and many of their mechanisms are in our opinion convoluted and counter-intuitive and not at all suitable for children.

Logo for children was simply a victim of being in the wrong place at the wrong time, and its stunted evolution reflected that. But there’s nothing wrong and a lot very right with Logo, and studies of the language itself have shown that. Its functional nature is fairly easy to grasp, the immediate feedback you get from the turtle promotes exploration and learning, and it is powerful enough to become a go-to language for someone even as an adult, if there was a Logo environment that was flexible enough to be useful for a broader audience, and could occupy that middle ground.

So we thought, “Why couldn’t we find that middle ground? We have the technology! Why don’t we go back to where it all started and work forward from there?”

I’d like to definitively state that we have succeeded in our task, but I’ll more tentatively say that we’re well into working on it. Here’s what we have accomplished so far:

  • A full re-implementation of the LCSI Apple Logo II primitive (command) set
  • The addition of a few hundred useful primitives from other Logos and programming languages (including some of our own invention), such as multiple turtles and threading, loops and math functions, retro-styled music and sound, turtle models, gamepad and image placement primitives
  • Several hundred primitives related to the 3D environment, including a wide variety of shapes, positional and vector based functions and tools, and Minecraft-inspired pixelated color schemes
  • An improved while retro-inspired interface that is able to easily get out of the way – no tiny window into the Logo world, no large obtrusive text areas that you can’t get rid of. You can make a program and execute it full screen just like any other game you might buy or download.
  • Written in Go so it’s cross-platform (Windows, macOS and Linux) with the potential for mobile platforms
  • Lots and lots of other smaller things that make the whole experience fun, engaging, productive and straightforward that I can’t even begin to mention.

Here’s a list of some big-ticket items that still need to happen (in no particular order):

  • Raspberry Pi, iOS and Android support, in particular for running turtleSpace apps
  • Stand-alone, distributable app generation for mobile and desktop
  • Private “Classes” that groups of students can join, whose progress can be viewed and monitored by their facilitators / teachers, who can share content between their students
  • Multi-user, multi-player capabilities so that users can design, code and play together
  • API to support control by other applications such as IDEs and tutorials
  • The ability to connect and interact with the outside world
  • 3D model import / export so that users can 3D print their creations, or use them in other 3D environments or vice-versa
  • Terrain and more complex shape design tools
  • In-environment tutorials, badges, achievements and so forth to encourage exploration
  • ‘Blocks’-based entry mode to support younger learners
  • Command-line version without the OpenGL baggage, but with internal FauxGL rendering support to enable image output
  • Refactoring and optimization!
  • A whole bunch more primitives!
  • Finally, and most importantly, to make Logo the relevant all-purpose language it was always meant to be

So, a long way to go. But a good start. Hope to see you around turtleSpaces soon!