The turtleSpaces webIDE is the full turtleSpaces Logo environment, running in your web browser. You can write code as blocks or as text, run it straight away, and watch your turtles draw in 3D beside it. Nothing needs installing, and you don’t need an account to start.
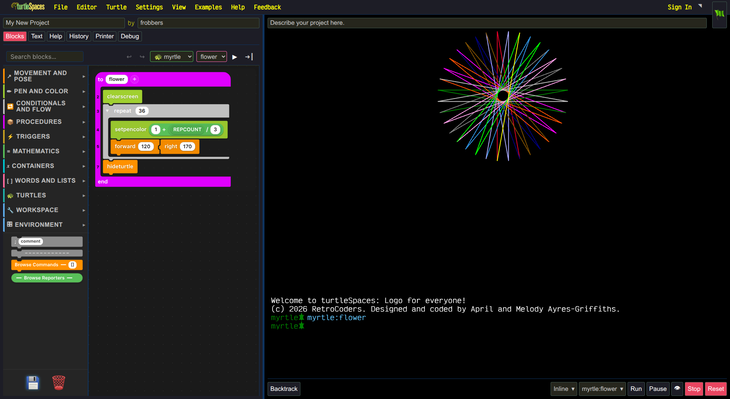
The layout
The screen is split in two:
- On the left are the project header and a row of panel tabs: Blocks, Text, Help, History, Printer and Debug. When you are signed in, a seventh tab, Claude, opens an AI assistant.
- On the right is the 3D view where your turtles draw. The console sits underneath it, and the run controls are along the bottom.
The menu bar runs across the top.
On a narrow screen, a tablet or a window that is taller than it is wide, the 3D view moves above the editor instead. On a phone you see one view at a time, with Canvas | Code | Blocks tabs to switch between them. See Using turtleSpaces on phones and tablets.
Beginner and Advanced modes
The IDE starts in Advanced mode, with everything showing. Turn on Settings › Beginner mode for a simpler IDE: it hides the Debug, History and Printer tabs and the expert settings, such as Live Coding, Auto Update, Code Completion and the printer. Turn it off again to get everything back. See Beginner and Advanced modes.
The panels
Blocks
The Blocks panel lets you build programs by dragging blocks from the palette on the left. The blocks are grouped by category: Movement and Pose, Pen and Color, Conditionals and Flow, Procedures, Triggers, and more. You can also search the palette. The drop-downs above the canvas choose which turtle and which procedure you are editing, and the ▶ button runs it. Changes made with blocks take effect straight away.
You can also use Blocks without a mouse. Arrow keys move between blocks, and you can move, insert, edit and delete them from the keyboard. Pressing Enter on a palette block places it without dragging. See Blocks keyboard controls.
Blocks and text are two views of the same program. Anything you build as blocks can be opened as text, and the other way round.
Text
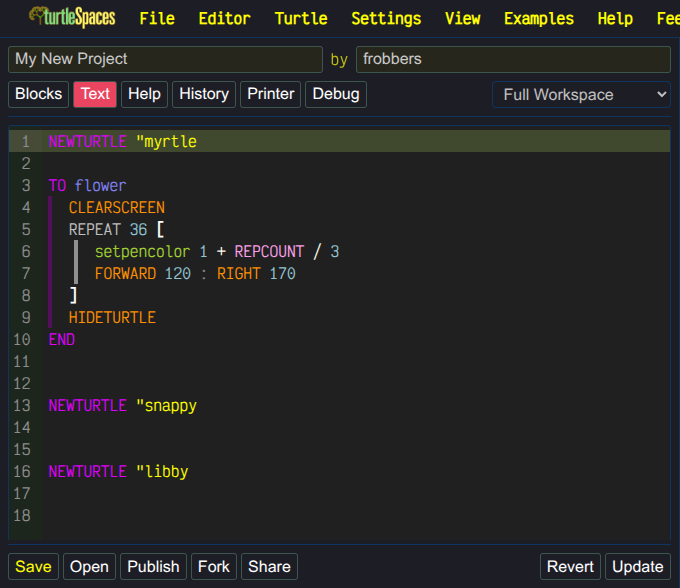
The Text panel is a code editor with syntax highlighting, automatic indentation and code completion. The drop-down next to the tabs chooses what you are editing: Full Workspace shows every turtle and procedure, or you can pick a single procedure.
Edits in the text editor don’t take effect until you press Update. Revert throws away your edits since the last Update. If you’d rather not press Update each time, turn on Settings › Auto Update, which applies your edits whenever the editor loses focus.
The buttons below the editor are Save, Open, Publish, Fork and Share (see Saving and sharing).
Help
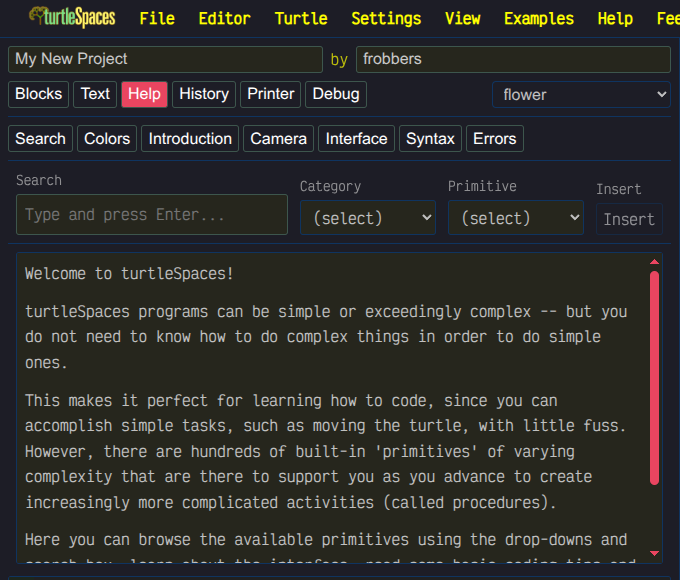
The Help panel is the built-in command reference. You can search for a primitive, or browse by category and insert a primitive into your code. Its tabs also cover colours, the camera, the interface, Logo syntax and error messages. The same material is on this site under Reference.
History
History lists the commands you have typed in the console. Click a line to put it back at the prompt, ready to edit or run again.
Printer
turtleSpaces has a virtual printer. Anything your program prints to it appears in this panel, where you can save it, print it or clear it. The printer is switched on and off under Settings › Printer.
Debug
The Debug panel shows what your program is doing while it runs. Its tabs are Errors, Containers (your variables), States (each turtle’s position, pen and so on) and Loops (the loops that are running).
The console

The console under the 3D view works like a classic Logo prompt. Type a command, press Enter and it runs immediately. The prompt shows which turtle you are talking to, and any text your program prints appears here too.
Lines in the console can be as long as you like. A long line wraps to fit the console instead of being cut at 80 columns, and the console shows as many lines as fit. When the IDE loads, the console picks a font size that fits 80 columns. In the console, settextsize and setcursor don’t change the layout; use textscreen or overlayscreen for that. If you prefer the classic fixed grid, open the IDE with ?repl=grid on the end of its address. See The console.
Run controls

The bar along the bottom of the screen controls your program:
- Backtrack undoes the turtle’s last step.
- The procedure drop-down and Execute start a procedure. If the procedure needs inputs, Execute asks you for them. The Inline drop-down beside them chooses how the procedure runs.
- While the program runs, the same button reads Pause: press it to stop the program for a moment. It then reads Continue, which carries on from where the program paused.
- The eye button highlights each line of code as it runs, so you can follow along.
- Stop ends the program.
- Reset puts the turtles back where they started. Press it twice in quick succession to reset everything.
The flag button at the top right runs your project’s flag procedure, like the green flag in Scratch.
Shelly’s error help
If a program hits an error, Shelly the turtle pops up to help. When you are signed in, Shelly offers to have Claude explain what went wrong. Claude can explain the error on its own or look at your code, and the answer appears in the Claude panel. When you are not signed in, Shelly gives a plain-language hint and a button to sign in for more help.
If you’d rather work without Shelly, tick Don’t show this again in the popup. To bring Shelly back, turn on Settings › Shelly error help.
The menus
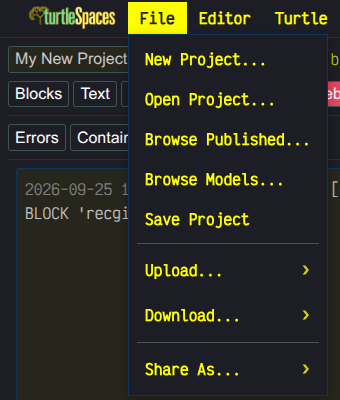
- File: start a new project from a template, open one of your saved projects, browse published projects or 3D models, and save. The Upload and Download submenus bring in projects, images, sounds, models and data. They also export your work as a PNG picture, an STL model for 3D printing, an MP4 video or animated GIF, or a replayable WebGL recording. Share As turns your project into a viewable model or a playable page.
- Editor: find, font size, indentation, tidying the workspace, and moving code between the editor and the console.
- Turtle: home, clear the screen, backtrack or reset, and change the turtle’s model and size.
- Settings: light or dark theme, language, console font, sound, the printer, Auto Update, code completion, Live Coding, Beginner mode and Shelly error help.
- View: move the camera, auto-orbit, change the aspect ratio, show the axes, and switch to fullscreen.
- Examples: opens the Examples browser.
- Help: replays Shelly’s welcome tour and links to the tour, reference, books, tutorials and community on this site.
- Feedback: send us a note from inside the app.
The webIDE is available in English, 日本語, Français, Español and Polski. Change the language under Settings.
On the right of the menu bar is the user menu. Use it to create an account or sign in, or, once signed in, to open your profile, open Classroom, or sign out. Classroom is where teachers set up groups and classrooms for their students. The ◥ button beside it switches to fullscreen.
The project header
Above the panels, you can type your project’s title. Next to it, by shows who created the project, which is filled in for you. Above the 3D view is a one-line description that you can edit.
Saving and sharing
- Save stores your project in your turtleSpaces account (you need to be signed in). Open loads one of your saved projects.
- Fork saves a copy of the current project as a new project of your own.
- Publish makes a saved project public, so other people can find it in the Published gallery. You can tag it by type, difficulty and category, and you can update or unpublish it later.
- Share creates a link to a viewable 3D model or a playable version of your project. For a published project, the Share dialog gives you a link to play it, code to embed it in a web page, an Open in the IDE link and a QR code. See Sharing your project.
The galleries
There are two galleries, each of which opens full-page inside the webIDE:
- Published projects: projects shared by the community. Press Play to run one, Remix to open your own copy in the IDE and change it, or Share to get a link, embed code or QR code for it.
- Examples: example programs you can filter by type, difficulty and category.
Moving the camera
In the 3D view:
- Left-drag orbits the camera around the scene.
- Right-drag up and down moves the camera closer or further away. Right-drag left and right rotates it.
- Scroll wheel zooms in and out.
- Middle-drag, or dragging with both buttons, pans.
On a one-button mouse or trackpad, Ctrl+click acts as a right-click. View › Camera Controls has a reminder.
Under the hood
The webIDE runs the same Logo engine as the desktop version of turtleSpaces, which is written in Go and compiled to WebAssembly. The interface is built with React, Radix UI and CodeMirror 6. Drawing is done with WebGL in a background worker, so the page stays responsive while your turtles work.
The engine download is large the first time. After that your browser keeps a copy, so later visits start much faster, and an interrupted download picks up where it left off.