Downhill Skiing exercises Logo’s list handling capabilities and leverages turtleSpaces 3D functionality to create an engaging yet simple game.
Once loaded, click the flag icon to start.
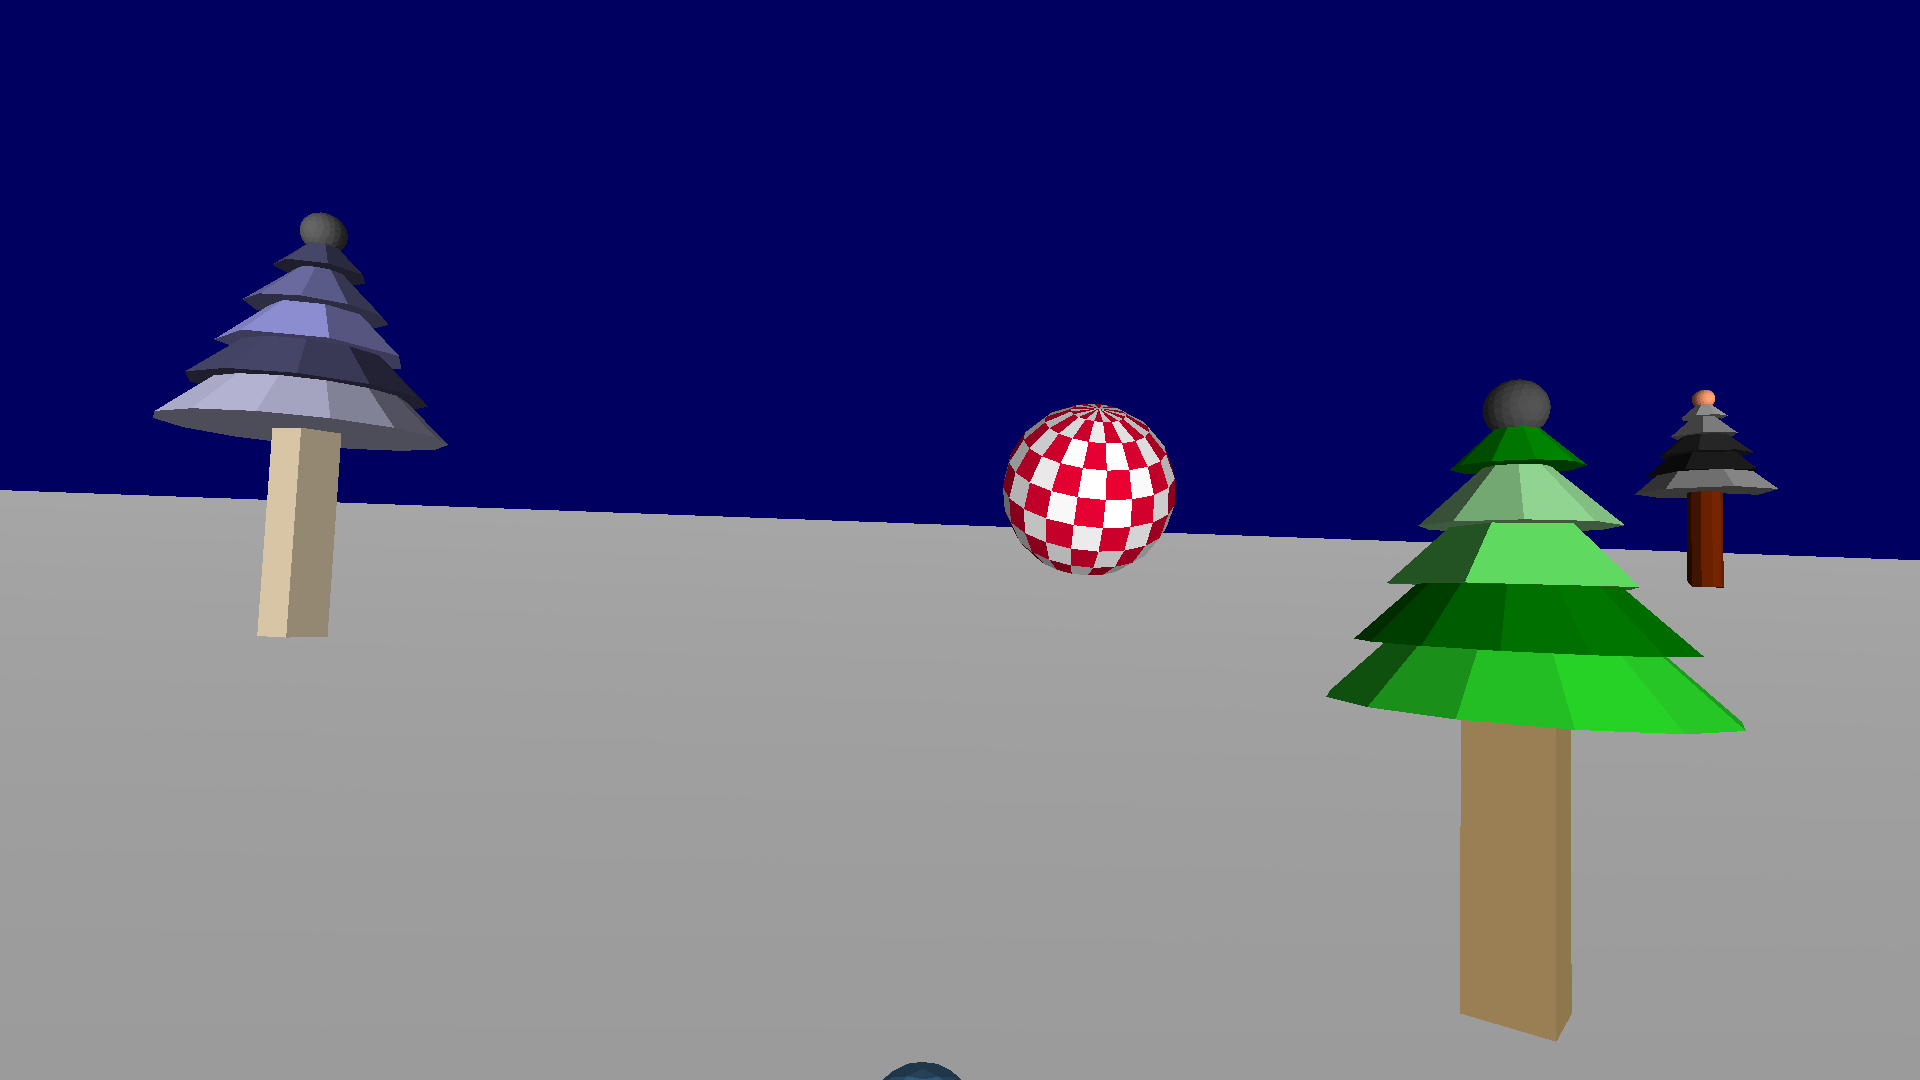
Click here to open this project in the web IDE.
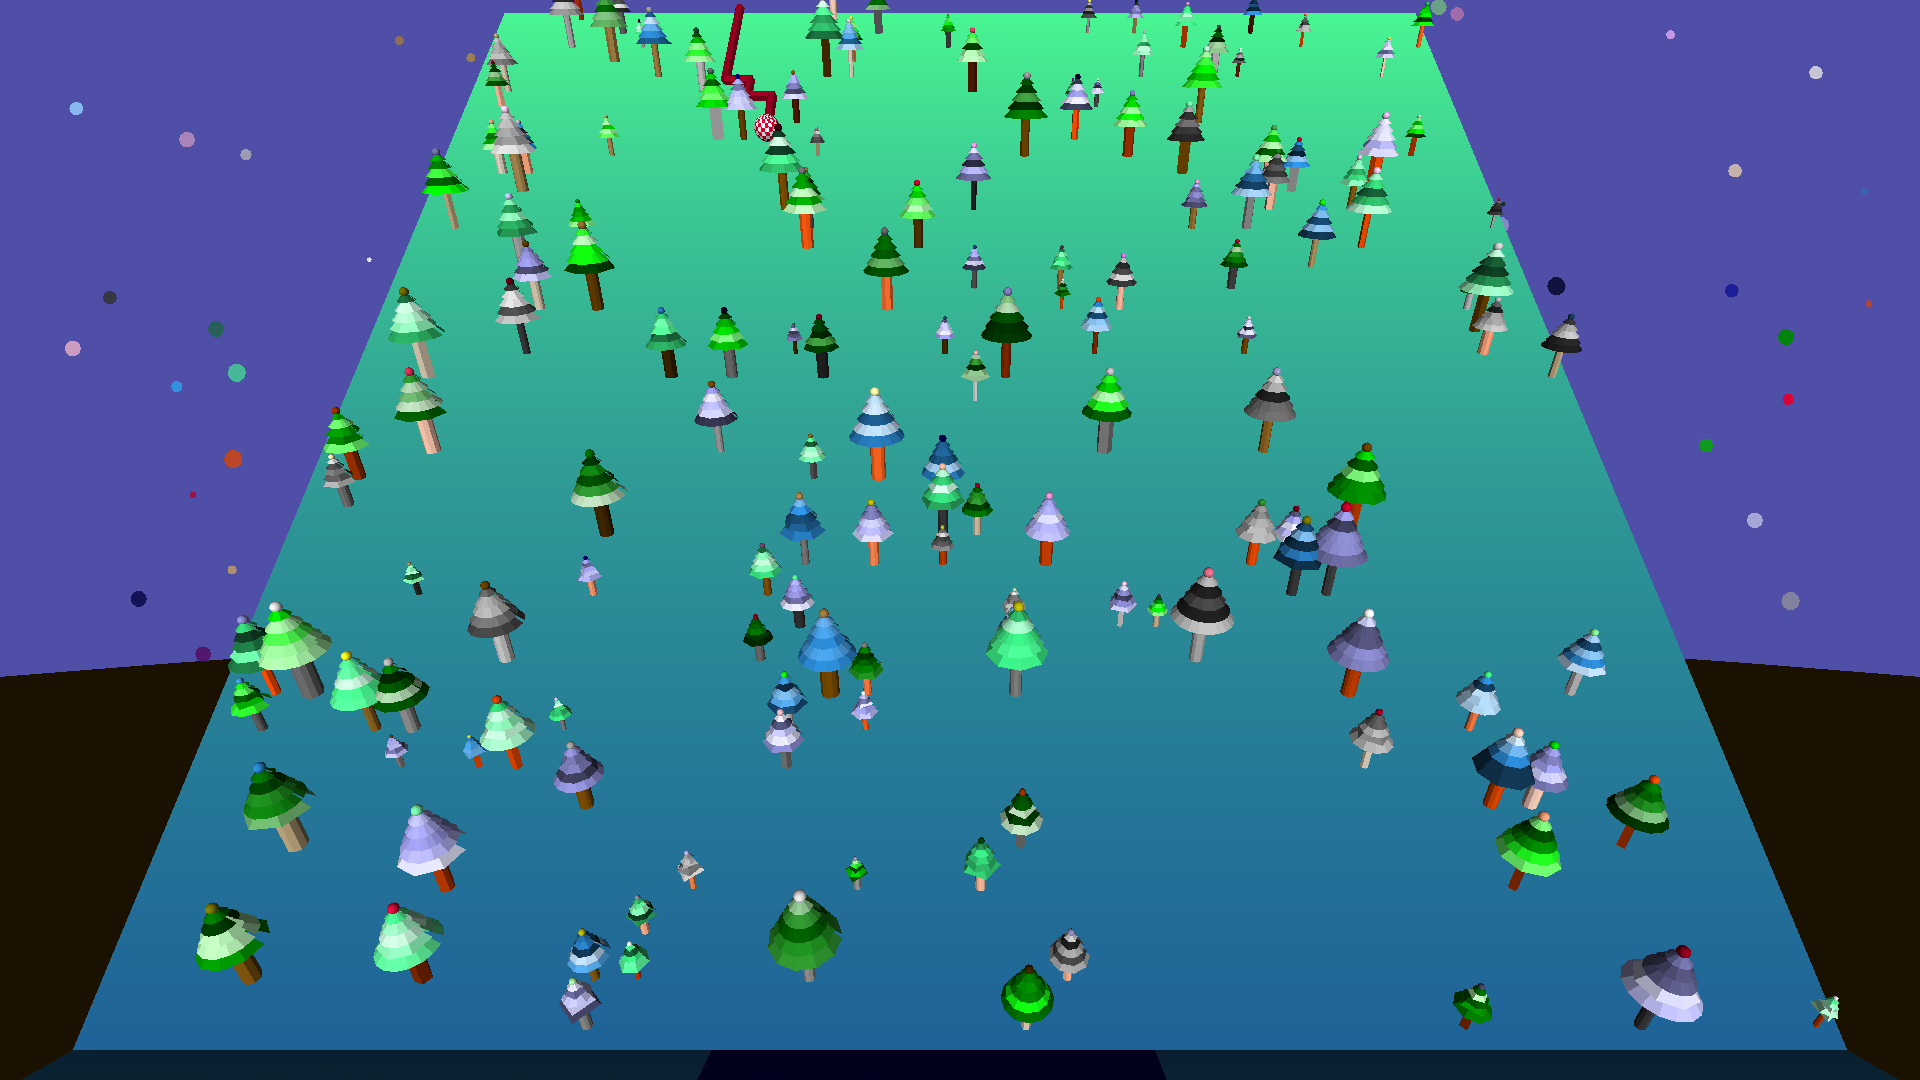
Herein lies a wonderful introduction to game development in turtleSpaces. The game mechanic behind downhill is simple: the player travels down the ski slope, avoiding randomly-positioned trees while shifting left and right to end in the target zone.
The core game mechanic is similar to simple early text-based ‘action’ games written in languages such as BASIC, where the player needs to avoid asteroids in an asteroid field, for example. It is straightforward and easy to understand.
As such, this program would make an excellent project for students moving from Scratch to text-based coding. It provides an introduction to the turtle, programmatically-generated lists, 3D model creation, user input and various sound primitives, without using any sophisticated math or complex language primitives.
The game logic is as follows:
- Create initial graphic elements (stars, ground, slope)
- Create the ‘landing zone’ and store its location in a container (variable)
- Move the turtle across the ‘slope’ to each spot on a 39 x 40 grid
- Decide randomly to create a tree or not, create that tree and log that decision in a list
- Each row has a separate list (trees0 trees1 etc), made up of 39 values (one for each column)
- Once finished, place the turtle randomly at the top, in a location free of trees
- Loop through each row of trees (and their respective list containers) in descending order
- Check the relevant list to see if the player is occupying the same location as a tree, if so crash
- Check to see if the player has pressed a key, and act accordingly, moving the player
- Pause between rows but for less time each iteration, so that the player speeds up as they descend
- When we get to the ‘bottom’, check to see if we’re in the target zone
- If we’re not in the target zone, retry with the same level
- If we are in the target zone, create a new level increasing the odds of trees
As you can see, developing a lesson plan is easily achievable. Let’s explore each area of the code in depth. This tutorial assumes some familiarity with text-based coding on the part of the reader, and sometimes speaks in general terms. The fully-commented source code for this game is available at the end of this article, and inside the turtleSpaces environment itself as a published project.
In the beginning…
When the procedure starts, the first thing we need to do is reset the workspace, to ensure we’re working with a clean slate. Next, we need to provide the user with some instructions!
For this, we’ll use the simple text command print. We can change the color of the text using settextforeground. Note that for every set command there is a corresponding function to return the parameter’s status, such as textforeground. settextforeground takes a number as a parameter, which represents a color (type showcolors in the console to see a list of colors and their numeric values). However, turtleSpaces has a number of color primitives (red, orange, yellow etc.) that return their respective numeric values, so that you can say, for example, setttextforeground yellow (which works because yellow is a function that returns the number 13.)
The print command itself takes either a word (a single word preceded with a quote “) a list (a series of words wrapped in square brackets []) or a ‘long word’ (a series of words wrapped in pipes ||). You can use either a list or a long word to display a sentence, eg print [Welcome to turtleSpaces!] or print |This also works.| The advantage to using a list is that you can cherry-pick one word from it easily, eg print first [Welcome to turtleSpaces!] , however it can be more complicated when pairing text with numeric values, for example, when using a long word would be preferable.
Note that print “Welcome to turtleSpaces” will throw an error, because the parser will attempt to execute to and turtleSpaces” as commands.
We can use cursordown to put a blank line between sections of text. We can also say text as well, to make things more interesting!
Next, we need to create some default containers (variables). We can create these using the make primitive, which is the traditional method in Logo (eg make “container 5), although turtleSpaces also supports put x in “container and “container := x(note the colon before the equals). A colon before a word in Logo returns the value stored in the container of that name, eg :container. But make needs the container name specified with a quote ” — this is because if you used a colon, make would create a container with the name of the value stored inside that container!
We need to set the initial :level (0). We’re also going to create a container containing the number of available ‘retries’ (we will give the player limited opportunities to generate a new level if the level provided to them is impossible.)
make “level 0 make “retry 3
Notice that we can ‘stack’ multiple commands on the same line! This can sometimes be a blessing, sometimes a curse, so use your discretion when stacking commands.
Finally, we’re going to declare a label , which can be returned to using the go primitive:
label “start
so that we can return here at the start of a new level.

My God, It’s Full of Stars!
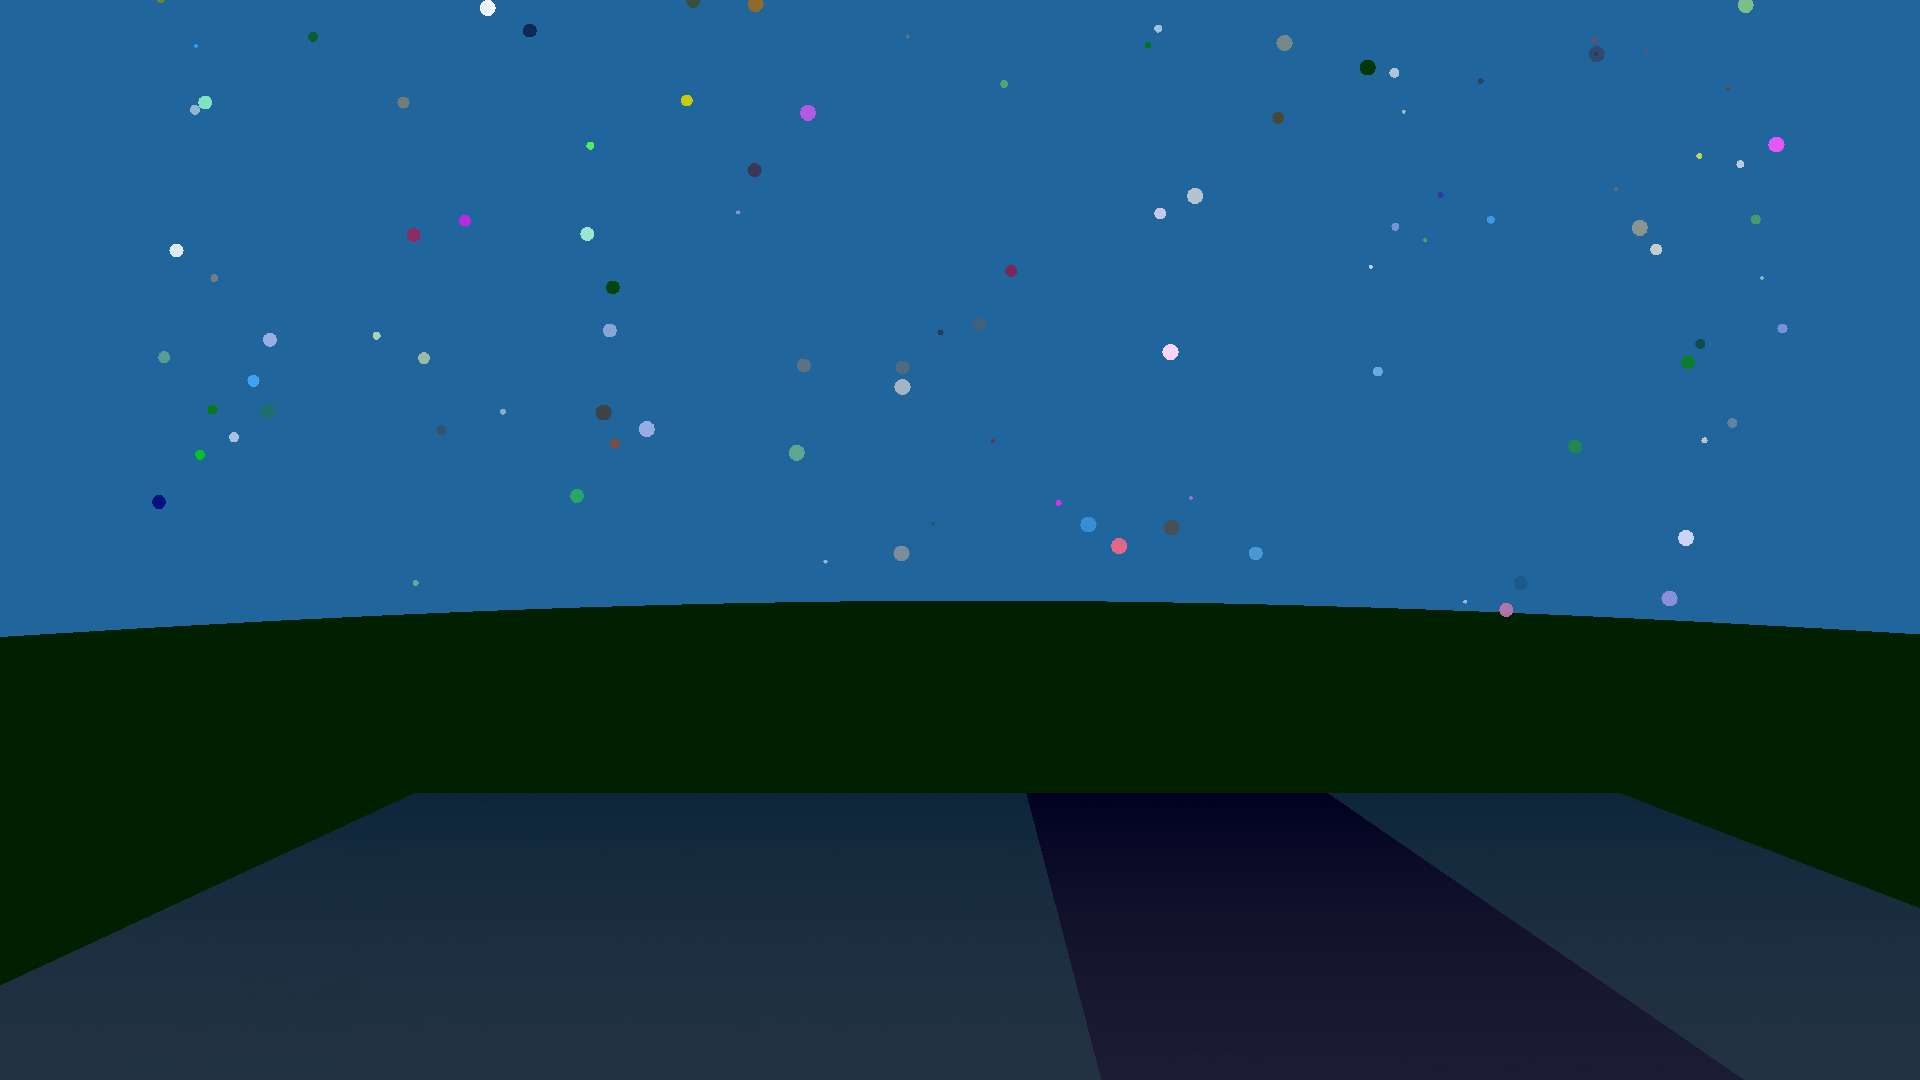
It’s time to start building the graphical environment in which the game will take place. First, let’s create a starfield. This is a fairly simple algorithm:
- set a ‘static’ z (depth) position
- set a random x and y position
- set a random ‘fill’ shade and color
- set a random fill opacity
- create a spot of varying size
- do this all 100 times
In the code we use the setxy and setz primitives to accomplish the first two items, and the random function to generate the random values we need to give to each. There’s some turtleSpaces-specific primitives such as randomfillshade and randomfillcolor (the color used to create shapes is the ‘fill’ color, as opposed to the color used to create lines which is the ‘pen’ color.)
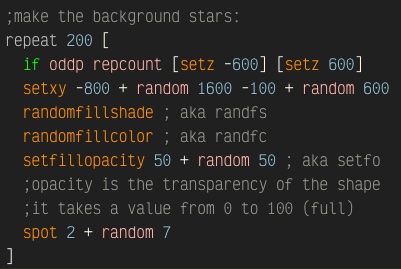
We wrap all of this in a repeat loop, which repeats the contents of the list provided to it the given number of times, for example repeat 20 [print repcount] which counts from 1 to 20.
We actually need to create two starfields, one behind the hill, and one in front of it (so that we see stars regardless of which direction we’re facing, either looking at the hill, or from it while we’re playing. We can make the single loop do double-duty by using the oddp primitive which returns true if the value passed to it is odd. As you saw with the above example, repcount returns the current repeat loop iteration, and so if we pass repcount to oddp , then oddp will be true on odd iterations of the repeat loop.
We can then pass oddp to if , which will then execute the first list of instruction if oddp is true, and the second list of instructions if it is false. In this way, we set the z position of the turtle in an alternating fashion.
Note that the back side of a spot is not ‘lit’ and so we need to enable twosided mode before we create the stars to ensure both sides of the spot are lit, since we’re going to be looking at them from both directions.
Making Ground
Next, we’re going to create the ground. This is another spot , like the stars, just a very big one! We use setxy and setz to position the turtle in the lower-centre of the screen, and then tilt it up 90 degrees (so that we see the ‘dark’ back side of the spot), setting random fill and shade colors before making the spot. The value passed to spot signifies its radius, and is given as ‘turtle units’, the same unit of measure used by all shapes and lines.
To choose the fill color we use the pick primitive, which randomly selects an item from a list, eg print pick [1 3 5 7 9]
The landing area is where our skiball will end up assuming the player avoids all of the trees. This is created using the quad primitive, which creates a filled rectangle. A container is created containing a random value signifying the left (from this perspective) side of the target area. It’s width is dependent on the level, but to begin with, it could just be arbitrary (eg 100 ‘turtle units’ wide). We will use the value in this container later, to determine if the player is inside the target zone.
There are, then, three quads, the left side before the target zone, the target zone itself, and the right side after the target zone. We color the target zone dark blue to distinguish it from the rest of the landing area.

Finally, we create the ski hill itself. Its angle does not matter that much, as from now forward the turtle will operate on the plane of the hill. In this example we’ve used the gradient mode to create a gradient fill on the quad that makes up the ski hill. In gradient mode, the pen and fill colors are both used to create the gradient, the pen color being the ‘near’ color and the fill color being the ‘far’ color.
It’s time to populate the hill with trees.
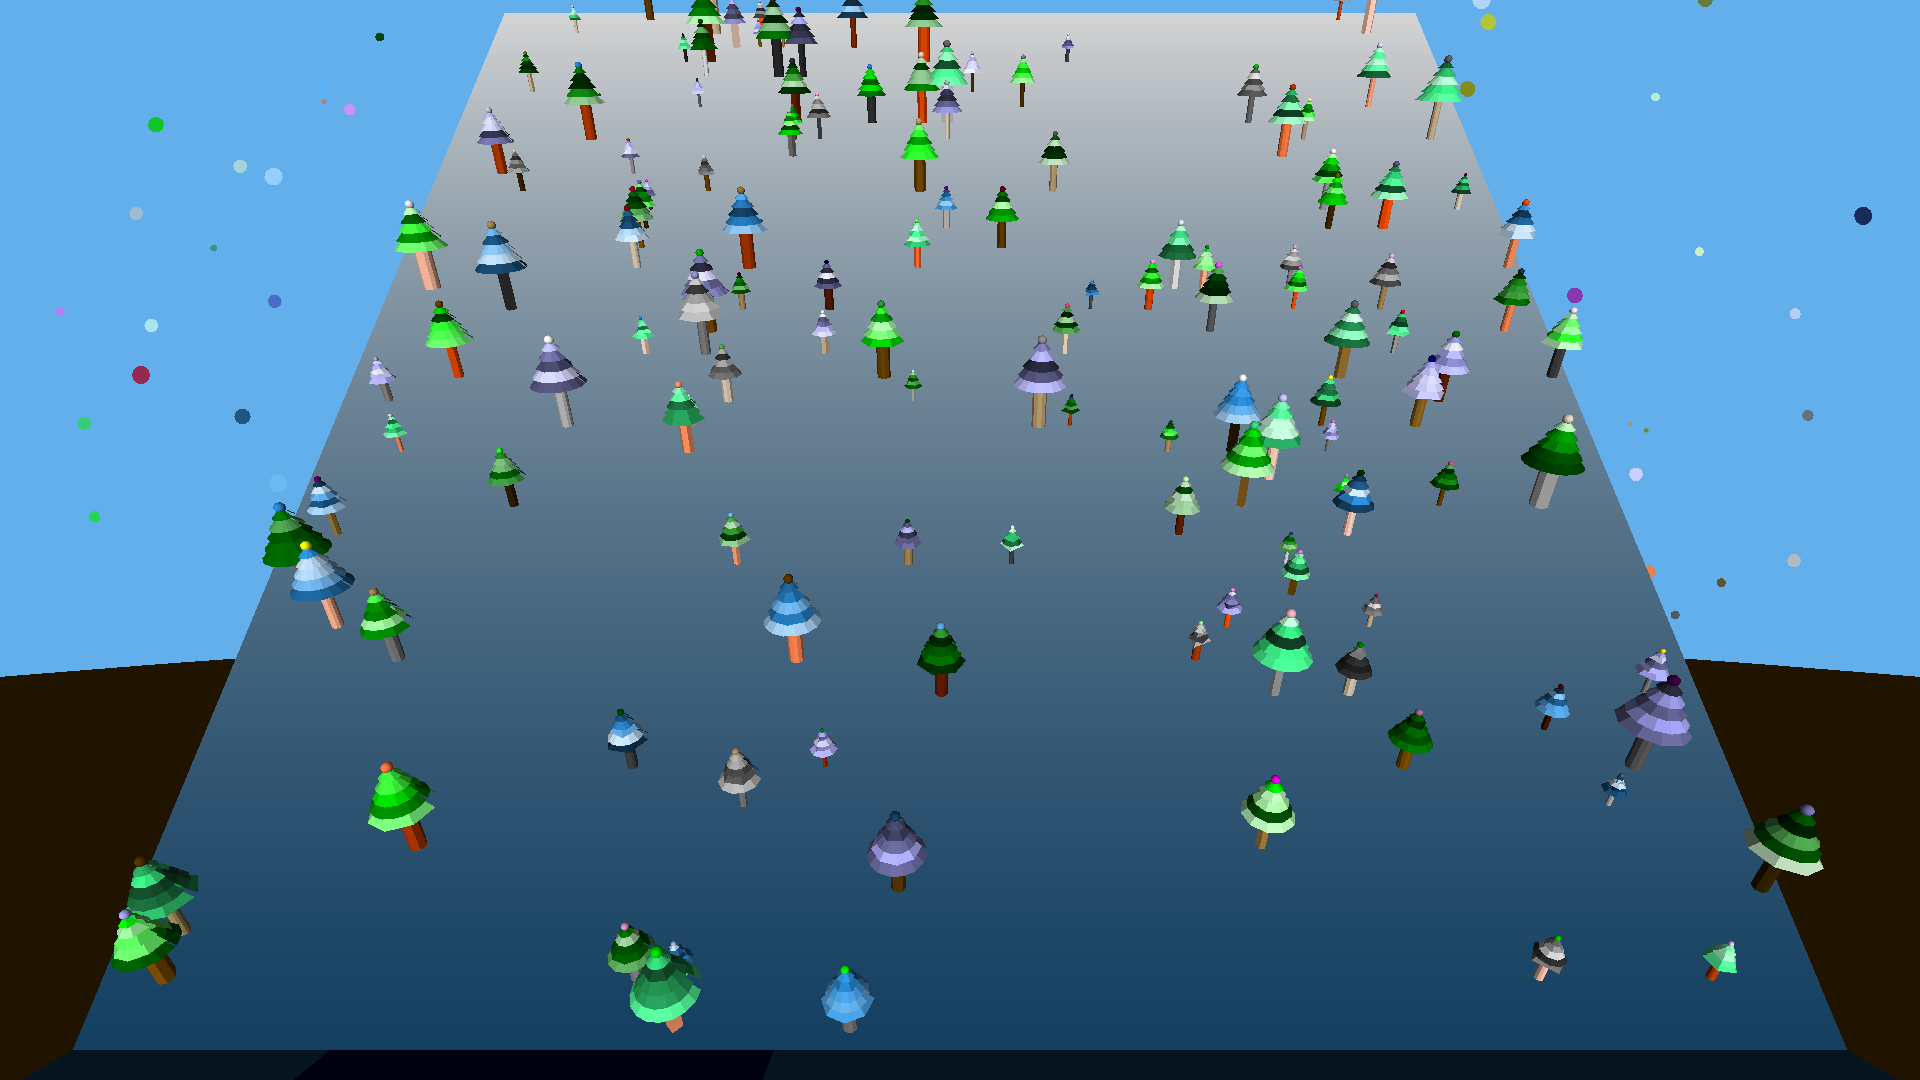
Seeing the forest for the trees
When this game was first developed, the ‘trees’ were simple icospheres. In creating a lesson plan, you can take two approaches here:
- Create and validate the core game logic first, using a placeholder such as a sphere
- Create the trees first, and then develop the game logic later
This is really a choice between whether we have vegetables or dessert first, but here we’ll start with dessert.
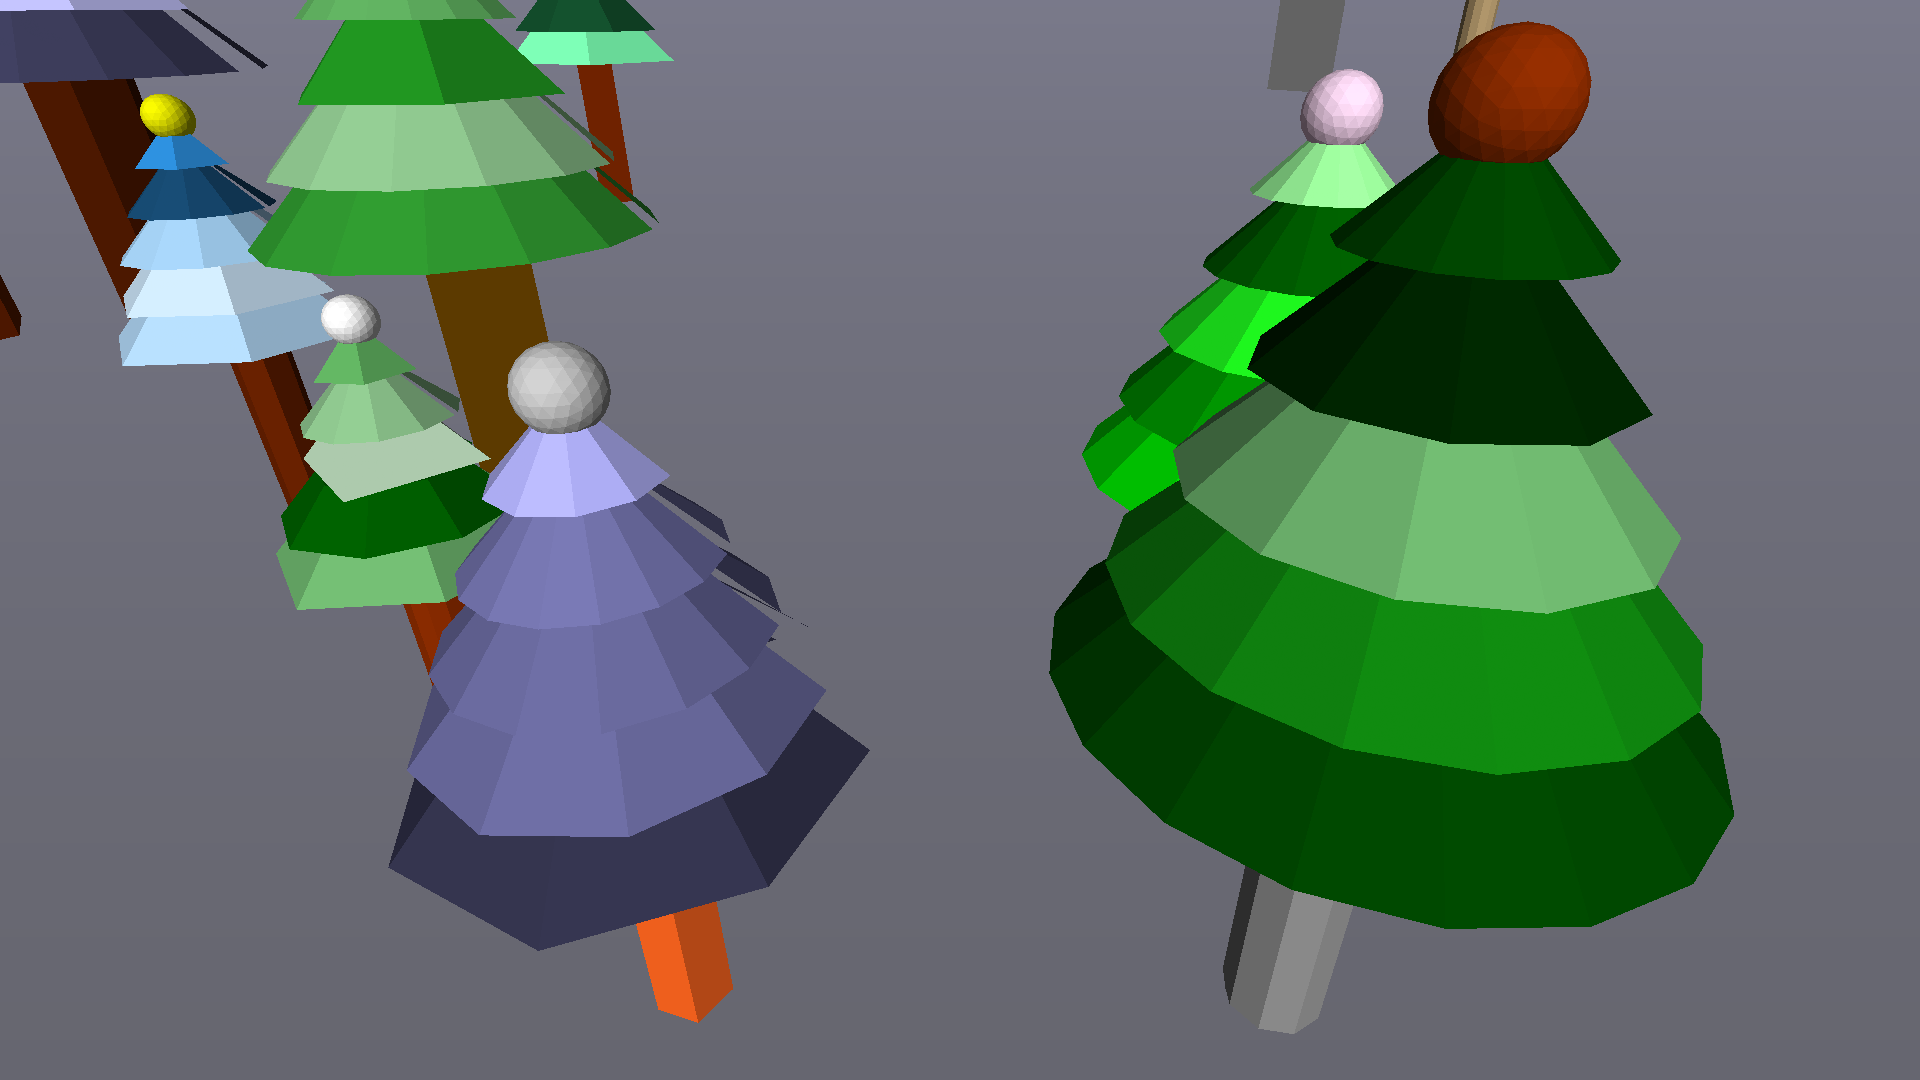
The trees are made up of firstly a cylinder (for the trunk), then a series of cutcone s and then finally an icosphere on the top. We select the color of each trunk and tree using the pick primitive, and select a random fillshade for each layer of the tree.
We need to do a bit of turtle acrobatics to ensure the trees are upright relative to the ground, and not upright relative to the slope! Shapes are created beneath the turtle, and so as a result the turtle needs to be ‘flipped over’ and the trees trees created successively from the trunk ‘downward’ to the icosphere on the top of the tree.
From a default startup state, type cylinder 20 50 20 into the console, then click and drag on the view area to rotate the camera:
As you can see, the cylinder is created beneath the turtle. To create additional shapes at the opposite end of the cylinder, we will need to lower the turtle the length of the cylinder.
cutcone s are similarly created under the turtle. However,icosphere s are created around the turtle. See the shape guides available on this website for more information about shape orientations relative to the turtle.
And so we sweep left to right, working up the slope, deciding at each ‘stop’ whether or not to build a tree, and then noting in the list for the current row if we have created a tree at the current column.
Here comes the vegetables. At the start of each row we create a list:
make word “trees repcount []
word combines two inputs into a single output. We’re using it here to create a new list container [] based on the current repcount , prefixing it with the word “trees, creating for example**:trees11**
As we sweep across each row, we use the queue primitive to add either a 0 (no tree) or a 1 (tree) to the end of the list:
queue 1 word “trees repabove 1
repabove returns the iteration of the parent repeat loop, in this case the row repeat loop. Using repcount here would return the current column, as we are iterating through the row.
We will use these lists later to cross-reference with the turtle’s position and reveal if a tree is present at that location.
Introducing the Player
Once we’ve created all the trees, we could spend a bunch of time creating an actual skier model, but I like just using the amigaball , which creates a checkered ball based on the current fill and pen colors. We use setmodel to make it the turtle model. Later on we can use setpremodel to make it ‘roll’ down the hill, which looks pretty cool! Note that we will need to elevate the turtle the radius of the amigaball to ensure it’s ‘sitting’ on the slope.

Skiing the Slopes
So basically now we’re ready to position the turtle at the top of the slope. We pick a random location and then check**:trees40** and :trees39 to ensure there isn’t a tree at the random location, or below it, respectively. We do this by using a container called :pos which contains the column number occupied by the player.
Alright, so now we enter the main game loop, which is a repeat loop based on the number of rows (40):
- Check for keypresses and action them as appropriate
- Move the ball down one row
- Check for collisions and act accordingly
We use if to check keyp which returns true if there are any keypresses waiting in the keyboard buffer. If there are, we use peekchar to ‘peek’ at what the first keypress in the buffer is. If the key is j or k we check our :pos and if valid we then move the turtle player andinc rement or dec rement the :pos container as appropriate.
We can also check for a press of the r key and then initiate a ‘retry’ but that is something that we can add in later. We don’t need to deal with it now.
Once we’ve dealt with the keypress, we can remove it and any superfluous keypresses from the key buffer using clearchar
The second thing we do in the loop is move the turtle forward 10 turtle units (one row). This is pretty straightforward.
Third, we check for a collision:
if 1 = item :pos thing word “trees 40 – repcount [do this stuff…]
Whew! That’s a mouthful, isn’t it? The first thing you’ll notice is the meat of our sandwich is on the right — other programming languages would tend to have the sides of the equals reversed, with the complicated bit first followed by the = 1. But Logo ‘parses’ right to left, which means that if we did that, the = comparator would only check 1 against repcount , ignoring all the rest of it.
We can solve that problem by putting round brackets () around the entire expression (the meat) but that adds extra clutter we don’t need if we just put the value first.
- item returns the nth list item. So print item 3 [1 2 3] will return 3, for example. item :pos returns the list item based on the player’s current position.
- thing returns the value stored in the container of the given name. It’s the longhand of :container. But it’s useful here because unlike using the colon method, we can construct the name of the thing to be retrieved, as we did with make earlier.
- word acts similarly here to when we created the lists, with the exception of subtracting repcount from 40 in order to get the current row list in descending order.
- And so, if the value returned from all of that is 1, we’ve hit a tree! Do the stuff in the list.
Ouch! Well, when all else fails, try, try again… we can use a label go pairing to send the player back up to the top, logically speaking. And we can wrap a tag around the player’s progress down the hill so we can erase it, sending the player turtle back to where it started, turtle-y speaking.
If we make it to the bottom of the hill we need to check to see if we’re in the target zone:
if and xpos > -200 + :zone xpos < -100 + :zone – 10 * :level [do this stuff…]
xpos holds the turtle’s current x position. We can use it along with the value stored in the :zone container to decide if we’re in the zone. This statement assumes we’ve factored the :level into the width of the :zone.
If we’re in the zone, congratulations! Then (if we’re not on the last level) we increase the level and send the player off to try again. If we’re not in the zone, too bad, and we send the player off to try the level again.
Of course, the version available to play has a few more bells and whistles, you can read all about them in the documented source code below.
Note: This was created as a monolith procedure, but you could break bits of it out into separate procedures in order to demonstrate Logo’s abilities in that area. For example, the tree model creation could be its own procedure, as could the contents of the main game loop, the crash logic, the level completion logic and so forth.
TO downhill
  ;myrtle builds a ski slope and then rolls down
  ;it in the guise of a rolling amiga ball.

  ;this is a wonderful introduction to game
  ;development in turtlespaces. The game mechanic
  ;is quite simple:

  ;the player needs to travel down the ski slope
  ;while avoiding the randomly-placed trees
  ;and finish in the highlighted zone.

  ;most of this procedure is window-dressing.
  ;at its core it simply fills a number of lists
  ;with 0s and 1s, and then checks these against
  ;indices inferred by the player's position, eg
  ;the 'row' being the current iteration of the
  ;player's progress down the ski hill, and the
  ;column being the player's horizontal location
  ;on that hill. The row matches against the list
  ;generated with the row number, eg :trees 10
  ;while the column (:pos) matches with the item
  ;number in that list, eg item :pos :trees10

  ;this game would be rather pedestrian with a
  ;simple text representation, but in turtlespaces
  ;we can 'jazz it up' and make it more engaging.

  ;Let's go!

  reset
  cam:pullout 10
  ;the slope doesn't quite all fit in the screen!
  ;so we'll pull out the camera turtle a little bit.
  ;'cam' is shorthand for whichever turtle is the current
  ;view turtle

  cleartext settextforeground red
  print |Welcome to Amigaball Backcountry Downhill Skiing!|
  ;bars indicate a 'long word' or a word that contains spaces
  ;while quotes indicate a single word and square brackets
  ;indicate a list. Curly braces indicate a list 'resolved'
  ;when the list is processed during execution. (Don't worry
  ;if you don't know what that means just yet!)

  cursordown
  settextforeground yellow
  print |Press J and K to steer your skier (Amigaball)|
  print |Land in the Blue Zone. Don't hit the trees!|
  print |More trees each level. Try to make it to level 10.|
  print |Press R to get a different map (3 retries) Q to quit|
  say |Welcome. Don't hit the trees!|
  make "level 0
  ;'make' creates a container with the given name containing the given value

  make "retry 3
  ;although the odds of trees on lower levels is less,
  ;it is still possible to get a very dense level if you are unlucky!
  ;and so we'll give the player three opportunities to regenerate
  ;the level

  ;hint: if you open this in the web IDE you can hover
  ;over the primitive names with the mouse and a popup will
  ;appear with their syntaxes

  label "start
  ;we will return here at the start of each 'level'
  ;the program gets redirected to labels using 'go'

  ;create the 'mountain':
  clearscreen hideturtle penup
  ;you can 'stack' multiple directives on the same line

  twosided ; by default the back side of faces is not 'lit'

  ;make the background stars:
  repeat 200 [
    if oddp repcount [setz -600] [setz 600]
    setxy -800 + random 1600 -100 + random 600
    randomfillshade ; aka randfs
    randomfillcolor ; aka randfc
    setfillopacity 50 + random 50 ; aka setfo
    ;opacity is the transparency of the shape
    ;it takes a value from 0 to 100 (full)
    spot 2 + random 7
  ]

  setfo 100 ; aka setfillopacity

  setz 0
  setxy 0 -115

  ;create the 'ground spot':
  notwosided
  up 90 raise 1
  setfs -5 + random 15 ; aka setfillshade
  setfc pick [4 5 8 9] ; aka setfillcolor
  spot 1000
  slideleft 200 lower 1

  ;pick colors:
  setbg pick [2 6 7] ; aka setbackgroundcolor
  setbs -5 + random 15 ; aka setbackgroundshade
  setpc pick [5 6] ; aka setpencolor
  setps random 10 ; aka setpenshade
  setfc pick [10 15 7 14] ;aka setfillcolor
  setfs -10 + random 10
  gradient
  ;this causes many shapes to transition from the
  ;pen color to the fill color

  ;create the landing area:
  make "zone random 300
  ;pick the 'target zone' area

  ;containers that hold values are created using 'make'
  ;with the given name and value

  twosided
  quad :zone 400 ; creates a quad stretching to the start of the zone
  ;values in containers are retrieved by specifying the container name
  ;prefaced with a colon. You can also use the 'thing' function to retrieve
  ;the value of containers, eg 'quad thing "zone 400'
  slideright :zone ; aka sr
  make "pencol pencolor
  ;we need to store the pencolor and restore it later
  setpc blue ; several color names translate to their color number
  quad 100 - 10 * :level 400 ; create the zone based on the level
  sr 100 - 10 * :level
  setpc :pencol
  ;this is where we restore the pencolor
  quad 300 - :zone + 10 * :level 400 ; create the remainder of the landing area
  sl 100 + :zone - 10 * :level ; return to the start


  ;create the ski slope:
  notwosided
  down 120
  quad 400 400
  nogradient


  ;position the turtle for creating trees:
  fd 5 ; aka forward
  sr 5 ; aka slideright

  ;place the trees:
  repeat 40 [
    ;we'll have 40 rows of trees

    make word "trees repcount []
    ;our strategy here is to make a series of lists, each of which
    ;indicate the presence or absence of a tree in a particular
    ;location on a particular 'line' of the ski slope

    repeat 39 [
      ;there are 39 columns on each row of the ski slope
      sr 10

      if 1 = random 10 - :level [
        ;the higher the level the more likely a tree will be
        ;placed in a given spot

        noise (10 * repcount) + (200 * repabove 1) 1
        ;let's make a little noise based on position

        up 150
        ;most shapes are created under the turtle, so we need
        ;to flip it over

        make "size 0.5 + 0.1 * random 10
        ;pick a random size

        setfc pick [5 8 9]
        cylinder (1 + 0.1 * random 10) * :size 10 * :size 4 + random 10
        ;create the tree trunk. cylinder takes radius, depth and sides

        lo 10 * :size
        ;remember, these shapes are created under the turtle
        ;so we have to 'lower' to continue to build 'beneath' them

        setfc pick [4 5 6 7 12 14]

        ;create the body of the tree:
        repeat 5 [
          randfs
          cutcone (7 - repcount) * :size (5 - repcount) * :size 2 * :size (5 + random 10) * :size
          ;cutcone takes 4 parameters: the starting radius, ending radius, depth and sides
          lo 2 * :size
        ]

        ;put a little 'cherry' on the top of each tree:
        randfc ico 1 * :size

        ra 20 * :size
        dn 150
        ;return to the base of the tree and reorient back

        queue 1 word "trees repabove 1
        ;a 1 in the list indicates a tree
        ;queue adds it to the end of the list
      ]
      [
        ;this second list executes if the if condition is false:
        queue 0 word "trees repabove 1
        ;a 0 indicates no tree
      ]
    ]
    sl 390
    fd 10
    ;move ahead a row and return back to the starting column

  ]
  ;return to the start of the repeat loop and loop until finished

  ;we're done making trees! Let's place the player:

  bk 10
  ;pick a random placement:
  make "pos 5 + random 30
  sr 10 * :pos
  ;and check to make sure there's no tree there or directly in front:
  until (
    and 0 = item :pos :trees39
    0 = item :pos :trees40) [
    sr 10
    inc "pos
    if :pos > 39 [sl 400 make "pos 1
      ;if we hit the end of the row, circle back to the start
    ]
  ]
  rt 180
  ;turn to face down the hill
  ra 5
  ;elevate a little bit off the hill

  make "startpos :pos
  ;store the starting position to return back to it later

  label "attempt
  ;we will return here if the player's attempt fails

  setpremodel []
  ;setpremodel allows for the manipulation of the orientation
  ;and position of the turtle model.
  ;we use setpremodel later and need to clear it if
  ;the player needs another attempt

  begintag "route
  ;we're going to place the players 'route' into a 'tag'
  ;so that we can erase it if the player's attempt fails.
  ;this way we can keep the level we've generated and
  ;they can try again

  setview "myrtle
  ;view the scene from myrtle's perspective
  myrtle:setlight 1
  snappy:setlight 0
  ;switch the light to myrtle's position
  setviewpoint [0 10 -30]
  ;set the viewpoint offset from myrtle's position

  randpc ; aka randompencolor
  setpenwidth 4 ; make the turtle draw fat lines

  pendown ; let's draw the route the player takes!
  ;because why not? It'll look interesting later

  clearchar
  ;clears the keyboard buffer so the player doesn't
  ;end up with a bunch of buffered keypresses
  ;influencing movement

  setmodel [
    setfc red
    ico 5 ; aka icosphere
  ]
  ;sets the turtle 'model' to the given contents
  ;setmodel can also use tags

  ;Ready set go:
  showturtle
  type "Ready...
  toot 1000 30
  ;frequency and duration in 60ths of a second

  setmodel [
    setfc white
    ico 5
  ]
  type "Set...
  toot 1000 30
  print "Go!
  setmodel [
    setfc red
    setpc white
    amigaball 5 10 20
    ;creates a chequred ball
  ]
  toot 2000 60
  ;and we're off!

  repeat 39 [
    setpremodel {"dn repcount * 20}
    ;the premodel processor doesn't know what 'repcount' is, and so we need
    ;to use curly braces to make a 'soft list' that is evaluated when it is
    ;executed -- that is, repcount is resolved into its value, which is then
    ;passed to setpremodel

    fd 10
    ;move forward

    if keyp [
      ;has a key been pressed?

      if and :pos < 39 "j = lowercase peekchar [ ;if it's the j key and the position is less than 39: sl 10 ; aka slideleft inc "pos ; increment the 'pos' container value ] if and :pos > 0 "k = lowercase peekchar [
        ;similarly, if the k key and the position is greater than 0:
        sr 10 ; aka slideright
        dec "pos ; decrement the 'pos' container value
      ]

      if and :retry > 0 "r = lowercase peekchar [
        ;if the player presses the r key and has retries remaining:
        dec "retry
        (print :retry |retries remaining...|)
        setview "snappy
        snappy:setlight 1
        setlight 0
        ;switch the light and view back to snappy, the default view turtle
        endtag
        ;close the route tag
        go "start
        ;jump back to the start label
      ]

      if "q = lowercase peekchar [finish]
      ;I quit!

      clearchar
      ;clear the key buffer
    ]

    if 1 = item :pos thing word "trees 40 - repcount [
      ;are we where a tree is?

      ; - 'thing' returns the value of the given container.
      ;   we need to use it because we programatically
      ;   created a series of list containers earlier named
      ;   trees0 trees1 trees2 etc. and so we're using thing
      ;   and 'word' to create the appropriate container name
      ;   and then using 'item' to retrieve the value in the
      ;   relevant column (list index)

      ; - 'repcount' returns the current iteration of the
      ;   repeat loop. there is a similar function for other
      ;   loops called 'loopcount' and indeed loopcount will
      ;   also return the current repeat loop iteration. But
      ;   repcount is used by a number of different Logos and
      ;   it's a useful distinction

      ; so apparently we did:

      pr |Ouch! You Crashed! Try again.| ; aka print
      playsound "crash
      say pick [|too bad| |ouch| |that hurt| |dont hit the trees| |wipeout|]

      setview "snappy
      snappy:setlight 1
      setlight 0
      ;return the view and light back to 'snappy' the default view turtle

      repeat 2 [ht wait 30 st wait 30] ; aka hideturtle and showturtle
      ;wait causes the program to pause for the given number of 60ths of a second
      ;this is due to early computers operating at 60 frames per second
      ;you can also use 'sleep' which takes milliseconds

      make "pos :startpos
      ;return the value of the 'pos' container to its starting value
      endtag
      ;close the 'route' tag
      erasetag "route
      ;erase the 'route' tag. This returns the turtle to the position
      ;it was at at the start of the tag, as we have erased part of its
      ;'turtle track'
      go "attempt
      ;return to the 'attempt' label and continue execution from there
    ]
    ;indicates the end of instructions to execute if the player hits a tree

    noise repcount * 200 (40 - repcount) * 0.5
    wait (40 - repcount - :level) * 0.5
    ;make a little static noise based on progress down the hill
    ;and similarly wait a little bit based on the progress and the level.
    ;this makes us speed up as we descend the hill

  ]

  ;we've made it to the bottom!
  up 60
  ;reorient the turtle upward

  repeat 100 [
    setpremodel {"fd repcount "dn 10 * repcount}
    ;this causes the ball to move ahead of the camera
    setmodel [
      setfc 1 setpc 15
      setfillopacity 100 - repcount
      setpenopacity 100 - repcount
      amigaball 5 10 20
      ;this causes the ball to fade out
    ]
    setpenopacity 100 - repcount
    ;this causes the line to fade out
    forward 1 noise 8000 - 80 * repcount 1]
  ;do a little victory 'lap'

  endtag
  ;close the 'route' tag

  setfo 100 setpo 100 ; aka setfillopacity setpenopacity
  ;set the fill and pen opacity back to full

  setview "snappy
  snappy:setlight 1
  setlight 0
  ;set the view and light back to snappy, the default view turtle

  if and xpos > -200 + :zone xpos < -100 + :zone - 10 * :level [
    ;are we in the zone? if so:

    say pick [|great job| |good effort| |way to go|]
    playsound "cheers
    inc "level

    if :level < 10 [
      (print |Great Job! Try level| word 1 + :level "!)
      ;round brackets allow more than the default number of
      ;parameters to be 'passed' to a primitive, in this case
      ;print

      go "start
      ;return back to the 'start' label to create a new level
    ]

    print |You Win! Game Over.|
    say |you win|
    finish
    ;this finish isn't strictly necessary because we will fall out
    ;of execution at this point anyway...
  ] [
    ;we're not in the zone! Let's try this again:

    playsound "aw
    print |You missed the Blue Zone! Try Again.|
    say pick [|try again| |go again| |you can do it| |you'll get it this time|]
    wait 120
    make "pos :startpos
    erasetag "route
    go "attempt
  ]
  ;that's all folks!
END