Alpine Trees: an Introduction to Terrain
turtleSpaces new terrain functionality provides some great opportunities for simple coding examples with few lines of Logo code, in this case less than 30.
First, we need to introduce the setterrain primitive. setterrain creates ‘terrain’ or a contiguous object of varying elevation.

The above is an example of the object created by setterrain. The setterrain primitive takes a number of parameters, and is a good opportunity to explain the different types of parameters used in turtleSpaces to students.
The setterrain command used to create the above is:
setterrain [-5 -5 5 5] [0 50 10 40] random 1000 [fbm 2] “voxel
As you can see, the command has a number of different parameters.
The first parameter is a list containing the number of quadrants (blocks of ten elevation points, by default spaced one turtle-unit apart) in each direction from [0 0], the center of the turtleSpace, expressed as X Y pairs.
So, in this case, we are creating a grid of 25 quadrants in each of the four directions (forward/left, back/left forward/right back/right) surrounding [0 0], for a total of. 100 quadrants.
The second list contains four values: The elevation (or z value) of the ‘bottom’ of the terrain, the elevation of the highest points of the terrain mathematically generated, the ‘floor’ of the terrain which is the lowest level of the generated terrain rendered (so you can create lakes) and the ‘ceiling’ of the terrain which is the highest elevation of the generated terrain rendered (so you can create plateaus).
You can use the setterraincolors primitive to set the colors of various elevations, but this is beyond the scope of this article.
The third parameter is the ‘seed’ of the terrain generator. In the case of our example, we are using the random function to generate a random number to use as the seed, to create a different terrain each time we execute the command. But you can use an absolute number, eg 433, which will create the same terrain every time. This allows you to build additional objects on the terrain and ensure that terrain is the same every time you execute your program.
The fourth parameter, the algorithm used to generate the terrain, is a chameleon of sorts: it can either take a list or a word value depending on your intent. You can provide just a word, eg “fbm (the only algorithm type currently available) or a list, eg [fbm 2] — the second value in the list provides the ‘magnification’ of the algorithm. The larger the number, the less dense the terrain will be in terms of peaks and troughs. If you use a fraction eg 0.2 then the terrain will become more dense, to the point of looking more like a cityscape then terrain!
The final parameter is a word that specifies the style. There is currently only one style, voxel, hence the parameter in our example is “voxel
And so, as you can see, we have lists, numbers and words all as parameters passed to setterrain.
You can play with these values a bit and see the results. Be aware that you need to either call reset or clearterrain (not clearscreen, which does not affect terrain) before you execute the setterrain command again, because you cannot ‘overwrite’ existing terrain. But keep in mind you can create different blocks of terrain in different areas, so long as they do not overlap!
The voxels in the terrain by default are only one turtle-unit cubed, which are very small, You can increase the size of the voxels used in the terrain by using the setterrainresolution primitive to change that size, eg setterrainresolution 10. This will expand the size of the terrain by a factor of 10, so keep in mind your camera may end up ‘inside’ the terrain and you will need to use the scroll wheel on your mouse to pull the camera to the outside of it. Or you could use commands like:
cam:setorbitdistance 1000
cam:orbitdown 60
which pulls the camera turtle away from the center point and ‘orbits’ it down 60 degrees, cam: denoting that we are talking to the camera turtle, by default ‘snappy’ (if you use the setview primitive to change the camera turtle, then cam: commands that turtle instead.)
And so the start of our program looks like this:
TO trees
  reset hideturtle penup
  setterrainresolution 10

  setterrain [-5 -5 5 5] [0 50 10 40] random 1000 [fbm 2] "voxel
  ;create random terrain

  cam:setorbitdistance 1000
  cam:orbitdown 60
  ;position camera
END
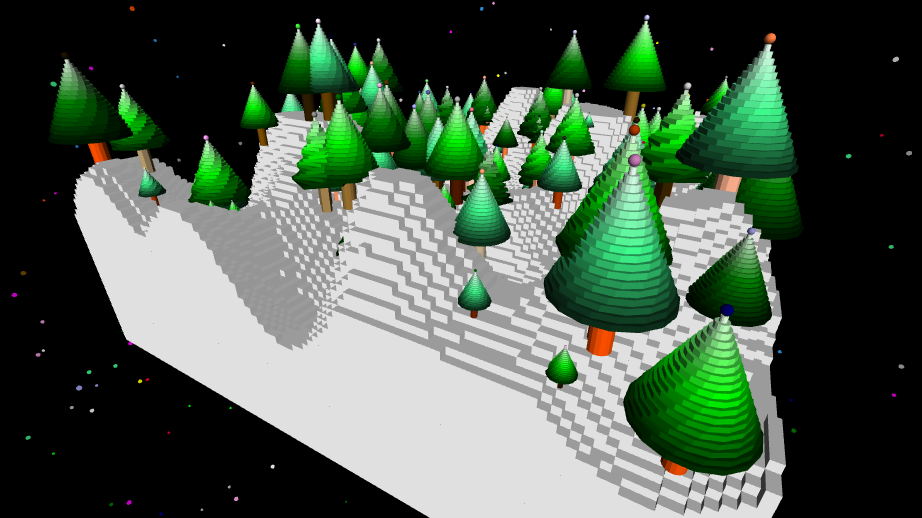
and results in this:

And so we have our terrain, which is by default all white and suits our purposes. But now we need to put trees on it!

Our trees are made up of cylinders, of varying size and side counts, to provide variety. A random icosphere adorns the top of each tree.
First, we’ll create a repeat loop of 100, to create 100 trees:
repeat 100 [

]
The lines between the square brackets are where we’ll put the lines we want to repeat. Next we want to position the turtle in a random spot on the terrain, but we want the treeline to be at least 200 turtle-units on the positive Z axis.
We’re going to be using the elevation primitive, which returns the elevation at the given x and y co-ordinates expressed as the z co-ordinate of the elevation NOT the voxel count (remember, we’ve set the terrainresolution to 10, which means the actual z co-ordinate will be 10 times the voxel count).
We’re also going to be using dountil, which repeats an action until the condition provided to it is satisfied. And so we’re going to position the turtle in random spots within the area of the terrain and measure the elevation there, only continuing if the elevation is 200 or greater:
    dountil 200 < elevation pos [
      setxy -480 + random 960 -480 + random 960
    ]
Once we’ve found an appropriate spot, we’re going to set our elevation to the top of the terrain and flip the turtle upwards 180 degrees, because cylinders are created beneath the turtle:
setz elevation pos up 180
We need to pick a color for the trunk (8 is brown and 9 is orange) and a random shade:
    setfillcolor pick [8 9]
    randomfillshade
Next we’ll create containers containing randomly-generated values determining the size of the tree and the number of sides it has:
    make "size 5 + random 20
    make "sides 3 + random 20
We’ll use the values contained in these containers in our cylinder commands to create our tree appropriately. Next we make the trunk based on these values:
cylinder :size / 2 2.5 * :size :sides
cylinder takes three parameters: the radius of the cylinder, the depth of the cylinder and the number of sides. :size returns the value stored in the “size container, similarly with :sides.
Next we’ll lower the turtle to the end of the cylinder:
lower 2.5 * :size
Now comes the creation of the tree’s ‘foliage’. First we need to select the tree’s color, then create 20 cylinders making up the foliage, then place a randomly-colored icosphere on the top.
setfillcolor pick [4 12 14]
4, 12 and 14 are greenish colors.
repeat 20 [

]
We’re going to make 20 cylinders. Inside the repeat loop we place the following:
      setfillshade 15 - 1.5 * repcount
      cylinder 2.5 * :size - ((2.5 * :size) / 20) * repcount :size / 4 :sides
      lower :size / 4
      right 90 / :sides
repcount returns the current repeat ‘loop’ we’re in, and so first we set the fill shade (fill colors are used by shape primitives such as cylinder) based on the repeat loop. Second we create the cylinder, third we lower the turtle to the bottom of the cylinder, and finally we turn the turtle right based on the number of :sides the cylinder has, creating the spiral effect.
    randomfillshade randomfillcolor
    raise :size / 4 lower :size / 5
    icosphere :size / 5 up 180
Next, we set a random fillshade and fillcolor, raise the turtle back up so that we can lower it with a more appropriate value for our icosphere, then create the icosphere based on the :size value. Finally, we create the icosphere. Then we repeat all of this 100 times for 100 trees, ending up with something like this:

Here is the listing in full:
TO trees
  reset hideturtle penup
  setterrainresolution 10
  ;the terrain resolution affects all terrain! If you change it, terrain is regenerated.

  setterrain [-5 -5 5 5] [0 50 10 40] random 1000 [fbm 2] "voxel
  ;create random terrain

  cam:setorbitdistance 1000
  cam:orbitdown 60
  ;position camera

  ;create 100 trees:
  repeat 100 [
    dountil 200 < elevation pos [
      setxy -480 + random 960 -480 + random 960
    ]
    ;position the turtle someplace where the elevation is 200 or greater

    setz elevation pos up 180
    ;raise the turtle to that elevation and flip it on its back

    setfillcolor pick [8 9]
    randomfillshade
    ;select trunk color / shade

    make "size 5 + random 20
    make "sides 3 + random 20
    ;select random values

    cylinder :size / 2 2.5 * :size :sides
    ;make the trunk

    lower 2.5 * :size
    setfillcolor pick [4 12 14]
    ;select foliage colors

    repeat 20 [
      ;create 20 'rings'
      setfillshade 15 - 1.5 * repcount
      cylinder 2.5 * :size - ((2.5 * :size) / 20) * repcount :size / 4 :sides
      lower :size / 4
      right 90 / :sides
      ;this creates a spiral effect in the tree
    ]

    randomfillshade randomfillcolor
    raise :size / 4 lower :size / 5
    icosphere :size / 5 up 180
    ;make the 'ball' on top
  ]
END
Don’t forget that you can click and drag the mouse to move the camera around the model, and scroll in and out to zoom!


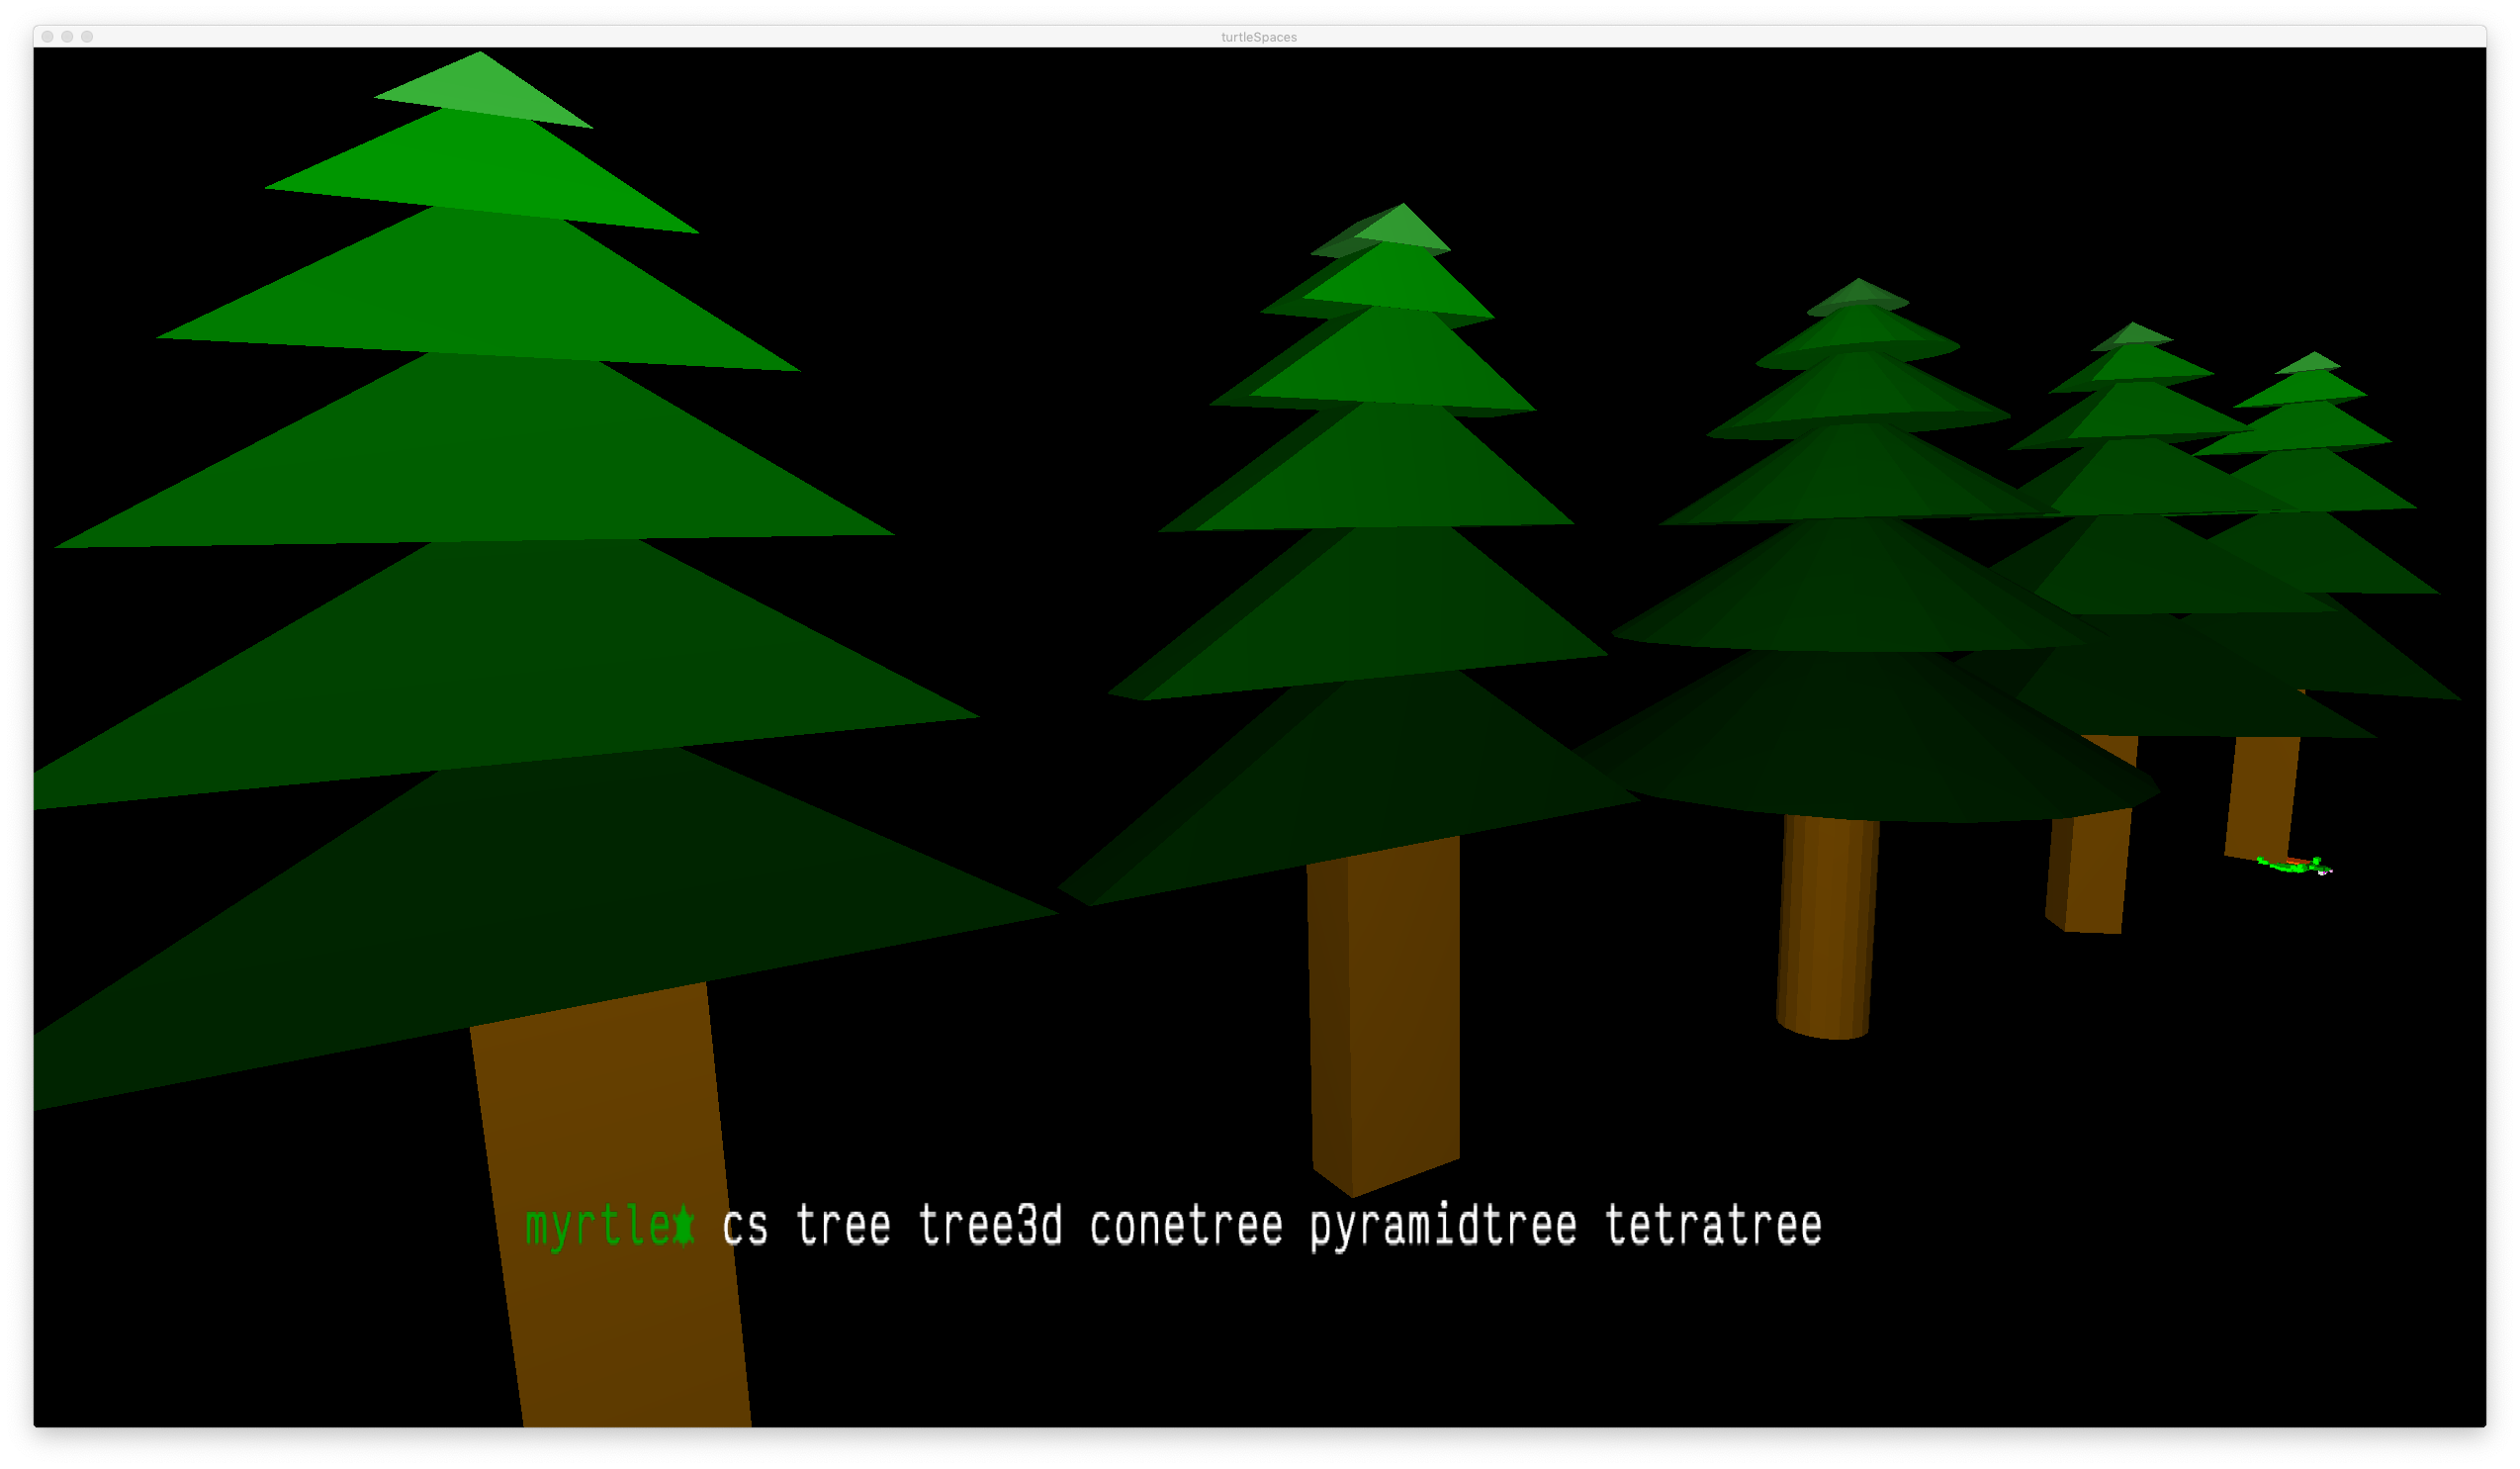
 TO tree
clearscreen penup
setpos [0 80] setfillcolor 4
repeat 6 [
setfillshade -6 + 3 * repcount
;repcount returns the current iteration
back 4 * repcount
fiso 8 * repcount 5 * repcount
;fiso = filled iso triangle
lower 0.1
]
setfillcolor 8 setfillshade 5
back 50 slideleft 10
quad 20 50
;trunk
END
TO tree
  clearscreen penup
  setpos [0 80] setfillcolor 4
  repeat 6 [
    setfillshade -6 + 3 * repcount
    ;repcount returns the current iteration
    back 4 * repcount
    fiso 8 * repcount 5 * repcount
    ;fiso = filled iso triangle
    lower 0.1
  ]
  setfillcolor 8 setfillshade 5
  back 50 slideleft 10
  quad 20 50
  ;trunk
END TO tree3d
cs pu setpos [0 80]
;cs = clearscreen
;pu = penup
setfc 4
;setfc = setfillcolor
repeat 6 [
setfs -6 + 3 * repcount
;setfs = setfillshade
bk 4 * repcount
;bk = back
tent 8 * repcount 5 * repcount 10
lo 0.1
;lo = lower
]
setfc 8 setfs 5
bk 50 sl 10
;sl = slideleft
voxeloid 20 50 10
;voxeloids are stretched cubes
END
TO tree3d
  cs pu setpos [0 80]
  ;cs = clearscreen
  ;pu = penup
  setfc 4
  ;setfc = setfillcolor
  repeat 6 [
    setfs -6 + 3 * repcount
    ;setfs = setfillshade
    bk 4 * repcount
    ;bk = back
    tent 8 * repcount 5 * repcount 10
    lo 0.1
    ;lo = lower
  ]
  setfc 8 setfs 5
  bk 50 sl 10
  ;sl = slideleft
  voxeloid 20 50 10
  ;voxeloids are stretched cubes
END TO conetree
cs pu setpos [0 80]
setfc 4 up 90
repeat 6 [
setfs -6 + 3 * repcount
ra 4 * repcount
cone 8 * repcount 5 * repcount 20
]
setfc 8 setfs 5 ra 50
cylinder 8 50 20
END
TO conetree
  cs pu setpos [0 80]
  setfc 4 up 90
  repeat 6 [
    setfs -6 + 3 * repcount
    ra 4 * repcount
    cone 8 * repcount 5 * repcount 20
  ]
  setfc 8 setfs 5 ra 50
  cylinder 8 50 20
END TO pyramidtree
cs pu setpos [0 80]
setfc 4 up 90
repeat 6 [
setfs -6 + 3 * repcount ra 4 * repcount
cone 8 * repcount 5 * repcount 4
;while there is also a pyramid primitive, you can
;also create a pyramid by creating a 4-sided cone
]
setfc 8 setfs 5 ra 50
cylinder 8 50 4
END
TO pyramidtree
  cs pu setpos [0 80]
  setfc 4 up 90
  repeat 6 [
    setfs -6 + 3 * repcount ra 4 * repcount
    cone 8 * repcount 5 * repcount 4
    ;while there is also a pyramid primitive, you can
    ;also create a pyramid by creating a 4-sided cone
  ]
  setfc 8 setfs 5 ra 50
  cylinder 8 50 4
END TO tetratree
cs pu setpos [0 80] setfc 4 up 90
repeat 6 [setfs -6 + 3 * repcount
ra 4 * repcount
cone 8 * repcount 5 * repcount 3]
setfc 8 setfs 5 ra 50
cylinder 8 50 3
END
TO tetratree
  cs pu setpos [0 80] setfc 4 up 90
  repeat 6 [setfs -6 + 3 * repcount
    ra 4 * repcount
    cone 8 * repcount 5 * repcount 3]
  setfc 8 setfs 5 ra 50
  cylinder 8 50 3
END