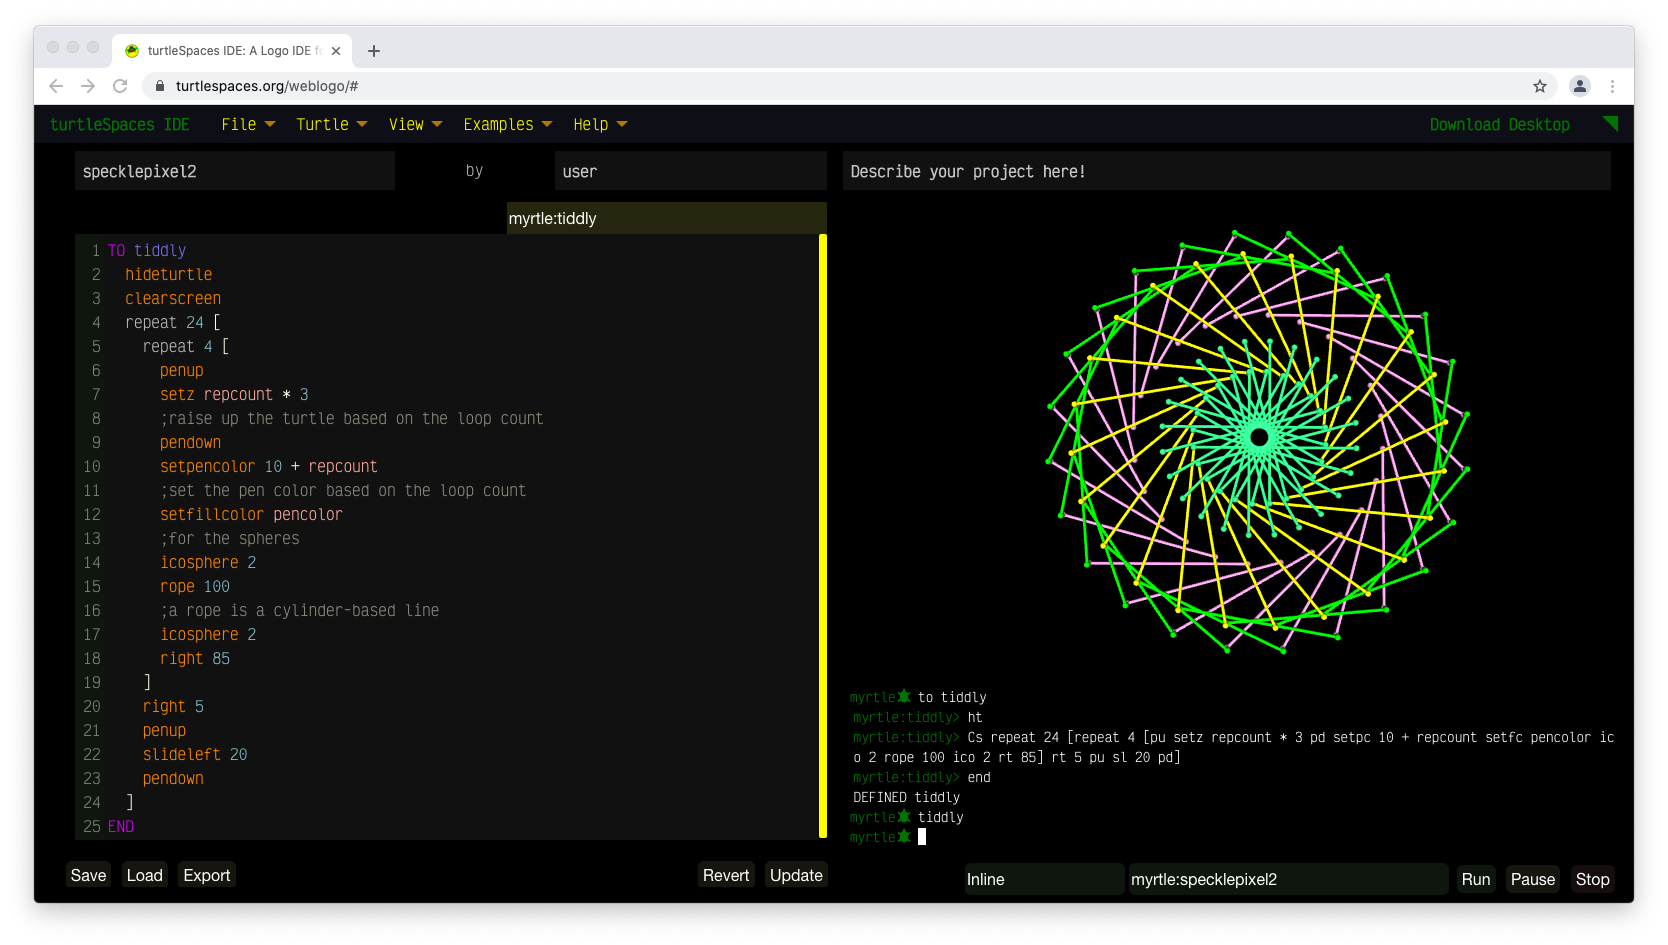
This simple commented project allows for the introduction of 3D movements and shapes (the rocket procedure) including a basic introduction to repeat, the creation of turtle models and the use of premodel, an introduction to the orbit primitives and the use of a new worker (thread) for orbiting the camera!
TO rocket
  forward 70
  down 90
  ;these two commands orient the rocket better for use as
  ;a turtle model

  setfillcolor yellow
  ;yellow is a function that returns the value 13
  ;it is a shortcut used for convenience in learning
  ;as is red, green, blue etc.

  cylinder 20 120 10
  ;cylinder takes

  rollright 180
  ;flip the turtle over to create the nose cone

  cone 20 50 10

  lower 50
  ;lower the turtle to create the 'nose'

  setfillcolor red
  icosphere 3

  setfillcolor orange
  ra 50 + 120
  ;ra is short for raise

  rr 180
  ;rr is shorthand for rollright

  cutcone 20 30 30 10
  ;move the turtle to the bottom of the rocket and
  ;create the tail

  up 90 bk 30.1
  ;bk is short for back

  setfillcolor white
  repeat 2 [cylinderslice 40 5 20 10 rr 90]
  ;create the fins

  setfillcolor red
  dn 90 sl 10 bk 10 cylinder 10 10 10
  ;sl is short for slideleft

  fd 20 cylinder 10 10 10 sr 20
  ;fd is short for forward
  ;sr is short for slideright

  cylinder 10 10 10 bk 20 cylinder 10 10 10
  ;create the jets

END

TO createmodel
  clearscreen
  ;cs is short for clearscreen

  begintag "rocketmodel
  ;tags are used to create turtle models
  ;among other uses. You can also use them to
  ;show or hide parts of the 'turtle track'

  rocket
  ;run the rocket procedure

  endtag
  ;close the tag

  newmodel "rocket "rocketmodel
  ;create a new model called 'rocket' based on the
  ;rocketmodel tag

  setmodel "rocket
  ;set the turtle's model to the rocket model

  clearscreen
  ;clear away the tagged model, leaving only the
  ;turtle
END

TO starfield :number
  hideturtle
  norender
  ;suspend rendering of the scene until we're done drawing the stars
  penup
  repeat :number [
    home
    randomvectors randomfillcolor
    ;randomvectors orients the turtle randomly
    ;while randomfillcolor sets a random fill color

    forward 1000 + random 1000
    ;move forward a random distance

    up 90
    ;orient the turtle up in preparation of creating a spot
    ;because the spot is created around and below the turtle

    spot 10 + random 10
    ;create a randomly-sized spot

  ]

  home
  showturtle
  render
  ;resume rendering

END

TO main
  reset
  ;resets turtleSpaces to a default state

  createmodel
  ;execute the createmodel procedure

  starfield 200
  ;execute the starfield procedure, passing the parameter value 200

  setmodelscale 0.5
  ;decrease the size of the turtle model to half normal

  setpremodel [lt 90]
  ;inserts 'left 90' into the turtle track between the scene
  ;and the turtle model ('pre' the model)

  setfillcolor 14
  ;sets the fillcolor to 14. Type 'showcolors' or 'sc' in the console
  ;to see a list of default colors. You can also definecolor your own!

  ico 50
  ;create an icosphere (the planet)

  penup
  dropanchor
  ;set the 'anchor point', or the point the turtle 'orbits' around
  ;using the orbit commands, to the current turtle position

  pullout 80
  ;pull away 80 turtle units from the anchor point

  snappy:newworker [forever [orbitleft 0.1]]
  ;tell snappy the camera turtle to create a new routine or thread
  ;that forever orbits around the scene to its left one tenth of
  ;a degree at a time

  make "rotation 0
  ;define a container (variable) called 'rotation'
  ;and set it to 0. We're going to use it to keep track of the
  ;rotation of the rocket

  forever [
    inc "rotation
    ;same as make "rotation :rotation + 1
    ;there is also dec (decrement)

    setpremodel {"lt 90 "rollright :rotation % 360}
    ;curly braces indicate a 'softlist', a list that is evaluated
    ;at runtime. In this case, so that we can have a dynamic
    ;rotation value we pass to setpremodel

    ;% is shorthand for modulus

    orbitleft 1
    ;orbit the rocket one degree to the left

    wait 1
    ;wait one sixtieth of a second

  ]
END
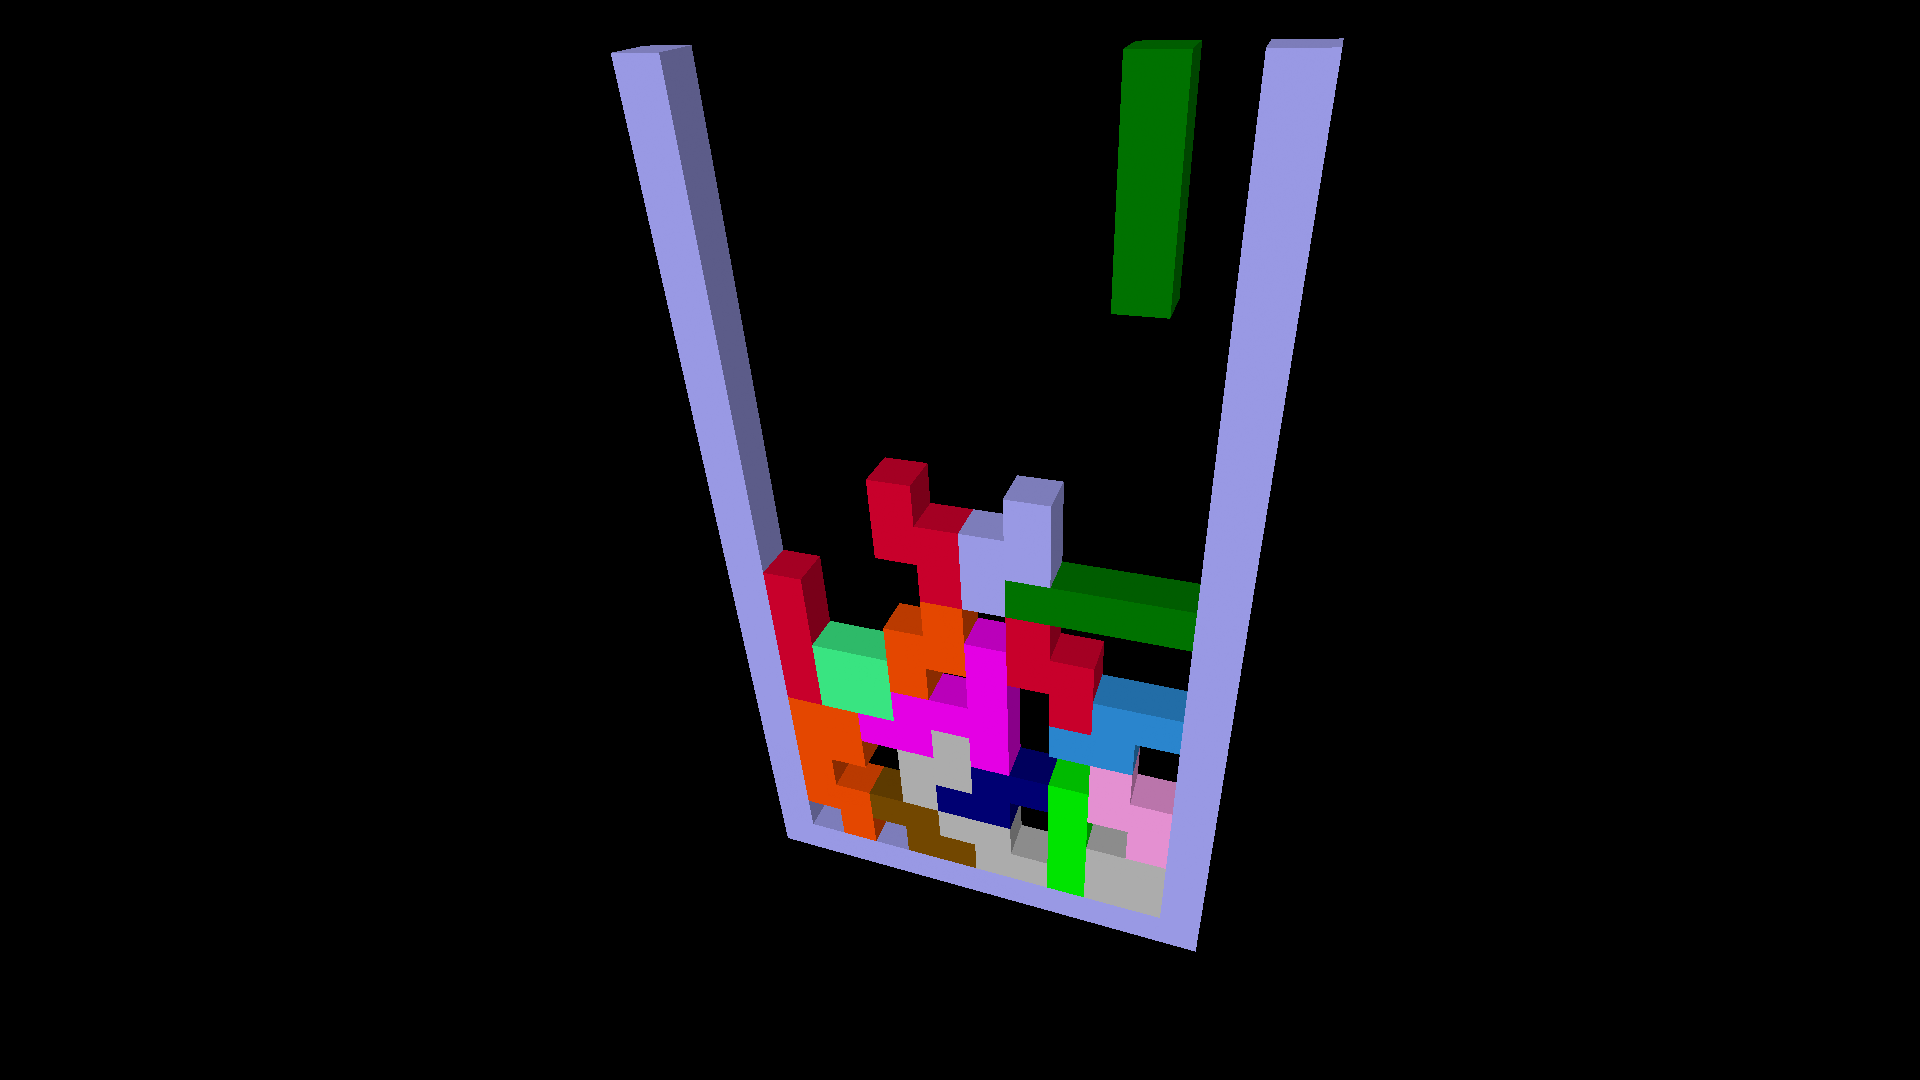
What do Steve Wozniak and George H.W. Bush have in common? They’ve both been seriously into Tetris! But who can blame them? The object of the game (as if you didn’t know) is to complete horizontal lines using falling shapes of various configurations. When you finish a line, it disappears, causing the rest of the blocks to fall down a line. However, if you stack up shapes to the point they overflow the top of the playfield: Game Over. When you finish a certain number of lines, the level ends… and in the next, the shapes fall faster, and you need to complete more lines! The insanity never ends.
In an era where games were becoming increasingly more complex, the simplicity of Tetris was seen as a breath of fresh air. Tetris would inspire a number of other “falling block puzzle games” such as Sega’s colour-matching Columns, and the three-dimensional Welltris. But Tetris would always remain king (tsar?) of the arcade puzzle game world, with sequels, clones and variations being released for virtually every console, computer, and operating system worldwide.
A little history
Alexey Pajitnov’s Tetris – early unauthorised versions of which, such as Spectrum Holobyte’s rendition described above, began appearing on home computers in 1987 – spawned a whole new generation of shape-based puzzle games.
Holobyte’s version took next year’s CES by a storm, and garnered the attention of the Soviet government, who held the rights to the game. They sold the arcade rights to Atari and the console rights to Nintendo.
Nintendo released Tetris on both its Nintendo Entertainment System and on the Game Boy, the latter as a pack-in with the portable console. The inclusion of Tetris arguably made the Game Boy a success –the game was perfect for smaller screen sizes, and was very addictive, spawning a whole generation of Tetris ‘junkies’.
Nintendo’s version of Tetris for the NES was criticised for not having a two-player mode; however, Atari Games, perhaps mistakenly believing their arcade licensing gave them the right to release a console version, came out with their own Nintendo Tetris game through their Tengen subsidiary (created after the consumer rights to the Atari name were sold to Jack Tramiel, see Point & Click) which featured head-to-head play.
Nintendo sued, and Tengen was eventually forced to withdraw its cartridge from sale, after selling around 100,000 copies. They are collectibles.
All right, so let’s take a look at the listing. The first thing you’ll notice is that it’s very monolithic, there’s only one procedure! That’s okay, though, in this context. While Logo is very versatile, sometimes aspects of that versatility such as the use of multiple procedures are unneeded.
In this example, we handle most of the structure using dountil and switch / case — dountil loops its contents until a condition is true, while switch takes a value from a container (variable) and then case compares the value it is given with the switch, and executes its list if that condition is true.
The game procedure begins with some basic initialization, such as creating the table we will use to note the finishing positions of the pieces, draws the border around the playfield and then proceeds into the main ‘run loop’, the dountil :gamover which loops until the gameover container is set to true.
Inside the dountil loop we choose the next Tetris piece to play, set a random fill color, set the starting position for the piece based on its characteristics (we don’t want it overlapping the edges or starting ‘over the top’) and ensure that the new piece doesn’t overlap an existing piece (if so, game over!)
If it doesn’t, we continue into the dountil :dropped loop, which runs until the piece has fully ‘dropped’ into its final position. We use a switch statement and case statements to run the logic relevant to the current piece. For readability I decided to make each orientation of a piece its own piece — while this means there are a lot more ‘pieces’ than if I had handled variants (rotations) using the same chunks of code, these are simpler to understand than they would have been had they had all of these conditionals in them dependent on the orientation of the piece.
Also, you can hand each orientation of a new piece off to a student to complete, which could make for an interesting group project. A number of pieces have not been implemented in this example, which could be implemented by your students, based off of the pieces that have been implemented.
Inside each piece subroutine we check for a keypress, then act if there was a keypress, checking to see if the action (moving left, right, or ‘rotating’ (switching to another orientation)) would collide with an existing piece or the edges before performing the action.
Then we draw the piece, and delay. There is a ‘drop key’ that sets the delay to zero for the remainder of the piece’s time in play. Then we see if we’ve ‘landed’ either on another piece or on the bottom, by checking the appropriate cells in the table. If so, we set the :dropped container to true, so that we will ‘drop out’ of the dountil loop, and we set our current piece’s occupied cells in the table. We only bother to set these when the piece has finished moving because there is no point in setting them while it’s dropping.
If we haven’t landed, we turn off rendering (so things don’t flicker) and ‘backtrack’ the necessary number of steps to ‘undo’ the drawing of the piece. Since turtleSpaces graphics are made out of 3D shapes, we can’t just erase a particular area, we have to erase or backtrack part of the turtle track — the list of objects the turtle has created.
You could also use tags to do the same thing, wrapping the piece in a tag, and then erasing the tag. turtleSpaces is versatile!
If the current piece has ‘dropped’ we then check to see if we’ve filled in any lines. To do this we sequentially run horizontally through each row in the table, checking each column, and adding to a counter each time a column has a value in it. If we count up to 10, we have a full row, and we erase it by copying the contents of all of the above rows down one row, clearing the top row when we are done. We add one to a score counter, and inform the user of their success.
The game then continues until the :gameover dountil condition is met, at which point it terminates.
TO game
  reset
  penup hideturtle

  ;create table to hold tetris piece placement information:
  newtable "board [10 21]

  ;draw playfield border:
  setpos [-60 -110]
  voxeloid 10 210 10
  voxeloid 120 10 10
  setpos [50 -110]
  voxeloid 10 210 10

  make "gameover false
  make "score 0

  dountil :gameover [

    ;pick random piece:
    make "piece pick [square hline vline hzed vzed hess vess]

    ;the logic is easier to implement if each orientation of a shape
    ;is its own piece. While this means implementing a lot of pieces
    ;to make a full Tetris game, it avoids cumbersome if statements

    ;TODO: tee0 tee90 tee180 tee270 -- T shapes
    ;TODO: jay0 jay90 jay180 jay270 -- J shapes
    ;TODO: elle0 elle90 elle180 elle270 -- L shapes
    ;MAYBE: crowbar corkscrew rightangle cshape?

    show :piece

    randomfillcolor

    ;choose random starting placement based on the piece.
    ;We need to make sure the piece is fully in the playfield
    ;and doesn't overlap any edges:

    if :piece = "square [make "y 1 make "x 1 + random 9]
    if :piece = "hline [make "y 0 make "x 1 + random 7]
    if :piece = "vline [make "y 3 make "x 1 + random 10]
    if :piece = "hzed [make "y 0 make "x 1 + random 8]
    if :piece = "vzed [make "y 2 make "x 1 + random 8]
    if :piece = "hess [make "y 1 make "x 1 + random 8]
    if :piece = "vess [make "y 2 make "x 2 + random 9]

    ;check if the area selected for the new piece is already
    ;occupied by another piece, if so then game over:

    if :piece = "square [
      if (or not emptyp cell "board {:x :y}
      not emptyp cell "board {:x + 1 :y}
      not emptyp cell "board {:x :y + 1}
      not emptyp cell "board {:x + 1 :y + 1}) [make "gameover true]]
    if :piece = "hline [
      if (or not emptyp cell "board {:x :y + 1}
      not emptyp cell "board {:x + 1 :y + 1}
      not emptyp cell "board {:x + 2 :y + 1}
      not emptyp cell "board {:x + 3 :y + 1}) [make "gameover true]]
    if :piece = "vline [
      if (or not emptyp cell "board {:x :y + 1}
      not emptyp cell "board {:x :y}
      not emptyp cell "board {:x :y - 1}
      not emptyp cell "board {:x :y - 2}) [make "gameover true]]
    if :piece = "hzed [
      if (or not emptyp cell "board {:x :y + 1}
      not emptyp cell "board {:x + 1 :y + 1}
      not emptyp cell "board {:x + 1 :y + 2}
      not emptyp cell "board {:x + 2 :y + 2}) [make "gameover true]]
    if :piece = "vzed [
      if (or not emptyp cell "board {:x :y + 1}
      not emptyp cell "board {:x :y}
      not emptyp cell "board {:x + 1 :y}
      not emptyp cell "board {:x + 1 :y - 1}) [make "gameover true]]
    if :piece = "hess [
      if (or not emptyp cell "board {:x :y + 1}
      not emptyp cell "board {:x + 1 :y + 1}
      not emptyp cell "board {:x + 1 :y}
      not emptyp cell "board {:x + 2 :y}) [make "gameover true]]
    if :piece = "vess [
      if (or not emptyp cell "board {:x :y + 1}
      not emptyp cell "board {:x :y}
      not emptyp cell "board {:x - 1 :y}
      not emptyp cell "board {:x - 1 :y - 1}) [make "gameover true]]

    make "dropped false
    ;boolean to indicate the piece has 'landed'
    make "speed 10
    ;the speed at which the pieces 'fall'

    dountil :dropped [
      ;repeat the following until :dropped is true

      switch "piece
      ;based on the value of the "piece container, execute one
      ;of the following case statements:

      case "square [

        make "y :y + 1
        ;increment "y

        if keyp [
          make "key readchar
          if :key = "j [
            if :x > 1 [
              if (and emptyp cell "board {:x - 1 :y}
              emptyp cell "board {:x - 1 :y - 1}) [dec "x]]]
          if :key = "k [
            if :x < 9 [ if (and emptyp cell "board {:x + 2 :y} emptyp cell "board {:x + 2 :y - 1}) [inc "x]]] if :key = "m [make "speed 0] clearchar ] ;we check to see if a key has been pressed, and ;if it has, then we see if it's one of the keys ;we respond to, and then we respond to them IF ;moving the piece will not collide with already ;existing pieces. m sets the speed to 0 and causes ;it to drop as quickly as possible ;clearchar clears the keyboard buffer sety 100 - :y * 10 setx -60 + :x * 10 voxeloid 20 20 10 ;sets the turtle's position and draws the shape if :speed > 0 [trackrender]
        ;don't render if the shape is 'dropping'
        ;(eg we pressed the m key)

        wait :speed
        ;delay in 60ths of a second, so 10 is 1/6th of a second

        ;check to see if we've landed on another piece,
        ;or hit the bottom, and then enter the piece position
        ;into the table:
        if (or :y = 20
        not emptyp cell "board {:x :y + 1}
        not emptyp cell "board {:x + 1 :y + 1}) [
          setcell "board {:x :y} fc
          setcell "board {:x + 1 :y} fc
          setcell "board {:x :y - 1} fc
          setcell "board {:x + 1 :y - 1} fc
          make "dropped true
          ;set dropped to true so we continue to the
          ;line check routine
        ]

        ;if we haven't 'landed' then turn off rendering,
        ;and 'undo' the drawing of the piece in preparation
        ;for the next move:
        else [notrackrender backtrack]

      ]
      ;that's it for this piece, on to the next!
      ;As the pieces get more complex, so does the logic
      ;needed to position and move them

      case "hline [

        make "y :y + 1
        if keyp [
          make "key readchar
          if :key = "j [
            if :x > 1 [
              if emptyp cell "board {:x - 1 :y} [dec "x]]]
          if :key = "k [
            if :x < 7 [ if emptyp cell "board {:x + 4 :y} [inc "x]]] if :key = "i [ if :y > 3 [make "piece "vline]]
          if :key = "m [make "speed 0]
          clearchar
        ]

        sety 100 - :y * 10 setx -60 + :x * 10
        voxeloid 40 10 10
        if :speed > 0 [trackrender]
        wait :speed

        if (or :y = 20
        not emptyp cell "board {:x :y + 1}
        not emptyp cell "board {:x + 1 :y + 1}
        not emptyp cell "board {:x + 2 :y + 1}
        not emptyp cell "board {:x + 3 :y + 1}) [
          setcell "board {:x :y} fc
          setcell "board {:x + 1 :y} fc
          setcell "board {:x + 2 :y} fc
          setcell "board {:x + 3 :y} fc
          make "dropped true
        ]
        else [notrackrender bt]
      ]


      case "vline [

        make "y :y + 1
        if keyp [
          make "key readchar
          if :key = "j [
            if :x > 1 [
              if (and emptyp cell "board {:x - 1 :y}
              emptyp cell "board {:x - 1 :y - 1}
              emptyp cell "board {:x - 1 :y - 2}
              emptyp cell "board {:x - 1 :y - 3}) [dec "x]]]
          if :key = "k [
            if :x < 10 [
              if (and emptyp cell "board {:x + 1 :y}
              emptyp cell "board {:x + 1 :y - 1}
              emptyp cell "board {:x + 1 :y - 2}
              emptyp cell "board {:x + 1 :y - 3}) [inc "x]]]
          if :key = "i [
            if :x < 8 [ if (and emptyp cell "board {:x + 1 :y + 1} emptyp cell "board {:x + 2 :y + 1} emptyp cell "board {:x + 3 :y + 1}) [make "piece "hline]]] if :key = "m [make "speed 0] clearchar ] sety 100 - :y * 10 setx -60 + :x * 10 voxeloid 10 40 10 if :speed > 0 [trackrender]
        wait :speed

        if (or :y = 20 not emptyp cell "board {:x :y + 1}) [
          setcell "board {:x :y} fc
          setcell "board {:x :y - 1} fc
          setcell "board {:x :y - 2} fc
          setcell "board {:x :y - 3} fc
          make "dropped true
        ]
        else [notrackrender bt]
      ]


      case "hzed [

        make "y :y + 1
        if keyp [
          make "key readchar
          if :key = "j [
            if :x > 1 [
              if (and emptyp cell "board {:x - 1 :y}
              emptyp cell "board {:x :y + 1}) [dec "x]]]
          if :key = "k [
            if :x < 8 [if (and emptyp cell "board {:x + 2 :y} emptyp cell "board {:x + 3 :y + 1}) [inc "x]]] if :key = "i [if :x > 1 [if (and
              emptyp cell "board {:x + 1 :y}
              emptyp cell "board {:x + 1 :y - 1})
              [make "piece "vzed]]]
          if :key = "m [make "speed 0]
          clearchar
        ]

        sety 100 - :y * 10 setx -60 + :x * 10
        voxeloid 20 10 10 bk 10 sr 10 voxeloid 20 10 10
        if :speed > 0 [trackrender]
        wait :speed

        if (or :y = 19 not emptyp cell "board {:x :y + 1}
        not emptyp cell "board {:x + 1 :y + 2}
        not emptyp cell "board {:x + 2 :y + 2}) [
          setcell "board {:x :y} fc
          setcell "board {:x + 1 :y} fc
          setcell "board {:x + 1 :y + 1} fc
          setcell "board {:x + 2 :y + 1} fc
          make "dropped true
        ]
        else [notrackrender repeat 4 [bt]]
      ]


      case "vzed [

        make "y :y + 1
        if keyp [
          make "key readchar
          if :key = "j [
            if :x > 1 [
              if (and emptyp cell "board {:x - 1 :y}
              emptyp cell "board {:x - 1 :y - 1}
              emptyp cell "board {:x :y - 2}) [dec "x]]]
          if :key = "k [
            if :x < 9 [ if (and emptyp cell "board {:x + 1 :y} emptyp cell "board {:x + 2 :y - 1} emptyp cell "board {:x + 2 :y - 2}) [inc "x]]] if :key = "i [ if (and :y > 2 :x < 9 :y < 19) [ if (and emptyp cell "board {:x + 1 :y + 1} emptyp cell "board {:x + 2 :y + 2} emptyp cell "board {:x + 3 :y + 2}) [ make "piece "hzed]]] if :key = "m [make "speed 0] clearchar ] sety 100 - :y * 10 setx -60 + :x * 10 voxeloid 10 20 10 fd 10 sr 10 voxeloid 10 20 10 if :speed > 0 [trackrender]
        wait :speed

        if (or :y = 20
        not emptyp cell "board {:x :y + 1}
        not emptyp cell "board {:x + 1 :y}) [
          setcell "board {:x :y} fc
          setcell "board {:x :y - 1} fc
          setcell "board {:x + 1 :y - 1} fc
          setcell "board {:x + 1 :y - 2} fc
          make "dropped true
        ]
        else [notrackrender repeat 4 [bt]]
      ]


      case "hess [

        make "y :y + 1
        if keyp [
          make "key readchar
          if :key = "j [
            if :x > 1 [
              if (and emptyp cell "board {:x - 1 :y}
              emptyp cell "board {:x :y - 1}) [dec "x]]]
          if :key = "k [
            if :x < 8 [ if (and emptyp cell "board {:x + 2 :y} emptyp cell "board {:x + 3 :y - 1}) [inc "x]]] if :key = "i [ if (and :y > 2 :x > 1) [
              if (and emptyp cell "board {:x :y}
              emptyp cell "board {:x - 1 :y}
              emptyp cell "board {:x - 1 :y - 1}) [
                make "piece "vess]]]
          if :key = "m [make "speed 0]
          clearchar
        ]

        sety 100 - :y * 10 setx -60 + :x * 10
        voxeloid 20 10 10 fd 10 sr 10 voxeloid 20 10 10
        if :speed > 0 [trackrender]
        wait :speed

        if (or :y = 20
        not emptyp cell "board {:x :y + 1}
        not emptyp cell "board {:x + 1 :y + 1}
        not emptyp cell "board {:x + 2 :y}) [
          setcell "board {:x :y} fc
          setcell "board {:x + 1 :y} fc
          setcell "board {:x + 1 :y - 1} fc
          setcell "board {:x + 2 :y - 1} fc
          make "dropped true
        ]
        else [notrackrender repeat 4 [bt]]
      ]


      case "vess [

        make "y :y + 1
        if keyp [
          make "key readchar
          if :key = "j [
            if :x > 2 [
              if (and emptyp cell "board {:x - 1 :y}
              emptyp cell "board {:x - 2 :y - 1}
              emptyp cell "board {:x - 2 :y - 2}) [dec "x]]]
          if :key = "k [
            if :x < 10 [ if (and emptyp cell "board {:x + 1 :y} emptyp cell "board {:x + 1 :y - 1} emptyp cell "board {:x :y - 2}) [inc "x]]] if :key = "i [ if (and :y > 2 :x < 9 not :y = 20) [ if (and emptyp cell "board {:x + 1 :y + 1} emptyp cell "board {:x + 2 :y - 1}) [ make "piece "hess]]] if :key = "m [make "speed 0] clearchar ] sety 100 - :y * 10 setx -60 + :x * 10 voxeloid 10 20 10 fd 10 sl 10 voxeloid 10 20 10 if :speed > 0 [trackrender]
        wait :speed

        if (or :y = 20
        not emptyp cell "board {:x :y + 1}
        not emptyp cell "board {:x - 1 :y}) [
          setcell "board {:x :y} fc
          setcell "board {:x :y - 1} fc
          setcell "board {:x - 1 :y - 1} fc
          setcell "board {:x - 1 :y - 2} fc
          make "dropped true
        ]
        else [notrackrender repeat 4 [bt]]
      ]

    ]

    ;if the game is over, don't bother checking for lines:
    if :gameover [go "gameover]

    ;the following code checks to see if we've made any lines:
    trackrender
    ;turns on rendering the turtle track

    ;we're going to check every column of every row. Every time
    ;we get a 'hit' checking a column, we add up a counter, called
    ;"count. If :count hits 10, then we've made a line:

    repeat 20 [
      make "count 0
      repeat 10 [
        if not emptyp cell "board {repcount repabove 1} [inc "count]
      ]
      ;repabove 1 returns the loop value of the repeat loop above
      ;the current repeat loop. repabove 2 returns the loop count
      ;above that, and so on

      ;if we've made a line, we need to shuffle every line above
      ;it down one, in order to remove it:

      if :count = 10 [
        inc "score
        (print "Score: :score)
        ;increase the player's score by one and display the score

        repeat repcount - 1 [
          repeat 10 [
            (setcell "board {repcount (repabove 2) - (repabove 1) + 1}
            cell "board {repcount (repabove 2) - (repabove 1)})
          ]
        ]

        ;we need to remember to clear the line at the top:
        repeat 10 [setcell "board {repcount 1} empty]

        ;now we need to redraw the playfield to match the table:

        notrackrender
        cs
        setfc 7
        setpos [-60 -110]
        voxeloid 10 210 10
        voxeloid 120 10 10
        setpos [50 -110]
        voxeloid 10 210 10
        ;draw the border

        ;we iterate through the table and if there's a color
        ;recorded in the specific cell, we create a matching
        ;voxel:

        repeat 20 [
          repeat 10 [
            setx -60 + 10 * repcount
            sety 100 - 10 * repabove 1
            if not emptyp cell "board {repcount repabove 1} [
              setfc cell "board {repcount repabove 1} voxel 10]
          ]
        ]

        trackrender

      ]
    ]

    label "gameover

  ]
  ;game over, man... game over!

  print |Game Over!|

END
Check out this simple space invaders clone, featuring 3D UFO’s and UFO and player movement. This runs well on both the application and in the web version using modest hardware.
Rather than using hatchlings each with its own thread (worker), Invasion creates 15 static turtles representing each UFO, then iterates through moving them using the main (Myrtle) worker, more like a conventional single-threaded application would.
One procedure is used to generate randomly-colored UFO models, which are then assigned to each UFO turtle. The UFO turtles move in a 3D pattern created by ‘rolling’ them (rotating them on the Z axis), moving them left or right using slideleft and slideright, and raising and lowering them (using raise and lower) – a great exploration of 3D movement in turtleSpaces.
The code is commented and follows below. It’s also available inside the WebIDE under the menu FIle -> Browse Published…
NEWTURTLE "myrtle

TO game
  ;invasion is a simple space invaders clone with a 3D twist

  reset
  release
  ;reset the workspace and release the non-standard turtles (ufos)

  stars:drawstars
  ;draw a starfield using the stars turtle

  nokeyclick
  ;don't click keys

  noaudiowait
  ;don't pause on audio playback

  snappy:newworker [
    pullout 100
    forever [
      repeat 45 [orbitleft 1 wait 5]
      repeat 90 [orbitright 1 wait 5]
      repeat 45 [orbitleft 1 wait 5]
      repeat 45 [orbitup 1 wait 5]
      repeat 90 [orbitdown 1 wait 5]
      repeat 45 [orbitup 1 wait 5]
    ]
  ]
  ;create a new 'worker' to move the camera around the scene
  ;independently of other activity

  make "fleet []
  share "fleet
  ;the fleet container holds the list of UFO turtle names
  ;it needs to be shared so all the UFO turtles can edit it

  make "score 0
  share "score
  ;the score cotnainer holds the score, the number of UFOs destroyed
  ;the UFOs themselves increment the score, and so it must be shared

  repeat 3 [
    repeat 5 [
      newtu word repcount repabove 1
      ;create a new turtle with the name column + row
      ;note: newtu is NOT the same as newturtle, newturtle is a
      ;declaration used in the workspace file (this), while newtu
      ;creates a new turtle during execution and selects it
      ;(we should change its name to instatiate?)

      noaudiowait

      makemodel
      ;create its UFO model

      queue turtle "fleet
      ;add the turtle name to the fleet container

      make "shootcount 0
      ;reset its shootcounter to 0

      penup
      ;don't draw anything!

      setposition {-225 + repcount * 75 -25 + (repabove 1) * 50}
      ;set its position based on its row and column number
      ;curly braces indicate a 'soft list', a list that is evaluated
      ;at runtime. repabove gets the loop count of the repeat enclosing
      ;the current repeat

      showturtle
      ;show the UFO
    ]
  ]
  ;create three rows of 5 UFOs each

  setturtle myrtle
  ;reselect myrtle

  setmodel "spaceship
  ;change myrtle's model to the built-in spaceship model

  setmodelscale 2
  ;set the model's scale (size) to a factor of 2

  penup back 150
  ;position Myrtle

  newworker [
    forever [
      movefleet
      ;run the movefleet procedure

      toot 200 + random 1000 2
      ;make a random beep

      wait 10
    ]
  ]
  ;create a new 'worker' to move the UFOs 'forever'

  make "delay 0
  ;stores the delay between player shots

  forever [
    if :delay > 0 [dec "delay]
    ;decrease the delay value by one, if it is above zero

    if keyp [
      ;if a key has been pressed:

      make "key uppercase readchar
      ;store the uppercase value of the key in the key container

      switch "key
      ;use the value of the key value for the following case comparisons:

      case "J [repeat 10 [repeat 10 [sl .1]]]
      case "K [repeat 10 [repeat 10 [sr .1]]]
      case "I [repeat 10 [repeat 10 [ra .1]]]
      case "M [repeat 10 [repeat 10 [lo .1]]]
      ;move Myrtle as required

      case "A [
        ;should I shoot?
        if :delay = 0 [
          ;yes, I should shoot!

          ;we're going to 'hatch' a missile BUT if we just
          ;do that, our detection routine will think we've been shot.
          ;to work around this, we're going to stop rendering our
          ;spaceship while we launch our missile from a position
          ;slghtly forward of our current position.

          notrackrender
          ;don't render this turtle's graphics

          forward 31
          updatestate
          ;update the state of the turtle. This is usually done while
          ;rendering, so we need to do this manually while rendering is
          ;off

          hatch [
            showturtle
            repeat 300 [fd 1]
          ]
          ;hatch our 'missile', which goes forward 300 steps and then 'dies'

          back 31
          ;move back to where we were before

          trackrender
          ;turn track rendering back on

          playsound "pew
          ;play a 'pew' sound

          make "delay 20
          ;set the delay container to 20, which causes us to have to wait
          ;before firing again
        ]
      ]
    ]

    if nearp 30 [
      ;check to see if we've been hit. If we have:

      playsound "explosion
      hideturtle
      print |Boom! Game over!|
      repeat 50 [
        randomfillcolor
        icosphere repcount
        wait 1
      ]
      ;explosion animation

      clean finish
      ;finish stops all execution
    ]

    wait 1
    ;wait 1/60ths of a second between loops
  ]
  ;do it again

END

TO movefleet
  ;this procedure moves the UFOs

  if :fleet = emptylist [
    ;if there are no UFOs left:
    print |Great work!|
    playsound "applause
    wait 120
    finish
  ]

  foreach "ufo :fleet [
    ;for each of the UFOs remaining:

    setturtle :ufo
    ;select the ufo turtle

    rollright 10
    ;roll right 10 degrees

    if 1 = last :ufo [slideright 5]
    if 1 = first :ufo [lower 5]
    if 2 = last :ufo [slideleft 5]
    if 2 = first :ufo [raise 5]
    if 3 = last :ufo [slideright 5]
    if 3 = first :ufo [lower 5]
    ;do a merry dance

    if :shootcount > 0 [dec "shootcount]
    if and 1 = random 20 :shootcount = 0 [
      make "shootcount 20
      hatch [
        right 180 showturtle
        repeat 300 [fd 1 rr 1]
      ]
    ]
    ;fire!

    foreach "i near position 50 [
      if "m = second :i [ht
        newworker [repeat 50 [ico repcount wait 1] clean]
        ;boom

        make "fleet without turtle :fleet
        ;remove ufo turtle from fleet list

        inc "score (print |Score:| :score)
        ;increase the score and tell the user

        playsound "explosion
        ;play an 'explosion' sound

        myrtle:try [halt hatchlingworker :i] []
        ;stop the missle that shot me (if it still exists)

      ]
    ]
    ;you got me!
  ]

  tu myrtle
  ;reselect Myrtle
END

NEWTURTLE "snappy


NEWTURTLE "libby

TO makemodel
  ;make the UFO model for the calling turtle

  begintag turtle
  makeufo
  endtag
  newmodel word "ufo turtle turtle

  clearscreen
  ;this applies only to the calling turtle

  setmodel word "ufo turtle
END

TO makeufo
  ;create the UFO itself

  penup
  randomfillcolor

  make "sides 3 + random 6
  down 90
  rollright 180

  torus 10 25 3 :sides
  ;make the outer ring

  switch {fc}
  case 1 [setfc 9]
  case 2 [setfc 7]
  case 3 [setfc 11]
  case 4 [setfc 12]
  case 5 [setfc 10]
  case 6 [setfc 2]
  case 7 [setfc 6]
  case 8 [setfc 13]
  case 9 [setfc 1]
  case 10 [setfc 15]
  case 11 [setfc 3]
  case 12 [setfc 14]
  case 13 [setfc 8]
  case 14 [setfc 12]
  case 15 [setfc 5]
  ; select a complementary fill color

  dome 25 3 :sides
  ;make the top dome

  polyspot 25 :sides
  ;make the bottom spot

END

NEWTURTLE "stars

TO drawstars
  ;draw the starfield
  penup

  repeat 100 [
    ;do 100 times:
    home
    ;go home

    randomvectors
    ;pick a random vector orientation

    forward 1000 + random 1000
    up 90
    randomfillcolor
    spot 5 + random 10
    ;create a randomly colored 'star'
  ]

END
This simple yet attention-grabbing Logo procedure is a real visual treat, creating random three-dimensional ‘flowers’ based on the sine function. This could spice up a math class or just provide a brief introduction to sine waves in general.
The procedure makes use of the move primitive, which allows the turtle to move based on an arbitrary number of degrees away from its current heading, on the X and Y planes. When combined with the sine function, it produces these interesting ‘natural’ 3D designs.
Live model view – click and drag to rotate
TO randomflower
  clearscreen randompencolor
  ;clear the screen and select a random
  ;pen color

  dountil and 200 < abs (:x - :y) 200 < abs (:y - :x) [
    make "x random 2000 make "y random 2000
  ]
  ;set :x and :y containers to a random value between 0 and 2000
  ;BUT make sure they aren't within 200 of each other.
  ;The results in that range aren't aesthetically pleasing.

  repeat 3600 [
    ;we move down a tenth of a degree each iteration, so to form
    ;a complete 'circle' we need 3600 repetitions.

    move 0.5 {:x * sin repcount :y * sin repcount}
    ;the move primitive takes a number of turtle steps as its
    ;first argument, and then either a single degree value (X)
    ;or a list of two values (X and Y), which turn the turtle
    ;the specified number of degrees on each plane.

    ;In the case of this example, we're passing a multiple of
    ;:x and :y based on the sine of the current interation
    ;(repcount). This produces the 'flower' effect.

    down 0.1
  ]
END
You could put a wait into the loop so that students can see the process a bit more clearly.
Don’t forget that you can click and drag the view to orbit around the model, click with both buttons and drag to ‘pan’ the orbit point, and use the mouse wheel (or right-click and drag up and down) to zoom in and out.
Children can pick their favourites and share them with the class!
This is the flower listing as seen in the turtleSpaces application editor
PS Adding the following two lines into the repeat 3600 loop can add a little ‘pizzaz’ in the form of frags, ‘fragments’ (think of a broken mirror) or triangles made of three arbitrary points. The frag primitive creates a triangle from the last three points the turtle has stopped at, while pin and pinfrag drop ‘pins’ at points you choose and generate triangles from the last three of those pin points respectively. When combined with the sine flower procedure they add a bit of ornamentation. Just remember to setfillcolor!
    if 0 = remainder repcount 10 [pin]
    if 0 = remainder repcount 30 [pinfrag]
Thanks for reading! Please let us know how you go at integrating turtleSpaces into your classroom’s studies. E-mail us at help@turtlespaces.org
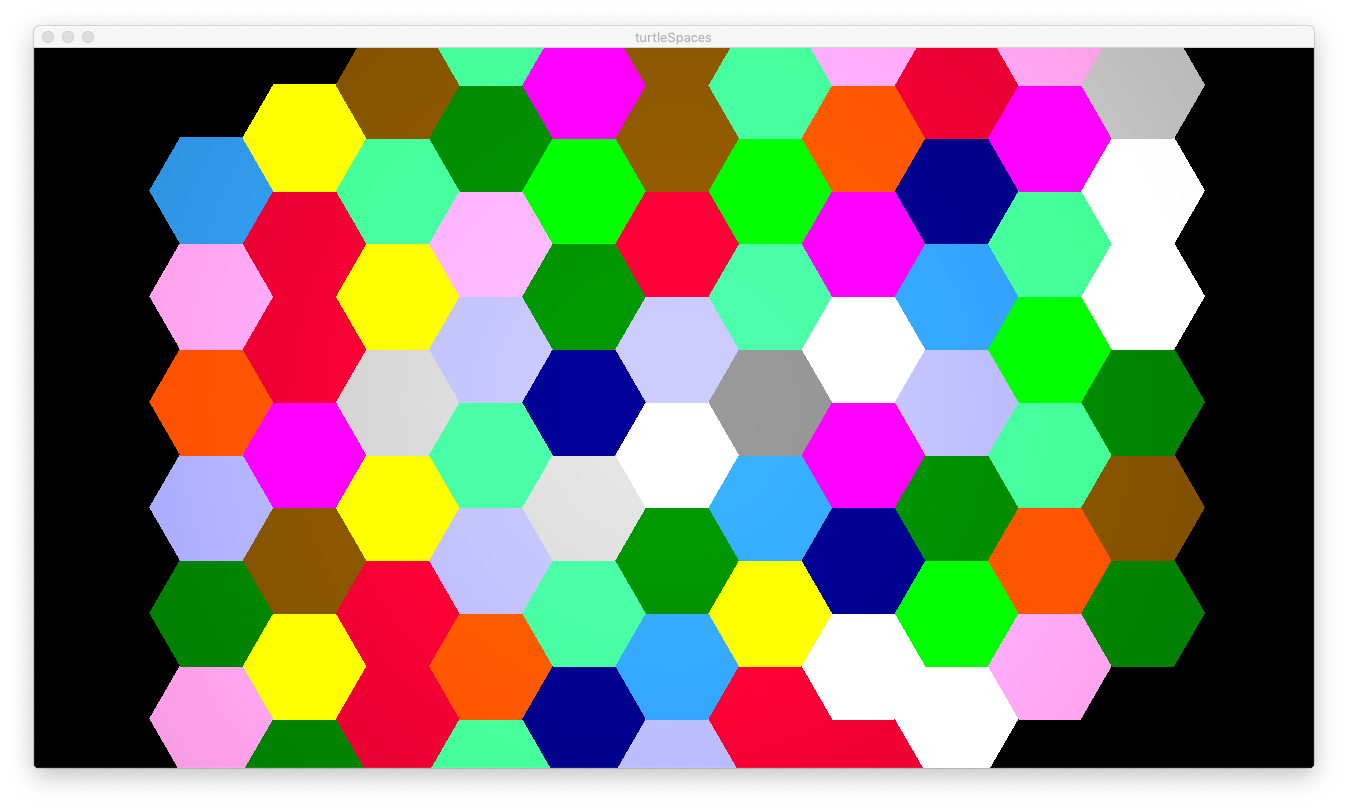
Here is a simple Logo project to get started with. It creates a colorful filled hexagon pattern using the polyspot primitive.
The hexagon pattern zoomed out
TO hex

  clearscreen penup
  ;not drawing lines

  repeat 10 [
    ;do all of the following ten times

    setpos [-149 -270]
    ;sets the 2D turtle position (on the current Z plane)
    ;you can use setposition to set all three co-ordinates

    forward repcount * 34
    ;positions the turtle to start the line
    ;you could use some math with setpos to accomplish this

    randomfillcolor
    ;choose a random fill color

    polyspot 20 6
    ;make a filled polygon of size 20, with 6 sides

    repeat 10 [
      ;make ten more polygons

      slideright 30
      forward 17
      randfc
      ;randfc is the short form of randomfillcolor

      polyspot 20 6]
    ;return to the start of the loop
  ]
  ;finished
END
A turtleSpaces (app) screenshot of the editor
The hexagon pattern viewed from a different 3D angle
When I was a young child, one of my best friends was a turtle.
Not a real turtle, although that would have been fun, but a virtual one. My turtle lived inside of an Apple II, an early 8-bit computer, at my elementary school.
When I first met her, my turtle, she didn’t do much. She just sat there. It didn’t take long for me to realize that in order to get her to do something, I would need to prompt her. To do this, there was a literal prompt on the screen, beckoning me to type something.
?
And so I typed FORWARD, thinking that this should, obviously, move the turtle forward.
NOT ENOUGH INPUTS TO FORWARD
Undeterred, I revised my input to FORWARD 10, just picking an arbitrary number. Although I was only six years old, I deduced that FORWARD needed a quantity, quantities were numbers and well, ten was a good start.
And hooray, the turtle moved! I was in love with my turtle from that moment on. I learned that she could also move BACK, and turn LEFT and RIGHT. I didn’t know what degrees were when I first met my turtle, but by the time I finished our first session together, I did!
Seymour Papert in 1971
That afternoon in 1981, I had learned some of a programming language called Logo. The father of Logo was a mathematician and philosopher named Seymour Papert. Interested in learning how to improve mathematics education in young children, in the early 1960s, he had studied under Jean Piaget, a Swiss psychologist who championed a philosophy of learning known as constructivism.
When children are given new information, for example, that a full turn is made up of 360 degrees, they are likely to only accept that information if they already have the underlying understanding required, such as that a turn can be divided in half, quarters and so on, down to 360ths. Or even the concept of a number as high as 360 can exist in the first place.
Otherwise, they are likely to either misinterpret the new information to fit their current understanding (“I only understand numbers as high as 100, and so they must mean 100”) or will simply ignore it, with a silent internal ‘syntax error’.
This can improve if a) the teacher explains numbers up to 360, b) the teacher explains division and then finally c) the teacher explains that when you spin around, you are making a circle (hold out your arm! The point of your finger draws a circle when you spin) and if you spin around halfway, you’re moving 180 degrees and so on.
This may still not be enough. If the child fails to understand a, b and / or c, they still won’t understand it.
However, if the child is able to actively explore these concepts in an environment that has some measure of feedback, the likelihood of their gaining understanding improves. For example, if the teacher suggests they turn randomly, and the teacher tells them how far they have turned each time they do it, they will soon learn that if they turn halfway, they have turned 180 degrees. They will learn that a full turn is 360 degrees. They will understand that the next number after 100 is 101, and hence the next number after 200 is 201. And so on.
This is what Papert learned under Piaget. But obviously, while desirable it’s not practical for each child to have an adult giving them feedback on everything they do until they understand it. The world just doesn’t (and probably will never have) a 1:1 student to teacher ratio. This was a problem Piaget and Papert simply couldn’t surmount.
But in the early 1960s, a new technology was emerging, one that Papert realized could remove his roadblock – the computer.
Computers did not tire, they did not lose patience. Although at that time large and small in number, it was not hard for Papert to see the future, a future where schools were full of terminals connected to computers, one for each child, with which the students could explore ‘mathland’, a simple environment where mathematical concepts could be demonstrated through trial and error. The more input students provided, and the more output they absorbed, the sooner they would grasp concepts. Computers seemed a perfect fit for the task of educating children using constructivist principles.
In 1961, Papert had met an American, Marvin Minsky, at a conference in England. They presented papers that were surprisingly similar, and connected as a result. So, powered by his idea of using computers to teach children, in 1964, Papert went to the US, and joined Minskey’s Artificial Intelligence Group, a team of researchers at the Massachusetts Institute of Technology (MIT).
Papert was impressed with the technology-centric culture at MIT, and attitude that everyone had the potential to learn anything they wanted to, a position Papert shared. The students under Minsky and Papert had free rein to work on whatever they wanted, encouraging experimentation and the practical testing of even the most wild theories. Papert saw how his students, when encouraged, would learn great amounts of knowledge on their own, and collaborate with others to get past roadblocks they encountered in their pursuits. At MIT these students were known as ‘hackers’.
One of these hackers, Daniel Bobrow, graduated and got a job at a research and development (R&D) firm called Bolt, Beranek and Newman. In the mid-1960s they had started exploring computer technologies, and their potential. Bobrow became head of their new Artificial Intelligence group. There, he met Wally Feurzeig, who was leading BBN’s education group. The space race had encouraged the US government to find ways of improving math education in schools, and BBN was hoping to find a solution. They had already developed ‘time-sharing’ technology which allowed a mainframe computer to be used by many people at the same time, they just needed software to run on it that children could use to learn.
Bobrow brought in Papert and introduced him to Feurzeig, and the three discussed the idea of developing a computing language for children, Papert’s Mathland. Around that time, BBN had a visitor who demonstrated a new programming language called BASIC. Rather than using memory addresses, BASIC used line numbers to track execution, and named variables that transparently linked to memory addresses. These abstractions made it much easier for non-computer scientists to create computer programs.
BBN’s researchers created a version of BASIC they called Telcomp, which Feurzeig modified to include strings, and called Stringcomp. BBN trialed Stringcomp (using teletypes, typewriters connected to a remote computer) in eight elementary and junior high-school classrooms in 1966. That year, Minsky’s assistant at MIT, Cynthia Solomon, joined Feurzeig’s team at MIT.
Seymour Papert at Muzzey Junior High School in 1966
After Papert visited these classrooms and saw the interaction between children and Stringcomp, he became convinced that BASIC was not the answer, and that a new language would need to be written, one more suited to learning.
Importantly, the new language would need to more adequately demonstrate how the computer came to its conclusions. Papert felt that due to computers’ requirements for literal instruction, children would be able to see how the computer ‘thought’ and realize that was how they themselves also thought, helping them break down problems into smaller elements the way a computer would when it solved them. Thus, the new language would serve a dual purpose, both teaching mathematics, and how mathematics are solved.
BASIC was too monolithic in its command-based structure, and those ‘smaller parts’ could not be shown to its users, happening behind the scenes and out of sight.
And so, the new language would both need to be able to accomplish what one could accomplish in BASIC, while doing so using smaller steps that could be inspected by novice programmers. But to avoid needless and redundant repetition of code, these steps would need to be able to be reused. Because of the philosophy behind it, Wally Feurzeig christened the new language ‘Logo’, derived from Logos, the greek word for ‘thought’.
Minsky, Papert and Solomon had a number of discussions about how Logo would work. Solomon had learned some of the Lisp programming language (a language where all code and data are written in the form of expressions and lists, the name Lisp short for LISt Processing) while Minsky’s assistant, and she appreciated its power for manipulating English language strings, which she recognized could be used as a method by which students could observe the effects of computer code on recognizable data, or data that they created themselves.
It also probably didn’t hurt that Lisp had been invented by the same BBN employee (and MIT alumnus) that had developed its time-sharing system. And so, it was decided that the new language would be a variant of Lisp.
However, Lisp had some drawbacks in terms of its use with younger coders. It had an extreme reliance on structure, using an intricate array of parentheses which often led to errors that were hard to resolve (leading to nicknames Lost in Stupid Brackets and Lots of Irritating Superfluous Parentheses). Its interpreter was also bulky, and not interactive, like BASIC.
In designing Logo, Papert, Minsky and Solomon took the expression, list and string elements of Lisp, removing much of the need for brackets by making assumptions about syntax parsing and inputs, and later allowing for the ‘stacking’ of what they called ‘primitives’ (functions which may or may not resolve to a value) on a single line, such that you could type:
PRINT SUM 4 4
and the computer would output 8, or:
TYPE 1 TYPE 2 TYPE 3
and the computer would output 123.
Lists allowed for the string manipulation Solomon had been hoping for:
(PRINT PICK [RED GREEN BLUE] PICK [DOG CAT BOAT])
BLUE BOAT
RED DOG
GREEN CAT
etc.
Logo was a lot more BASIC-like in its syntax and usage, while allowing for many features BASIC did not, such as the ability to create ‘procedures’, lists of primitives that could be named, and executed just like any other primitive, such as:
TO BOX

   REPEAT 4 [
      FORWARD 10
      RIGHT 90
   ]

END
which could be executed simply by typing:
BOX
but even better:
TO POLY :SIDES :SIZE

   REPEAT :SIDES [
      FORWARD :SIZE
      RIGHT 360 / :SIDES
   ]

END
the colon indicating a variable or container for storing a value.
POLY 4 10
would re-create our box, but the user could provide any desired values, like SUM. This satisfied Papert’s need to have both the ability to demonstrate computer problem-solving in smaller chunks, while also allowing for the reuse of code. Students could create the BOX or POLY procedures themselves, then use them in other procedures. A picture would form in their minds of the hierarchy of execution, and they would understand better how the computer, and they themselves, thought.
Except that we are getting ahead of ourselves with BOX and POLY, because in the beginning Logo did not have a turtle! When Logo was initially trialled in a seventh-grade classroom (in 1968 at Muzzey Junior High School in Lexington, Massachusetts), students were using the same teletypes the Stringcomp trial had used, and they used Logo to manipulate lists and strings rather than a turtle. Which worked quite well to engage students who were strong in English, but failed to engage those who were not.
Cynthia Solomon (left) and Seymour Papert (right) at Muzzey Junior High in 1966
Also, on the teletype math was still just numbers, regardless of the more elegant way Logo could break down mathematical equations. Kids who didn’t ‘get’ numbers still didn’t get numbers! Papert craved some sort of graphical representation, but the technology at the time strongly precluded that. And so, towards the end of the trial, he had the idea of creating a physical robot, one that could move about on the floor, and draw out graphical representations of mathematic output.
Papert and Solomon left BBN and headed back to MIT, where they formed the Logo Group. In England, two robots had been developed that could wander about a space, their inventor dubbing them ‘tortoises’. The Logo Group developed their own robots, calling them turtles. Having access to expensive display hardware, they also developed a virtual turtle, one that lived on the computer screen.
They added primitives to Logo to control the turtle: FORWARD, BACK LEFT, RIGHT. And they discovered that Papert had been right – children took to the turtle, the turtle allowing Logo users to have a perspective inside the computer, that of the turtle, rather than depending on an understanding of abstract concepts of code paths or numbers. The procedural structure of Logo meant the turtle could be ‘taught’: taught how to draw a square, taught how to draw a polygon, creating them inside of its environment, interacting it and shaping it like a child scrawling on the wall of their bedroom.
The turtle allowed for an empathetic bond to form between it and the child, giving the child a dual sense of accomplishment when the turtle succeeded at what the child told it to do – both because the child correctly instructed the turtle, and the turtle successfully carried out those instructions, the result of the latter the evidence of the former. The child could also ‘think like the turtle’ when developing procedures and debugging, moving about the room as the turtle would, figuring out roughly what they needed the turtle to do, and then refining their program as needed.
An early Logo video display
While Logo’s string and list facilities are impressive, it is fair to say the turtle made Logo. Both the physical and virtual turtles were used by fifth graders at the Bridge School in Lexington in a trial during 1970 and 1971. But both robots and video terminals were expensive in the 1970s, and schools hadn’t widely adopted computer terminals; as such, there was no widespread use of Logo in the 1970s.
However, the emergence of the home computer market in the late 1970s provided an opportunity for Logo to reach a wider segment of the population. In 1980, Minskey, Papert, Solomon and two Canadians founded Logo Computer Systems Inc. (LCSI) andin 1981 they published a version of Logo for the Apple II computer, which I booted up and met Seymour, Cynthia and Marvin’s turtle for the first time.
They would have been very happy I learned about degrees (and other things) from their turtle!
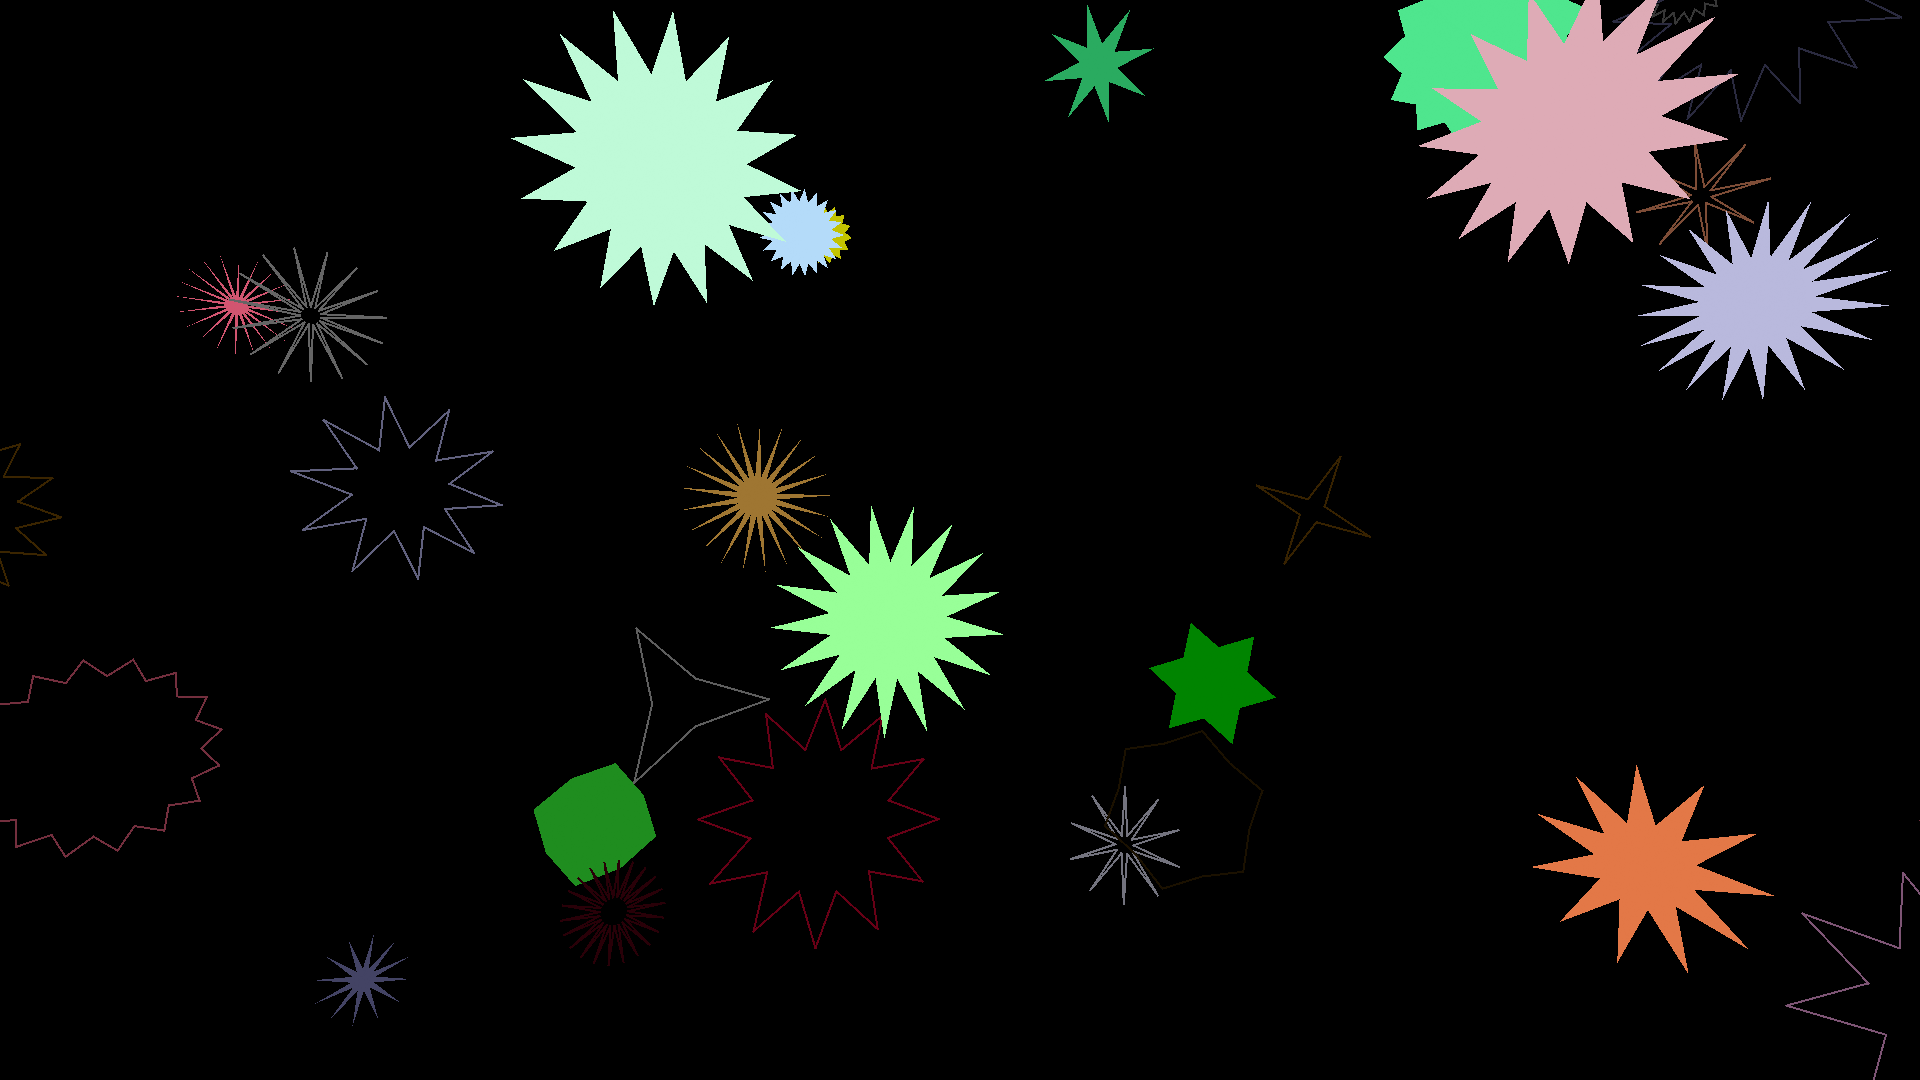
Run starscape to create a galaxy of randomly-shaped and colored stars.
TO star :radius :points :size :filled
  ;takes number number number boolean (true or false)
  ;eg star 10 9 40 false
  ;or star 20 5 50 true

  pu dropanchor tether
  ;pull up the turtle pen, drop the 'anchor' to set the 'anchor point' to the current position, and do not change it if the turtle's rotation changes (tether)
  ;the anchor point is the point the orbit primitives orbit around

  if :filled [polyspot :radius :points * 2
    if oddp :points [rt 360 / :points / 4]]
  ;if creating a filled star, create a polygon to fill in the center
  ;if the star has an odd number of points, we need to turn a little

  pullout :radius
  ;pull out from the anchor point, which is currently the turtle's position

  repeat :points [
    ;repeat once for each point:

    pu make "position position
    ;set the :position container to the current turtle position

    orbitleft 360 / :points / 2
    ;orbit around the anchor point (in this case the center) to the left
    ;a fraction of 360 degrees divided by the number of points divided by 2

    pullout :size
    ;pull the turtle out from the center of the star (anchor point)

    setvectors direction :position
    ;point the turtle toward the previous position

    if not :filled [pd line distance position :position]
    ;if not making a filled star, create a line in front of the turtle of
    ;the length required for its end to be the previous turtle position.

    if :filled [frag]
    ;if creating a filled star, create a 'fragment' based on the last three
    ;turtle positions

    pu make "position position
    ;set the :position container to the current position

    pullin :size
    ;pull the turtle in toward the center of the star (anchor point)

    orbitleft 360 / :points / 2
    ;orbit to the left again a similar amound to the last orbitleft

    setvectors direction :position
    ;point toward the previous position

    if not :filled [pd line distance position :position]
    ;create a line if not a filled star similarly to the previous line

    if :filled [frag]
    ;create a fragment if a filled star similarly to the previous frag

  ]
END

TO starscape
  reset ht snappy:setposition [0 0 0] snappy:dropanchor repeat 200 [pu home randvec fd 1000 + random 1000 up 90 snappy:setvectors direction myrtle:position randfc randpc randps randfs star 10 + random 100 3 + random 20 10 + random 90 randbool]
END
In turtleSpaces, you can ‘stamp’ the current model, leaving a copy of it in the current position. This can be useful in some circumstances, to create artworks made out of more sophisticated models. In the case of this example, we’re going to use the default ‘myrtle’ turtle model to create a descending spiral of turtles.
If you change the colors in the default palette using the definecolor primitive, then those colors are also used to render the turtle model, and by extension the stamp. And so, if we ‘cycle’ the colors, shifting their RGB values from one palette slot to the next, we can create a rotating series of differently-colored turtles.
Note: For reasons, colors 0 (black) and 15 (white) cannot be redefined. But there are 1-14 and 16-63 to play with, which is plenty!
For aesthetic reasons, we want a certain turtle to have the default colors, so we need to add an offset to some of the calculations to make that happen. Finally, we need to position Snappy (the camera or view turtle) in a certain position to get the view we want. Because this involved a fair amount of manual fiddling, I’ve just inserted the position and vectors into the listing to reproduce Snappy’s position and orientation.
Finally, to make the spiral we’re going to use the orbit commands, which rotate the turtle around an ‘anchor point’. The tether primitive allows us to turn the turtle away from the anchor point, which would normally move the anchor point but does not if tether is called. We descend a little each time we move, creating a downward spiral.
TO turtlesallthewaydown

  reset

  snappy:setposition [-0.0567188571145 -41.2097873969 -9.14256453631]
  snappy:setvectors [
    [0.0177688320245 0.192937058466 -0.981050233209]
    [-0.00350577343795 0.981211134942 0.192905205264]
    [0.999835975629 1.16396598173E-05 0.0181113694522]
  ]
  ;position Snappy where we want him to reproduce the image

  make "defaultcols colors
  ;make a copy of the default color palette

  penup dropanchor
  pullout 50 tether
  ;we want 'orbit' in a circle

  left 90 orbitright 39
  ;because we tethered, we can point away
  ;then orbit around the anchor point

  repeat 800 [
    setfillshade -5 + repcount / 20
    ;set the shade of the fill color, the color used
    ;to create the voxels that make up the turtle, amongst others

    make "offset remainder repcount + 11 14
    ;why +11? So we get the default turtle colors in the right place!

    repeat 14 [
      definecolor repcount item 2 + remainder (:offset + repcount) 14 :defaultcols
      ;shuffle the color palette. We need to start at item 2 because 1 is black
      ;(item is 1-based, whereas definecolor is 0-based -- 0 being black)

    ]

    stamp "myrtle
    ;make a copy of myrtle in the current position

    orbitleft 22.95 lower 1
  ]

END
If you replace stamp “myrtle with stamp “astronaut, and before it add a setmodelscale 0.5, like this:
setmodelscale 0.5 stamp "astronaut
you get:
If you change the “astronaut in stamp “astronaut to stamp pick [astronaut spaceship plane] like so:
Today’s example is short but sweet. It creates a design made out of a bunch of qtip-like ‘sticks’ with balls on the ends.
It is a design made out of ‘almost squares’ (four sides each at an 85 degree angle to each other). The turtle then turns right 5 degrees, and slides left 20 before continuing to the next almost-square.
Each side of the almost-square is coloured based on its iteration in the almost-square loop, and the fill colour of the balls is set to match. Also, each iteration is raised an amount relative to its iteration, creating a pleasing 3D effect.
TO qtips
  hideturtle
  clearscreen
  repeat 24 [
    repeat 4 [
      penup
      setz repcount * 3
      ;raise up the turtle based on the loop count
      pendown
      setpencolor 10 + repcount
      ;set the pen color based on the loop count
      setfillcolor pencolor
      ;for the spheres
      icosphere 2
      rope 100
      ;a rope is a cylinder-based line
      icosphere 2
      right 85
    ]
    right 5
    penup
    slideleft 20
    pendown
  ]
END


")


 In 1961, Papert had met an American, Marvin Minsky, at a conference in England. They presented papers that were surprisingly similar, and connected as a result. So, powered by his idea of using computers to teach children, in 1964, Papert went to the US, and joined Minskey’s Artificial Intelligence Group, a team of researchers at the Massachusetts Institute of Technology (MIT).


 Papert and Solomon left BBN and headed back to MIT, where they formed the Logo Group. In England, two robots had been developed that could wander about a space, their inventor dubbing them ‘tortoises’. The Logo Group developed their own robots, calling them turtles. Having access to expensive display hardware, they also developed a virtual turtle, one that lived on the computer screen.
 They added primitives to Logo to control the turtle: FORWARD, BACK LEFT, RIGHT. And they discovered that Papert had been right – children took to the turtle, the turtle allowing Logo users to have a perspective inside the computer, that of the turtle, rather than depending on an understanding of abstract concepts of code paths or numbers. The procedural structure of Logo meant the turtle could be ‘taught’: taught how to draw a square, taught how to draw a polygon, creating them inside of its environment, interacting it and shaping it like a child scrawling on the wall of their bedroom.
 The turtle allowed for an empathetic bond to form between it and the child, giving the child a dual sense of accomplishment when the turtle succeeded at what the child told it to do – both because the child correctly instructed the turtle, and the turtle successfully carried out those instructions, the result of the latter the evidence of the former. The child could also ‘think like the turtle’ when developing procedures and debugging, moving about the room as the turtle would, figuring out roughly what they needed the turtle to do, and then refining their program as needed.