Archives 2021

Bale Example: Dodgeball

Dodgeball is a very simple game using a bale wherein the player moves the turtle from the left to right sides of the screen using the keyboard.

This is similar to a popular example used to teach Scratch, and the basic concept should be familiar to most Scratch learners.

In the case of this example, there are multiple balls that are controlled by a ‘bale’, a group of turtles who all execute the same code, first the code in the bale’s init procedure, and then the code in the ‘main’ procedure repeatedly. Each member of the bale executes consecutively, and once all members of a bale have executed (a cycle), the bale’s graphical output (its ‘turtle tracks’) is updated.

The bale’s execution is started by Myrtle, using the startbale command.

Myrtle checks to see if the user has pressed any of the movement keys and moves if required. She also checks to see if she’s been hit by a ball, or if she’s reached the right side of the screen, and if either condition has been met, the game ends.

The balls meanwhile move up and down at different speeds, gradually sliding towards the left side of the screen (to prevent Myrtle from procrastinating!)

NEWTURTLE "myrtle

TO start
  ;this is a very simple yet addicting and frustrating game
  ;add in your own sound effects!

  reset
  setmodel [bk 7.5 stamp "myrtle]
  ;myrtle's position is usually her tail, so we need to move her a bit
  ;so that her position is center-ish of her shell

  startbale "balls 11
  pu
  setxy -170 0
  rt 90
  forever [
    if keyp [
      make "key lowercase readchar
      if :key = "k [sr 10]
      if :key = "i [sl 10]
      if :key = "j [bk 10]
      if :key = "l [fd 10]
    ]
    ;pressing keys causes turtle to move

    if nearp 15 [pr "ouch! repeat 1000 [rt 1] finish]
    ;got hit by a ball

    if xpos > 180 [pr "win! finish]
    ;made it to the other side!
  ]
END

ON start flag queue []
  start
END


NEWTURTLE "snappy


NEWTURTLE "libby


NEWBALE "balls

TO init
  setmodel {"setfc baleindex "ico 10}
  st
  penup
  setxy -160 + baleindex * 30 100
  output {"dir 1 "speed 1 + (0.1 * random (5 * (5 + baleindex)))}

END

TO main
  if :dir = 0 [bk :speed] [fd :speed]

  slideleft 0.1
  ;the balls gradually move toward the left side
  ;of the screen to discourage procrastination!

  if ypos < -100 [make "dir 1]
  if ypos > 100 [make "dir 0]
END


Bales, Missiles and Triggers, Oh My!

turtleSpaces is great for creating 3D models and animations, but we also want it to be great for games. Unfortunately, the interpreter is not the fastest thing around — but that’s okay! We can compensate by creating new commands that work ‘under the hood’ to take care of certain game elements.

Bales are groups of turtles that all execute the same code, for example alien attackers in a space battle game. They are declared similarly to turtles, using a NEWBALE declaration.

When each member of a bale is initialized, it executes the code in the bale’s INIT procedure. Then, it repeatedly executes the code in the MAIN procedure in sequence with the other members of the bale, that is each member of the bale executes the code in succession using the same thread. At the end of each cycle, when all bale members have executed, their ‘turtle tracks’ are rendered. This makes it seem like they’ve all moved at the same time.

Take for example this code from a Space Invaders-inspired game (you can try it out here: https://turtlespaces.org/weblogo/?pub=81)

NEWBALE "ships

TO init
  ;bales are groups of turtles that execute the same code in sequence,
  ;one after the other. They are useful for things like groups of
  ;enemies, to keep them in lock step, where hatchlings can end up
  ;executing at different rates of speed and fall out of sequence
  ;with each other.
  
  ;new bale members always execute the init procedure, after which
  ;they repeatedly execute the main procedure until they are
  ;removed or the entire bale is stopped.
  
  penup
  noaudiowait
  newmodel "bullet [setfillcolor 15 icosphere 1.5]
  setmodelscale 1.5
  setposition {
    (-150 + 30 * (remainder baleindex - 1 5))
    100 - (20 * (int ((baleindex - 1) / 5)))
    5
  }
  ;based on the number (index) of the bale member, place
  ;it in the attacking wave
  
  if 1 = remainder int (baleindex - 1) / 5 2 [setx xpos + 10]
  ;let's offset the turtles in alternating rows
  
  right 180
  ;turn to face down
  
  showturtle
  ;show the turtle
  
  rollright baleindex * 10
  ;set the default roll rotation
  
  output [dir 1]
  ;the pairs provided by output become variables in main
  ;in this case we're setting the default move direction, which
  ;is the same for all members in this bale
END

Each member of the bale is placed based upon its index number in the bale. Once we position the bale member, it moves on to the main execution loop:

TO main
  dosleep 10 [
    ;take at least 10 milliseconds to do the following:
    
    rollright 10
    ;roll right ten degrees
    
    if and xpos < 150 :dir = 1 [drift 5 [1 0 0] drift 1 [0 -1 0]] if and xpos = 150 :dir = 1 [make "dir 0 drift 10 [0 0 -1] drift 10 [0 -1 0]] if and xpos > -150 :dir = 0 [drift 5 [-1 0 0] drift 1 [0 -1 0]]
    if and xpos = -150 :dir = 0 [make "dir 1 drift 10 [0 0 1] drift 10 [0 -1 0]]
    ;we use drift to move the ships because we're rolling them for effect
    
    if 1 = random 20 [
      newmissile "missile "bullet [0 -1 0] 20 + random 20 [200]
      playsound "zap3
    ]
    ;fire a missile randomly
    
    if or ypos < -100 containsp "myrtle near position 20 [ make "hit true ] ;if an alien reaches the bottom of the screen it's over if baleindex = last balemembers balename [ if :delay > 0 [dec "delay]
      ;this increases the speed of the invaders 'music'
      ;once each time all the bale turtles have executed
      ;(each loop)
    ]
  ]
END

Each bale member moves across the screen, randomly firing missiles, until they are destroyed or reach the bottom of the screen, triggering a ‘game over’ condition.

newmissile "missile "bullet [0 -1 0] 20 + random 20 [200]

Missiles are simple elements that are controlled by the game engine. They move through 3D space, and are detected by primitives such as NEARMISSILEP and NEARMISSILES. They can also be detected by the nearmissile trigger. They are much more efficient than using turtles as projectiles.

Similarly, triggers are blocks of code that are executed when a certain condition occurs. These conditions are monitored by the underlying game engine, and are ‘triggered’ when these conditions are detected to be true. Once again, this is much more efficient then having a turtle constantly execute Logo code waiting for the condition to occur!

The following trigger belongs to the previously mentioned alien ships bale:

ON boom nearmissile block [missile2 10]
  hideturtle
  playsound "explosion
  inc "score
  show :score
  stopmissile flat list :boom :boomanim
  die
  ;this turtle is no more
END

This trigger increments the player’s score, disposes of the missile that triggered it, and then ends the turtle to whom the trigger belongs, in this case a member of the alien ship bale.

As you can see, bales, missiles and triggers all contribute to empowering turtleSpaces coders to create faster-paced, more engaging games.


The Art of the Turtle

turtleSpaces isn’t just about games or 3D models, it’s also about art. Although generated by a Logo computer program, some of the visuals created by turtleSpaces can be quite striking! Combined with a digital art program such as Filter Forge, the results can be very artistic indeed.

Check out this gallery of turtle art:

Images Copyright 2021 Melody Ayres-Griffiths

Activity Idea: Gone Fishin’

Build this cool island scene using turtleSpaces Logo and a few basic shapes!

First we begin with a tree. We can build a trunk using a repeat loop of cylinders that get narrower in diameter and longer as we go. We can introduce a slight curve as well by tilting the turtle up a bit each cylinder we create:

Next we need to create the leaves, which we can do using the fiso (filled triangle) primitive. We can use a repeat loop to create a series of triangles growing in size, and then a second repeat loop to create a further series of triangles shrinking in size. In both cases, we tilt the turtle down a bit each triangle we create:

Then we can use a further wrapping repeat loop to create 8 of them around the trunk:

Let’s add six coconuts to the top of the tree using another repeat loop and icospheroids:

But one tree is kind of lonely, so let’s create a ring of eight around the edge of the island using the orbitleft primitive. We can also make the island more mound-like using a domoid:

Let’s add a dock Myrtle can fish off of made out of cylinders and voxeloids:

And a hut to shelter in made out of made out of a cutsphereslice and a sphereslice:

Myrtle’s all set, let’s get her fishing! The fishing rod is created using a thick line and a thin line:

The sunset effect is created using an inverted gradient tube:

Good job, Myrtle! You can check out the island yourself at https://turtlespaces.org/weblogo/?pub=64

Just click the flag to create the island. Don’t forget that you can click and drag on the viewport to move the camera, use the scroll wheel to zoom in and out, rotate using the right button and drag, and click both buttons and drag to pan.

Check out the code to see how it’s done! Then try something similar yourself. What will your island look like? Share it so we can see for ourselves!

Introducing Environments

Environments are a cool new way to get started with Logo. turtleSpaces now provides a variety of environments in different settings to inspire Logo creation:

Starry Night and Star Platform – Myrtle builds in space!

Winter Ice Pond – Myrtle goes skating!

Pyramid Desert – Build a monument to the Gods!

Under the Sea – Shelly swims with the fishes!

Forest Cabin – Myrtle’s hideaway in the woods.

City Park – Myrtle plays in Central Park!

Parking Lot – Myrtle learns to drive.

The Moon Base – Myrtle on the Moon!

Alien Trees – A ring of growing alien trees.

Environments are available in both the desktop application and the web application. In the web application, you can find them when you start a new project (under the file menu). On the desktop, you open them the way you open examples, in the environments folder.

Environments are written in Logo and are randomly created when they are opened, so some of them may take a minute or two to fully form. You can’t see the environment code in the built-in editors as they are managed by system turtles, which can be used to program the broader Logo environment for purposes such as environments, tutorials and games that use the Logo interpreter to interact with them.

But if you download the procedures, or look at them in an external text editor, you can see the code that makes up the environments, and tweak them, or use them as a template to create your own!

turtleSpaces Halloween!

Witches, pumpkins, devils, ghosts and black cats are all haunting turtleSpaces this Hallowe’en! turtleSpaces is great for creating 3D models using code.

You can also find these models in the Published projects section of the webLogo interpreter.

The Pumpkin:

The pumpkin is created using the spheroidslice primitive, which creates an elongated slice of a sphere. By creating ten of these slices (every 36 degrees) we can easily create the pumpkin’s body:

TO pumpkin
  pu
  ;penup
  
  rr 180 up 90 lt 18 ra 20
  ;these were added after in order to position
  ;the pumpkin to face the camera
  
  pushturtle
  ;stores the turtle's state on to a stack,
  ;to be restored later using popturtle
  
  setspheroidaxis false
  setfillcolor orange
  setpencolor brown
  
  gradient
  repeat 10 [
    setfillshade 0
    spheroidslice 50 10 40 18 23 1.5
    rt 36
  ]

Next, we’ll position the turtle and use the domoid primitive to create the eyes, nose and mouth:

  left 2
  raise 37
  down 42
  right 30
  lo 85
  setfillcolor 13
  setpencolor 8
  setspheroidaxis true domoid 15 10 3 0.5
  ;eye
  
  ra 85
  lt 30
  UP 42
  RT 40
  DN 42
  RT 30
  lo 85
  domoid 15 10 3 0.5
  ;other eye
  
  ra 85
  LT 30 UP 42 LT 20 DN 50 RT 30 lo 85
  domoid 10 10 3 0.5
  ;nose
  
  ra 85
  LT 30 lo 3 DN 48 FD 40 lo 60 
  domoid 17 10 10 0.5
  ;mouth

Finally, we’ll create the pumpkins stem:

  popturtle
  ;return the turtle to its position, orientation
  ;and so forth when we did pushturtle
  nogradient
  setfc 8
  ;setfillcolor
  cylinder 8 60 10 lo 60
  up 90 rt 180 sr 20 lt 72.5
  ;sr = slideright
  cylinderarc 8 20 10 10 3
  home ht
END

The Witch:

The witch procedure first stores the pumpkin as a turtle model, then begins with her signature feature: her hat!

First we position the camera and store the pumpkin as a turtle model:

TO witch
  reset cam:pullout 150 cam:orbitleft 20 cam:orbitup 10
  begintag "pumpkin
  pumpkin
  endtag
  newmodel "pumpkin "pumpkin
  cs

Then we create her hat:

  pu setfs 0
  dn 90 ra 80 
  setoriginvectors vectors
  pushturtle
  setfc 5
  rr 180
  cone 40 100 20
  cylinder 80 5 20

Next is her head:

  rr 180
  setfc 1
  up 5
  cylinderslice 40 50 20 10
  lo 50
  cutsphereslice 40 20 20 10 20 10
  up 90
  spot 40
  dn 90
  ra 50
  dn 5
  lo 30
  setfc 11
  rl 90
  icospheroid 35 1.5
  rr 90
  ra 20
  lt 30
  bk 30
  setfc 2
  ico 7
  fd 30
  rt 60
  bk 30
  ico 7
  fd 30
  lt 30
  lo 30
  up 90
  rr 180
  up 10
  setfc 11
  cutcone 15 7 60 20
  lo 60
  setfc 1
  dome 7 20 20
  popturtle

Then her body:

  lo 100
  setfc 2
  rr 180
  cappeddomoid 30 20 20 2
  rr 180
  setfc 9
  cylindroid 30 50 20 1.2
  pushturtle
  lo 50
  domoid 30 50 20 1.2
  repeat 2 [
    pushturtle
    sr 25
    lo 10
    dn 30
    rr 180 dome 20 20 20
    rr 180
    cylinder 20 50 20
    lo 50
    ico 20
    up 90
    cutcone 20 15 50 20
    lo 50
    setfc 2
    cylinder 20 20 20
    lo 20
    dn 90
    cylindroid 10 20 20 2
    lo 20 domoid 10 20 20 2
    ra 20 rr 180
    cylindroid 10 10 20 2
    lo 10
    domoid 10 20 20 2
    popturtle sl 50]
  popturtle
  pushturtle
  sr 45
  dn 20
  ra 4
  setfc 11
  cylinder 13 50 20
  lo 50
  ico 13
  dn 90
  cutcone 13 8 50 20
  lo 50
  ico 12
  setmodelscale 0.5
  dn 90 rt 160 lo 25 stamp "pumpkin
  setmodelscale 1
  popturtle
  pushturtle
  sl 45
  dn 20
  ra 4
  setfc 11
  rl 9
  cylinder 13 50 20
  lo 50
  ico 13
  dn 20
  rl 40
  cutcone 13 8 50 20
  lo 50
  ico 12

And finally her broom!

setvectors originvectors 
  setx 0 
  pushturtle 
  up 80 
  setfc 8 
  cylinder 5 100 20 
  lo 100 
  lo 5 
  rr 180 
  cappeddomoid 13 20 20 3.5 
  rr 180 
  cylindroid 13 15 20 3.5 
  lo 15 
  sl 35 
  setfc 13 
  repeat 15 [
    rl -8 + repcount 
    cylinder 0.1 * (10 + random 20) 70 20 
    rr -8 + repcount 
    sr 5 
    randfs 
  ]
  sl 72.5 
  fd 5 
  repeat 14 [
    randfs 
    rl -7 + repcount 
    cylinder 0.1 * (10 + random 20) 70 20 
    rr -7 + repcount 
    sr 5 
  ]
  bk 10 
  sl 5 
  repeat 14 [
    randfs 
    rr -7 + repcount 
    cylinder 0.1 * (10 + random 20) 70 20 
    rl -7 + repcount 
    sl 5 
  ]
  popturtle 
  up 90 
  rr 180 
  up 10 
  setfc 8 
  cylinder 5 100 20 
  lo 100 
  dome 5 20 20 
  dn 90 
  ra 5 
  bk 10 
  st 
END

The Devil:

This unicycling devil robot is a scary creature!

His head is made out of a padded voxel:

TO devil
  cs
  pu
  setfc 11
  cylinder 10 50 20
  bk 10
  voxeloid 50 20 50
  fd 10
  sr 50
  cylinder 10 50 20
  sl 60
  voxeloid 70 50 50
  fd 50
  sr 10
  cylinder 10 50 20
  bk 10
  voxeloid 50 20 50
  fd 10
  sr 50
  cylinder 10 50 20
  rr 180
  repeat 2 [
    repeat 4 [
      dome 10 5 20
      rl 90
      cylinder 10 50 20
      rr 90
      sr 50
      rt 90
    ]
    up 180
    ra 10
    voxeloid 50 50 10
    lo 60
    lt 90
  ]
  lo 10
  bk 15
  sr 15
  lo 0.1
  setfc 1
  polyoval 10 5 100
  bk 20
  polyoval 10 5 100
  sl 10
  rr 180
  fd 5
  rt 60
  quad 15 3
  rt 30
  sl 10
  rt 30
  quad -15 3
  lt 30
  sr 5
  bk 40
  pushturtle
  repeat 8 [
    quad 4 3
    sr 4
    lt 10
  ]
  popturtle
  pushturtle
  repeat 8 [
    quad -4 3
    sl 4
    rt 10
  ]
  popturtle
  fd 50
  lo 20
  sl 20
  up 90
  pushturtle
  repeat 2 [
    repeat 15 [
      cylinder 16 - repcount 10 10
      lo 8
      up 10
      rr 30 - 20 * repabove 1
    ]
    popturtle
    sr 40
    pushturtle
  ]

And his body:

  sl 60
  ra 60
  bk 15
  rr 180
  rt 20
  setfc 13
  cylinder 30 10 20
  setfc 1
  lo 10
  cylindroid 30 20 20 2
  sl 40
  setfc 1
  cylindroid 20 100 20 1
  pusht
  lo 100
  ico 20
  up 120
  rr 30
  cutcone 20 10 100 20
  lo 100
  up 90
  rl 15
  ra 20
  setfc 10
  cylinder 20 40 20
  popt
  pusht
  sr 80
  cylinder 20 100 20
  lo 100
  ico 20
  up 60
  rl 20
  cutcone 20 10 100 20
  lo 100
  setfc 5
  up 90
  rl 10
  ra 20
  cylinder 20 40 20
  popt
  sr 40
  cylinder 40 100 20
  lo 160
  rr 90
  ra 20
  setfc 11
  cylinder 60 40 20
  setfc 13
  ra 5
  cylinder 10 50 20
  lt 90
  lo 2.5
  up 90
  cylinder 2.5 100 10
  dn 90
  lo 45
  up 90
  cylinder 2.5 100 10
END

The Ghosts:

These bug-eyed PacMan-style ghosts are a real scream!

The Ghost:

TO ghost
  up 90 
  make "gc 1 + random 14 
  make "ec pick [0 1 2 3 4 8 9] 
  setfc :gc 
  dome 50 20 18 
  rr 180 
  cylinder 50 50 18 
  lo 50 
  dn 90 
  repeat 18 [
    tent 9 30 49.2 
    rl 20 
  ]
  setfc 15 
  up 90 
  ra 50 
  fd 50 
  rr 90 
  icospheroid 15 1.5 
  fd 15 
  setfc :ec 
  icospheroid 7.5 1.5 
  rl 90 
  bk 65 
  rt 40 
  fd 50 
  setfc 15 
  rr 90 
  icospheroid 15 1.5 
  fd 15 
  setfc :ec 
  icospheroid 7.5 1.5 
  rl 90 
END

The Ghost Circle (this code assumes the above code is in a procedure called ghost:)

TO ghostcircle
  reset 
  snappy:newworker [
    setposition [0 0 0] 
    dropanchor 
    forever [
      orbitleft 0.5 
      wait 1 
    ]
  ]
  randbg 
  setbs 13 
  setfs 0 
  dropanchor 
  up 90 
  pu 
  ra 80 
  gradient 
  randpc 
  setfc bg 
  spot 400 
  lo 80 
  nogradient 
  pullout 300 
  repeat 18 [
    pushturtle 
    dn 90 
    rr 20 
    ghost 
    popturtle 
    orbitright 20 
  ]
END


The Cats:

Don’t get in the way of these cats, or it’s bad luck!

The Cat’s Eye:

TO cateye
  setfc 13 
  pu 
  rt 90 
  spot 10.1 
  fd 4 
  fiso 9.3 20 
  bk 8 
  rt 180 
  fiso 9.3 20 
  bk 4 
  ra 0.1 
  setfc 0 
  polyspot 6 40 
  lt 90 
  fd 3 
  fiso 5.2 7 
  bk 6 
  rt 180 
  fiso 5.2 7 
  bk 3 
END

The Cat:

TO cat
  sl 30 
  setfs 0 
  cateye 
  sr 60 
  cateye 
  sl 30 
  lo 0.3 
  bk 10 
  setfc 5 
  setfs 12 
  cylindroid 40 10 50 2 
  sl 20 
  lt 30 
  fd 25 
  tent 30 70 10 
  bk 25 
  rt 30 
  sr 40 
  rt 30 
  fd 25 
  tent 30 70 10 
  bk 25 
  lt 30 
  sl 20 
  bk 5 
  up 180 
  setfs 0 
  setfc 11 
  dome 5 20 20 
  fd 15 
  setfc 5 
  setfs 5 
  dome 8 20 20 
  lo 3 
  dropanchor 
  tether 
  pullout 7 
  rt 180 
  orbitright 70 
  setpw 2 
  repeat 2 [
    repeat 5 [
      line 80 
      orbitright 10 
    ]
    orbitright 130 
  ]
  pullin 7 
  rr 180 
  lo 12 
  rt 20 
  setfs 12 
  sr 20 
  setfs 13 
  cylindroid 40 100 50 2 
  lo 90 
  rr 90 
  setfs 12 
  cylinder 10 200 20 
  lo 200 
  dome 10 20 20 
  ra 200 
  rr 180 
  up 20 
  cylinder 10 130 20 
  lo 130 
  dome 10 20 20 
  ra 130 
  dn 40 
  cylinder 10 130 20 
  lo 130 
  dome 10 20 20 
  ra 130 
  sr 80 
  cylinder 10 130 20 
  lo 130 
  dome 10 20 20 
  ra 130 
  up 40 
  cylinder 10 130 20 
  lo 130 
  dome 10 20 20 
  ra 130 
END

The Cat Ring:

TO catring
  cs 
  pu 
  dn 90 
  dropanchor 
  pullout 250 
  pu 
  repeat 8 [
    pushturtle 
    up 90 
    cat 
    popturtle 
    orbitright 45 
  ]
END

Happy Hallowe’en!

Creating Animated Videos Using turtleSpaces

The above animation was created inside turtleSpaces, and then exported as a webm video file using the savewebm primitive. I then used Final Cut Pro to add the audio and the titles.

The Logo code used to create the animation is fairly straightforward. The turtle moves in an arc outwards from the center, creating arcs around it and generating the pattern. The location and sizes of the arcs depends on the current loop iterations. Graphics rendering is suspended while each ‘frame’ is created, after which the code renders the frame and pauses to ensure the user sees it, then continues on.

It runs much faster via the desktop application than in the web version, so you may need to adjust it to slow it down. Tinker with it! Play around. It’s the best way to learn.

TO arcflower3d
  cs
  ;clearscreen

  ;maximize
  ;the above line forces full-screen display. This is needed
  ;with savewebm, because the video capture routine uses the
  ;webgl canvas, and so whatever resolution it displays at
  ;is the resolution the video file will be. Uncomment it if
  ;saving video

  ht
  ;hideturtle

  setpw 2
  ;setpenwidth

  ;savewebm 260
  ;uncomment the above line to record video

  repeat 3600 [
    norender
    ;suspend rendering graphical output

    cs
    
    repeat 128 [
      setpc 1 + remainder repcount 15
      ;set the pencolor to the remainder of a modulus
      ;of the current loop count (repcount)

      pu
      ;penup

      rarc 0.1 * repabove 1 repcount
      ;move in an arc trajectory to the right
      ;based on the current repcount and the 
      ;repcount of the loop above (repabove)

      rr 0.1
      ;rollright

      dn 0.1
      ;down

      arc 90 repcount
      ;create a 90 degree arc based on the current
      ;repcount
    ]

    render
    ;resume rendering

    nextframe
    ;wait until one frame is rendered
  ]

END


A Starry turtleSpaces Logo Introduction Part Three: Starwarp Improvements

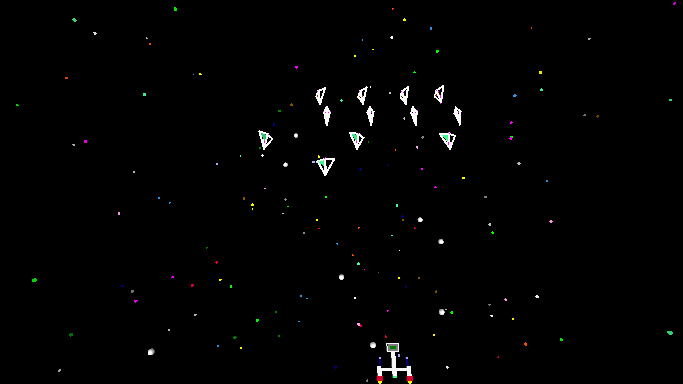
In the previous episode, we created a progressively-generated starfield we moved through with the camera turtle, creating a cool flying-through-space effect.

But it has a few issues we should address. Firstly, it is possible for a star to end up flying through the windscreen of our spaceship! Which is cool, but looks a bit strange. Second, as the program runs it piles up all of these stars behind us, which can slow everything down. We need to get rid of those. Finally, it would be pretty neat if we could have the stars ‘pop’ into view, so we’ll explore how we can do that.

Improvement One: Spaced Out Stars

So, firstly we want to ensure that stars aren’t placed too near to the center, where they could possibly fly through our windshield. Ideally we want to detect if we’re going to place a star within the narrow barrel our ship is flying through, and if so don’t place it there, place it somewhere else.

There are a few new tools we can use to accomplish this:

distance – takes two lists of coordinates, eg [x1 y1 z1] [x2 y2 z2], and returns the distance between them. This will be useful to us, because we are going to provide the prospective new spot position as one list, and {0 0 zpos} as the second list, giving us the distance between the new spot and the XY center of the space at Myrtle’s current Z position.

dountil – repeats a list of commands until it gets the desired results. In this case, we’re going to want to have dountil pick a random position, and then use the distance function to check if that position is outside of our no-go range. dountil executes the list of instructions it is provided before checking the condition it needs to stop executing, while its cousin until checks first.

So, to ensure we don’t place a star within that ‘barrel’, instead of the existing setposition command, we do the following:

dountil 100 < distance position {0 0 zpos} [
  setposition {-1500 + random 3000 -500 + random 1000 zpos}
]

So, until 100 is less than the distance between the turtle’s position and the XY center of the turtle’s current Z position, keep choosing a new position — and choose a new position before doing the first check.

Note: because of the way Logo’s parser works, if you do a comparison operation (<, >, = etc) where one side is a single parameter (eg a number) you’re best to put that FIRST and the complex parameter second.

Why? Because Logo collects things up right to left, and while Logo will evaluate the stuff to the right of the operator correctly, passing that to the operator, the parser will give the operator the first ‘complete’ thing it sees to the left of it, which if you switched things around would be {0 0 zpos} and is not what we want!

So to solve this you would need to put round brackets () around distance position {0 0 zpos} to ensure that Logo evaluated and gave < what we really wanted to give it. It’s easier in this case just to put the single parameter on the left.

This solves our problem! Stars will keep out of our way. However, this method also moves the turtle every time we try a new position, and all of these false jumps will stay in the turtle’s ‘turtle track’ or list of things the turtle has done.

There are a few methods we could use to stop this from happening, but this one is probably the simplest:

dountil 100 > distance :position {0 0 zpos) [
  make "position {-1500 + random 3000 -500 + random 1000 zpos}
]
setposition :position

Rather than set the position every time we try, we make a container (variable) called position containing the prospective coordinates, and test that instead. Then, once we have a good set of coordinates, we set that :position using the setposition command.

A colon before a word indicates to the parser that it is meant to pass the contents of a container with that name to the next command or function in the chain.

The colon is shorthand for thing, which returns the value of the container named passed to it. So, for example, you could have used setposition thing “position instead. Note that the name of the variable is preceded by a quote, not a colon. If you used a colon, thing would return the value of the container with the name CONTAINED inside of the container you referenced with the colon!

The mind boggles, doesn’t it?

This is also why you generally make “container rather than make :container — if you did the second, you would make a container with the name contained inside of the container you referenced, which does have practical applications but can be a bit confusing at first.

For now, just remember you make with a quote, retrieve with a colon.

Okay, moving on…


Improvement Two: Galactic Janitorial

This procedure creates a lot of stars. Like, a lot. While you can have a lot of things in turtleSpaces (so many things!) they can start to gum up the works if they get to extreme numbers. A computer can only remember so much you know! And so, we should clean out the stars behind us, because they don’t matter to us anymore anyway.

But the stars are part of Myrtle’s ‘turtle track’, and so we can’t just clean out some of them, can we? There are the clean and clearscreen commands but they get rid of everything!

Never fear, tag is here!

tag allows you to wrap one or more turtle track entries so that you can reference them later, to replace, copy or delete them. We’re going to put tags around stars so we can delete them. We do this with begintag and endtag.

We need to give each tag a name, and so we need to give begintag a name to use. endtag doesn’t take a name, since we can only close the last opened tag. If you create a tag within a tag, that tag has to be closed first, before you can close the tag above it.

What we’re going to do is every 2000 stars, we’re going to close off the existing tag (the stars still  in front of the camera turtle), then create a new tag for the next batch of stars, and erase the tag that came before the one that we just closed off (the stars now behind the camera turtle). It’s a real slight-of-hand magic trick!

To set up our tags, first we have to add the following before the forever loop:

  begintag 0
  endtag
  ;dummy 'first' tag (numbered 0)
  make "tag 1
  ;create tag container
  begintag :tag
  ;create second tag using the tag
  ;container value

Because we’re erasing the tag before the previous tag, we need to create a dummy 0 tag to erase when we get started. Then we create a tag container, which contains the value (number) of the current tag, and then we create a tag with a name of that value (1).

We’re all ready to go! Now, inside of the forever loop, we need to add:

    if divisorp 2000 loopcount [
      ;every 2000 loops:
      endtag
      erasetag :tag - 1
      ;erase the tag BEFORE the tag we just closed
      inc "tag
      ;increment the tag container
      begintag :tag
      ;start a new tag
    ]

if is sort of like dountil, except that it checks if the condition is true first and then executes the list of instructions provided to it, but it only does it once and only if the condition is true.

divisorp is a boolean, it returns only true or false. Because of booleans, unlike in other programming languages if does not require a comparison operator. Comparison operators (=, >, < etc) are themselves boolean operators — they return either true or false to if, until, dountil or whatever other command needs a boolean parameter passed to them.

divisorp returns true if the first value passed to it divides equally into the second value. divisorp  in this case returns true if 2000 divides equally into loopcount, which is the total count of the number of loops executed  — for example, the number of times we’ve been through the forever loop.

So every 2000 times through the forever loop, divisorp returns a true value and that causes if to execute the contents of the list. Which is:

endtag – end the current tag

erasetag :tag – 1 – erase the tag before the tag we just closed

inc “tag – increment the tag counter

begintag :tag – start a new tag

And that’s all there is to it. The janitor will come every so often and sweep out those old stars, keeping things running smoothly!


Improvement Three: View Screen On

I’m kind of torn on which is cooler, having the galaxy wink into existence around us or approaching it as if we’ve arrived from the intergalactic void, but if you want to try the winking-into-existence option, here’s how to do it:

First, before the forever loop, we put in a norender command. This stops turtleSpaces from updating the ‘render’, or representation of items in 3D space.

Second, inside the forever loop, before everything else, we need to put the following:

    if loopcount = 1500 [
      render
      print |Engage!|
    ]

which as you may remember from the previous section, after 1500 loops will cause if to execute the render command, which turns rendering back on. This ensures there are stars for us to see before we start to see them.

That’s all there is to it!
Bonus Improvement: Spinning Through Space

As a final bonus improvement, after the cam:forward command, insert the following:

cam:rollright 1/10

This will simulate the gentle roll of the spacecraft as it travels through the stars, causing the stars to spin slightly around the spacecraft.

Congratulations! You’ve graduated from starwarp academy! Good job. Welcome to turtleSpaces.


A Starry turtleSpaces Logo Introduction Part Two: Starwarp

In this second part of our introduction to turtleSpaces Logo, we’re going to take the stars we made in the first part, and create a ‘rolling’ starfield we are going to move through using the camera turtle, to create a Star Trek-style warp effect.

To create this effect, the drawing turtle, Myrtle, is going to create stars deep into the space. The camera turtle, Snappy, will move forward (the camera turtle points into the space, towards Myrtle, by default) following Myrtle as she moves deeper, creating stars.

This tutorial is in three parts: First we’ll create the moving starfield, then we’ll cause old stars to vanish (and explain why we need to do that), and finally we’ll set things up so that the starfield ‘pops’ into view, rather than being shown from the beginning.

To begin, we’ll create a new procedure:

TO starwarp
END

and then we’ll start with some setup commands:

TO starwarp

  reset
  hideturtle
  penup
  lower 3000

  setfillshade 12
  setpenshade -12
  gradient

END

We know all of this already from the first part, except for lower, which causes the turtle to descend, from its point of view.

Then we’ll add the main forever loop, which will repeat, well, forever:

  forever [
  ]

Then we’ll populate it with the commands needed to make the rolling starfield, and explain them:

  forever [
    
    lower 10
    setposition {-1500 + random 3000 -500 + random 1000 zpos}
    randomfillcolor
    setpencolor fillcolor
    spot 0.1 * (1 + random 50)
    cam:forward 10

  ]

This is the basic routine, but it can use a lot of work, which we’ll get to in a moment.

lower 10 – lowers the turtle 10 turtle units. The turtle descends from its position and orientation, like an elevator.

setposition {-1500 + random 3000 -500 + random 1000 zpos} – this is a bit complicated. setposition sets the turtle’s position in 3D space. It takes a list of three values, X Y and Z. It does not change the turtle’s orientation.

The center of 3D space is [0 0 0]. From Myrtle’s default position, to her left is negative on the X axis, to her right is positive. To her rear is negative in the Y axis, to her front positive. Below her is negative in the Z axis, while above her is positive.

And so, we’re passing a list to setposition made up of two random calculations (for the X and Y coordinates) and Myrtle’s existing Z co-ordinate, which is expressed by the zpos primitive, which is a function that returns Myrtle’s current Z coordinate.

Why the curly braces? Well, traditional Logo lists such as [pig duck cow] aren’t dynamically generated — if you want to remove, add or change values inside of them, you need to do so using commands that manipulate the list. But this can be a bit tedious and so we created the concept of ‘soft lists’ (as opposed to traditional ‘hard lists’) which are lists whose contents are evaluated (or solidified) at runtime, when the interpreter actually processes and executes the command to which the list is attached.

And so, with soft lists, each item is usually either a function (such as random) or a value (such as 10). If you want to add a string value to a softlist, you need to precede it with a ” eg “duck or surround it with pipes eg |duck|.

So, when the setposition command is evaluated, the parser (the part of Logo that decides what to do next) sees the softlist, and evaluates its contents, turning it into a hard list. So it generates the two random numbers, and gets the zpos, and then creates a hard list of 3 items, passing it back to setposition.

randomfillcolor – sets a random fill color (as in part one)

setpencolor fillcolor – sets the pen color to the fill color (as in part one)

spot 0.1 * (1 + random 50) – creates a spot of a size from 0.1 to 5

cam:forward 10 – moves the camera turtle (cam is a shortcut turtle name for the current view turtle). Prefixing a command with turtle: causes the named turtle to execute that command.

…and that’s it for version one! Run the starwarp procedure and see what happens.

Pretty cool huh? But it has a few shortcomings, which we will address in part three.

TO starwarp

  ;this procedure recreates the classic
  ;'moving starfield' effect
  
  ;the turtle starts deep into the workspace
  ;(by 'lowering' or decreasing its Z-coordinate)
  ;then creating stars (at least a certain distance
  ;away from the center using the distance function)
  ;and continuing to lower. Meanwhile the camera
  ;moves forward (from its perspective), following
  ;the turtle.
  
  ;Like in reality, the stars are not moving, the
  ;turtles are!
  
  ;On to the code:
  
  reset
  ;reset the workspace
  hideturtle
  ;hide me!
  penup
  ;don't draw
  lower 3000
  ;'lower' into the distance
  
  setfillshade 12
  setpenshade -12
  gradient
  ;gradiented stars
  ;gradiented shapes graduate between the
  ;pencolor / penshade and the fillcolor / fillshade
  
  forever [
    
    lower 10
    ;move the 'star turtle' deeper into the scene
      
    setposition {-1500 + random 3000 -500 + random 1000 zpos}
    ;flat-ish galaxy
    
    ;curly braces denote a 'soft list', a list that
    ;is evaluated and created upon execution
    
    randomfillcolor setpencolor fillcolor
    ;spots and other shapes use the fill color
    ;which randomfillcolor randomly chooses
    ;we set the pencolor to the fill color
    ;for the gradient, because we're only
    ;gradienting the shade
    
    spot 0.1 * (1 + random 50)
    ;make a randomly-sized star
    ;between 0.1 and 5 turtle units in size
    
    cam:forward 10
    ;the camera turtle points towards
    ;what it's looking at, so moving
    ;forward decreases its z position
    ;(in its default orientation)
    
  ]
  ;do this forever and ever
  
END


A Starry turtleSpaces Logo Introduction Part One: Starfield

Traditional Logo had new users build a house as an introduction, but due to turtleSpaces’ 3D nature, starfields are much more impressive, so we’ll start there.

Click and drag the window above to see all the stars!

Cool huh? First, we’re going to create this simple starfield that wraps around the camera position.

We’ll start by creating the procedure:

TO stars
END

Then we’ll add in some setup stuff:

TO stars

  reset
  hideturtle
  penup

  setfillshade 12
  setpenshade -12
  gradient

END

reset – resets the workspace to its default configuration
hideturtle – hides the turtle
penup – doesn’t draw lines. The turtle draws lines as it moves by default

setfillshade 12 – sets the fill shade to 12. Shades have a range of -15 (light) to +15 (dark) where 0 is normal
setpenshade -12 – sets the pen shade to -12 (light)
gradient – causes shapes that support gradients to use them. They graduate from the pen color / shade to the fill color / shade

We don’t need to use the gradients, but the starfield looks so much better with them enabled!

So, now we’ll carry on and create our main loop:

  repeat 1000 [
  ]

This will create 1000 stars, once we fill in the rest of it. Let’s fill in the loop and then go through each command:

  repeat 1000 [
    randomvectors
    forward 500 + random 1000
    up 90
    randomfillcolor
    setpencolor fillcolor
    spot 1 + random 10
    home
  ]

…and that’s it! Not a lot, is it? Let’s go through it step-by-step.

randomvectors – sets a random three-dimensional orientation for the turtle. This is the equivalent of going left random 360 up random 360 rollright random 360 but in an easier and faster method. Why vectors? Because vectors describe the turtle’s orientation in 3D space, as well as the orientation of all other objects in it. Why build-in a shortcut? Because we wan’t to be easy to use!

forward 500 + random 1000 – move forward 500 turtle-units PLUS 0-999 turtle-units. random returns a random value between 0 and one less than the given value, because 0 is one of the (in this case) possible 1000 choices. This gives our starfield depth while making sure the stars aren’t too close!

random is a function, it doesn’t do anything on its own. Try typing random 30 at the prompt and see, you’ll get:

I don’t know what to do with 10

for example. That value needs to be ‘passed’ to another function or command — its output needs to become someone else’s input, in this case +.

Then +‘s output is passed to forward, which then moves the desired number of turtle-units. This is a big part of how Logo works, and is why commands can be stacked on the same line — they gobble up all of the inputs, and once they do they are ‘complete’ and we know to move on.

up 90 – spots are created around the turtle on its z-plane and so we need to tilt the turtle up 90 degrees so that the stars are facing back towards our view point near the center of the space.

(Note that if you used the lower primitive instead of forward, you wouldn’t need to tilt the turtle up.)

(Note also that different shapes may be positioned in different orientations relative to the turtle. The best way to build things is to progressively build them through the REPL (the command-line interface), using the backtrack command to undo any mistakes.)

randomfillcolor – picks a random fillcolor (the color shapes are colored), a value between 1 and 15 that is NOT the current fillcolor. The alternate form of this is complex: make “oldfillcolor fillcolor dountil fillcolor != :oldfillcolor [setfillcolor 1 + random 15]randomfillcolor is nicer. But you could do it the hard way if you want!

setpencolor fillcolor – because we’re using gradients we need to make the pencolor the new fillcolor so that the stars don’t gradient to a different color. fillcolor is a function that returns the current fillcolor.

spot 1 + random 10 – create a spot graphical primitive between 1 and 10 turtle-units in diameter around the turtle. Remember, random 10 will return a value from 0 to 9. If you just did spot random 10 without adding the 1 you might get 0., which while not an error won’t create anything of substance (literally).

home – return the turtle to the home position, which by default is [0 0 0], the center of the space.

Finally, all of this ‘filling’ is a list, passed to repeat to execute. Logo uses lists for all sorts of things, as you’ll see as you progress in your journey through Logo!

Congratulations, you’ve reached the end of this first (ahem) turtorial! Next in part two, we’re going to make a moving star ‘warp’ effect.

Here’s the full commented listing:

TO stars
  ;TO declares a procedure, in this case one called
  ;'stars'. Procedures can be simply called by name
  ;to execute them. So, at the prompt, you can
  ;type 'stars' (without quotes) to execute this
  ;procedure
  
  ;this is a very simple starfield generator and
  ;a good first project for turtleSpaces. All
  ;we're doing is randomly orienting the turtle,
  ;moving forward a random amount and creating
  ;a randomly-sized spot 1000 times.
  
  ;10 commands, one function. Dead simple!
  
  ;But first a little setup stuff...
  
  reset
  ;reset the workspace
  
  hideturtle
  ;hide the turtle
  
  penup
  ;don't draw lines
  
  ;we could omit this but it looks much better this way:
  setfillshade 12
  setpenshade -12
  gradient
  ;gradiented stars
  ;gradiented shapes graduate between the
  ;pencolor / penshade and the fillcolor / fillshade
  
  ;...and that's it for setup stuff!
  ;Now on to the main event:
  
  repeat 1000 [
    ;this means 'do this 1000 times'.
    ;things between square brackets are lists.
    ;repeat is a command that takes the number
    ;of times it is supposed to execute the contents
    ;of a list, and that list itself. What follows
    ;is the contents of that list:
    
    randomvectors
    ;give the turtle a random 3D orientation.
    ;you could do this yourself using a bunch
    ;of movement commands but we like making
    ;things easy!
    
    forward 500 + random 1000
    ;move forward 500 turtle units
    ;plus 0-999 turtle units
    ;(random returns a value between
    ;0 and the number passed to it
    ;excluding that number)
    
    ;random is a function that does not
    ;'do' anything on its own. Try typing
    ;'random 30' at the prompt to see.
    ;It returns a random value, which is
    ;then passed to another function or
    ;a command. In this case, random's
    ;output is passed to the + function,
    ;which then adds 500 to it and then passes
    ;its output to the forward command
    
    ;this is a big part of how Logo works
    
    up 90
    ;spots are created around the turtle
    ;on the z-plane, and so we need to tilt
    ;the turtle up
    
    ;try creating a spot eg 'spot 100'
    ;after the workspace has been reset
    ;to see how the spot is placed relative
    ;to the turtle
    
    ;different shapes may be places different
    ;ways relative to the turtle
    
    randomfillcolorsp
    ;shapes use the fill color
    ;and randomfillcolor picks a random
    ;fill color. You can pick one arbitrarily
    ;using the setfillcolor command
    
    setpencolor fillcolor
    ;because we're using a shade gradient, we
    ;need to set the pencolor to the fillcolor
    ;otherwise it would gradient to the default
    ;pencolor as well
    
    spot 1 + random 10
    ;make a spot between 1
    ;and 10 turtle-units in diameter
    ;(remember, random 10 returns
    ;a value between 0 and 9)
    
    home
    ;return to the home position
    ;(where the turtle started)
    
  ]
  ;perform the above list 1000 times
  ;as you can see, lists can be spread out
  ;across many lines
  
  ;So, 14 commands, a fillcolor and a couple of
  ;randoms and that's it.
  
  ;Click and drag the mouse over the view window
  ;to rotate the camera and see all the stars!
  
END