Archives 2021

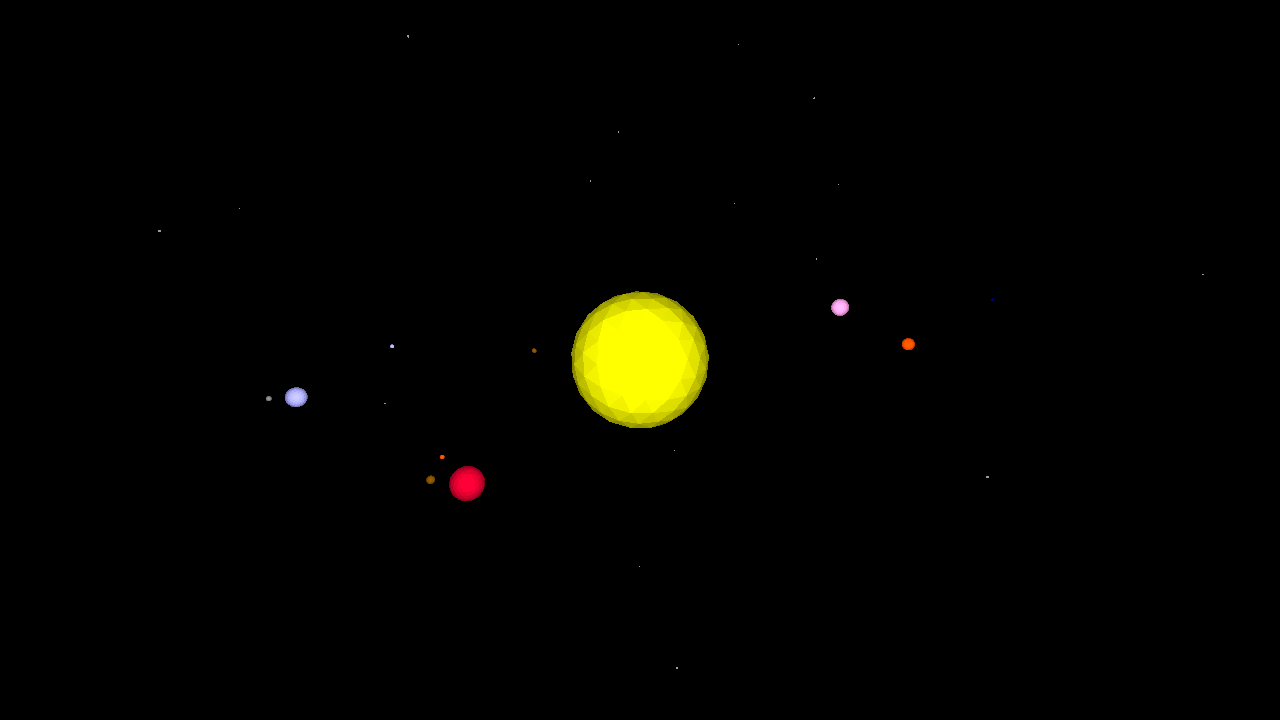
Solar System Simulation

This Solar System simulation features the ability to add orbiting moons to the planets, a few of which are already defined. It is not entirely to scale (the planets are larger than they are in reality).

Use the scrollwheel or finger-scroll to zoom in and out, and drag the mouse to rotate around the sun!

TO solarsystem
  
  reset
  penup
  hideturtle
  
  cam:pullin 100
  ;pull in the camera turtle
  
  ;---------------------------------
  ;make a starfield in the distance:
  ;---------------------------------
  
  setfillcolor 5
  repeat 200 [
    home randomvectors
    forward 2500 + random 100
    up 90
    spot 1 + random 5
  ]
  
  ;---------------------------------
  ;define planetary parameter lists:
  ;---------------------------------
  
  make "distance [0 39 72 100 152 520 953 1918 3006 3953]
  ;the distance of the planets from the sun in 100ths of an AU
  ;The first value is the sun itself, which is at the home position
  
  make "size [100 3 7.5 7.9 4.2 88.7 74.6 32.6 30.2 1.41]
  ;the planets are in scale relative to each other but not the sun,
  ;which is much larger than the value we have given it here
  
  make "color [13 8 9 7 1 14 11 7 2 10]
  ;each planet's color (and the sun)
  
  make "tilt [0 7 3.3 0 1.85 1.31 2.49 0.77 1.77 17.14]
  ;ecliptical tilt
  
  make "speed [0 4.1 1.62 1 0.53 0.084 0.034 0.011 0.006 0.004]
  ;speed of orbit
  
  ;-------------
  ;define moons:
  ;-------------
  
  make "moon [0 0 0 1 2 0 0 0 0 0]
  ;how many moons?
  
  make "mooncolor [[][][][5][8 9][][][][][]]
  make "moondistance [[][][][3][2 3][][][][][]]
  make "moonsize [[][][][2.1][1.12 0.62][][][][][]]
  make "moontilt [[][][][0][1 2][][][][][]]
  make "moonspeed [[][][][30][40 30][][][][][]]
  ;moon parameters, similar to planets
  ;only earth and mars are populated here,
  ;add the others as you like!
  
  ;---------------------------
  ;create the sun and planets:
  ;---------------------------
  
  repeat 10 [
    home
    
    make "planet repcount
    ;store the current planet for use inside hatch
    
    newmodel repcount {"setfc item :planet :color "ico 0.1 * item :planet :size}
    ;create a new turtle model using the data from the :color and :size lists
    ;we use a 'soft list' {} to create 'hard data' for use by newmodel
    ;as the turtle model is rendered each frame
    
    hatch [
      ;create a new hatchling
      
      setmodel :planet
      ;set the turtle model
      
      penup
      dropanchor
      ;set the orbit (anchor) point to the current position
      
      pullout 0.5 * item :planet :distance
      ;pull away from the anchor the distance specified in the :distance list
      
      orbitright random 360
      ;orbit around a random amount
      
      orbitup item :planet :tilt
      ;orbit up (tilt) the amount specified in the :tilt list
      
      showturtle
      ;hatchlings are not visible by default
      
      if 0 < item :planet :moon [ ;are there any moons? foreach "moon item :planet :mooncolor [ ;for each moon, let's create it the same way we did planets: make "moonnumber loopcount make "moonmodel word :planet loopcount newmodel :moonmodel {"setfc :moon "ico 0.1 * item :moonnumber item :planet :moonsize} make "parent turtle ;define the 'parent' turtle for use by the moon hatchling hatch [ ;hatch the moon setmodel :moonmodel dropanchor right random 360 pullout item :moonnumber item :planet :moondistance orbitup item :moonnumber item :planet :moontilt showturtle forever [ fixate query :parent [position] ;keep 'fixated' (look at and set the anchor point to) ;the parent turtle's position. if orbitdistance > item :moonnumber item :planet :moondistance [
                pullin orbitdistance - (item :moonnumber item :planet :moondistance)
              ]
              ;if it's getting away from us, try and catch up!
              
              orbitright 0.1 * item :moonnumber item :planet :moonspeed
              ;orbit the planet based on the :moonspeed
              
              sleep 6.25
              ;take a little nap
            ]
          ]
        ]
      ]
      forever [
        orbitright 0.05 * item :planet :speed
        sleep 25
      ]
      ;orbit the sun (we're back to the planet now) based on the value
      ;from the :speed list. Then take a little nap (wait 1)
      
    ]
  ]
  hideturtle
  ;hide Myrtle, although she would be sitting in the sun
  
END

One-a-Day: Space Tube Ride using TUBE and TUBEARC

Myrtle creates a 3D space tube ride for her to fly through…

Sometimes Myrtle needs to take a break and have a little fun! One of the things she can do is make a space tube and fly through it, using the TUBE and TUBEARC primitives:

TUBE makes a straight tube, and takes the parameters <radius> <depth> and <sides>. So, tube 20 10 10 makes a tube with a radius of 20 turtle units, a depth of 10 turtle units and 10 sides.

TUBEARC creates a curved tube, and takes the parameters <thickness> (the radius of the tube itself) <radius> (the radius of the arc itself) <sides> <totalsegments> and <arcsegments> – the last two are the total segments that would make up a complete torus, or donut, and the number of segments we actually want to create. So values of 20 and 10 will create a half-donut: tubearc 10 20 20 20 10

There are four procedures to our space tube program: createcourse, drawcourse, followcourse and spacetube.

createcourse generates the data that represents the tube’s course. It creates a course made up of 100 segments, represented by a word made up of a series of numbers between 0 and 4, where 0 represents a straight section of tube, and 1 to 4 represent four directions of turn. We use dountil to ensure we don’t repeat the same direction of turn more than once and end up looping back on ourself. Although, createcourse is not perfect and it is still possible for the course to cross over itself – but it’s a good thing tube walls aren’t solid!

drawcourse creates the graphical representation of the contents of the :course container we generated using createcourse. We use the twosided primitive to generate reflective “normals” on both sides of the shapes we generate from that point forward, and we use randfc to set a random ‘fill color’ or shape color for each segment as we create them.

We use foreach to step through each segment listed in the :course container, creating either a tube or a tubearc where appropriate.

While tubes are created directly under Myrtle, tubearcs are created around her, and so this means we need to do a bit of calisthenics to position the tubearcs where they need to go. Follow them through one command at a time to see how they work! We wait 2 / 60ths of a second between each segment creation so we can follow it.

followcourse causes Myrtle to fly through the created course, once again iterating through the :course container using foreach. fluid causes Myrtle to move forward smoothly, and to turn through the arcs we use a repeat. sleep is another form of wait, which takes milliseconds as a parameter instead of wait‘s 60ths of a second.

setpremodel allows us to ‘prepend’ commands to the turtle’s model, allowing us to make Myrtle look like she’s turning the appropriate way as she moves through the course.

Finally, spacetube puts it all together and is the procedure we execute to create the maze and fly through it. spacetube performs a reset, turns off the text layer, tells Snappy (the camera turtle) to pull away from Myrtle 1000 turtle units, tells Snappy to ‘follow’ Myrtle (turn to face her when she disappears from his view), then executes the createcourse procedure, the drawcourse procedure, sets the view (camera) turtle to Myrtle, turns Myrtle’s ‘light’ on (so we can see properly inside the tubes), turns Snappy’s light off, sets the camera ‘view point’ of Myrtle a bit up and behind her, and then executes followcourse.

TO spacetube
  reset
  fullscreen
  snappy:pullout 1000
  snappy:follow "myrtle
  createcourse
  drawcourse
  setview "myrtle
  setlight 1
  snappy:setlight 0
  setviewpoint [0 10 -30]
  followcourse
END

TO createcourse
  make "course empty
  make "last 5
  repeat 100 [
    
    dountil :last != :segment [make "segment random 5]
    
    make "course word :course :segment
    if :segment != 0 [make "last :segment]
  ]
END

TO drawcourse
  nofluid
  cs
  pu twosided
  foreach "segment :course [
    randfc
    if :segment = 0 [tube 50 200 20 lo 200]
    else [rt :segment * 90
      dn 90 rr 90 sl 100 tubearc 50 100 20 20 5 fd 100 rr 90 lt 180 + :segment * 90]
    wait 2
  ]
  home
END

TO followcourse
  dn 90
  fluid
  foreach "segment :course [
    if :segment = 0 [fd 200]
    if :segment = 1 [setpremodel [rt 22.5] repeat 90 [fd 1.75 rt 1 sleep 1] setpremodel []]
    if :segment = 2 [setpremodel [dn 22.5] repeat 90 [fd 1.75 dn 1 sleep 1] setpremodel []]
    if :segment = 3 [setpremodel [lt 22.5] repeat 90 [fd 1.75 lt 1 sleep 1] setpremodel []]
    if :segment = 4 [setpremodel [up 22.5] repeat 90 [fd 1.75 up 1 sleep 1] setpremodel []]
  ]
END

Release Notes: New SKEW* and TRAPE* shape primitives + SAVEPNG high-res export

We’ve added a number of new 3D shape primitives in the latest release:

skewfiso
skewiso
skewpyramid
skewpyramoid
skewquad
skewrect
skewtraperect
skewtrapevoxeloid
skewtrapezoid
skewvoxeloid
traperect
trapevoxeloid
trapezoid

These allow you to “skew” (or slant) the created shape and / or compress or expand one “end” of it (trape, or trapezoidal). This allows for a large increase in the number of possible shapes you can create in turtleSpaces.

Also, you can export an arbitrarily-sized render of the current scene using the new SAVEPNG primitive:

SAVEPNG [width height] “filename.png

Note that if you specify a really large size (> 10000 pixels per side) you can cause the application and even your operating system to crash! This is because the rasterisation needs to be done in memory.

The image is saved in the current “working directory”, usually a turtleSpace TSP folder inside of your user folder (inside of the turtleSpaces folder in your home directory).

We’ve also created a lot of short-hand primitives for shapes. You can find them listed in the shapes and graphics reference.

One-a-Day: Amiga Ball Bounce


The Commodore Amiga computer had a famous ‘bouncing ball’ demonstration program, a checkered bouncing ball. It was a bit different than this, but this is certainly reminiscent of it.

We love the Amiga demo so much that we created a special checkered ball primitive, AMIGABALL, and a second ‘oid’ primitive, AMIGABALLOID, which is used to create the ‘compressed’ ball.

Rather than turning the turtle into a ball (one method), this method ‘cleans’ the ‘turtle track’ after rendering each frame of the animation (which we wait for using the NEXTFRAME primitive).

The background voxel is actually an ‘inverted’ voxel, a voxel that is created using a negative size value. Due to the nature of OpenGL, only the insides of negative voxels are visible, which is why we can see inside it, and not see the face directly in front of us. Because we clean the ball each frame, we need to use a HATCHLING to create and hold the voxel in place. The hatchling just sleeps while the program runs.

The CAM: prefix directs the current view turtle (usually ‘Snappy’) to do things. You could also use SNAPPY: in this case but CAM: is shorter.

DOUNTIL PENCOLOR != FILLCOLOR [RANDFC] ensures that the ball has two different colors. The Amigaball(oid) uses both the pen and the fill colors in its construction, the only 3D primitive to do so.

To stop the ball from bouncing, press the Escape key.

TO bounce
  reset fs
  penup lower 120 slideright 120 fd 120
  
  hatch [randomfillcolor voxel -240 forever [wait 10]]
  ;create the cube, using a hatchling so it persists
  
  cam:run [oup 10 ra 5]
  
  home
  setspheroidaxis 1
  ;stretch the spheroid on the vertical, default is horizontal
  dn 90 rr 10
  randpc dountil pencolor != fillcolor [randfc]
  ;set random pen and fill colors
  
  forever [
    
    repeat 14 [
      amigaball 50 10 20
      setx xpos - 1 lo 4 lt 2
      nextframe clean
    ]
    ;move down
    
    repeat 11 [
      amigaballoid 50 10 20 1 - repcount / 20
      lo 2 lt 2 nextframe clean
    ]
    ;compress ball
    
    randpc dountil pencolor != fillcolor [randfc]
    ;change colors
    
    repeat 11 [
      amigaballoid 50 10 20 0.375 + repcount / 20
      ra 2 lt 2 nextframe clean
    ]
    ;expand ball
    
    repeat 28 [
      amigaball 50 10 20
      setx xpos + 1 ra 4 lt 2
      nextframe clean
    ]
    ;move up
    
    repeat 11 [
      amigaballoid 50 10 20 1 - repcount / 20
      ra 2 lt 2 nextframe clean
    ]
    ;compress ball
    
    randpc dountil pencolor != fillcolor [randfc]
    ;change colors
    
    repeat 11 [
      amigaballoid 50 10 20 0.375 + repcount / 20
      lo 2 lt 2 nextframe clean
    ]
    ;expand ball
    
    repeat 14 [
      amigaball 50 10 20 setx xpos - 1
      lo 4 lt 2 nextframe clean
    ]
    ;move back to center
  ]
END


One-a-Day: FRAG

The FRAG primitive creates a filled shape out of the current turtle position and her last two positions. For example:

FD 100 RT 90 FD 100 FRAG

will create a triangle.

While turtleSpaces has a variety of shape primitives, sometimes you need to create an arbitrary shape, and FRAG aids you in this.

Take this example, which draws a star:

TO star
  repeat 4 [
    forward 100
    right 170
    forward 86
    frag
    left 70
    forward 86
    right 170
    forward 100
    frag
    right 180
  ]

We can change the number of sides the star has by changing the number of repeats and fiddling with the values a bit:

TO star2
  repeat 5 [
    fd 100 rt 170
    fd 86 frag
    lt 88 fd 86
    rt 170 fd 100
    frag rt 180
  ]
END

First, let’s change our star procedures so they can take a :size parameter, like so:

TO star1 :size
  repeat 4 [
    fd 100 * :size
    rt 170
    fd 86 * :size
    frag
    lt 70
    fd 86 * :size
    rt 170
    fd 100 * :size
    frag
    rt 180
  ]
END

In this case, :size is a ratio, that is, 0.5 will make a star half the size, and 2 will make a star twice the size of the default.

You can change the color of the star using the SETFILLCOLOR primitive, or set a random fill color with RANDFC.

The following procedures create a sky full of stars:

TO star1 :size
  repeat 4 [
    fd 100 * :size
    rt 170
    fd 86 * :size
    frag
    lt 70
    fd 86 * :size
    rt 170
    fd 100 * :size
    frag
    rt 180
  ]
END

TO star2 :size
  repeat 5 [fd 100 * :size rt 170 fd 86 * :size frag lt 88 fd 86 * :size rt 170 fd 100 * :size frag rt 180]
END

TO star3 :size
  repeat 6 [fd 100 * :size rt 170 fd 86 * :size frag lt 100 fd 86 * :size rt 170 fd 100 * :size frag rt 180]
END

TO star4 :size
  repeat 7 [fd 100 * :size rt 170 fd 86 * :size frag lt 108.625 fd 86 * :size rt 170 fd 100 * :size frag rt 180]
END

TO star5 :size
  repeat 8 [fd 100 * :size rt 170 fd 86 * :size frag lt 115 fd 86 * :size rt 170 fd 100 * :size frag rt 180]
END

TO stars
  reset cam:setposition [0 0 0]
  cam:fixate [0 0 0]
  cam:setviewpoint [0 0 0]
  cam:newworker [forever [up 0.1 lt 0.1 rr 0.1 wait 1]]
  repeat 200 [
    pu home randori fd 400 + random 1000 up 90
    lt random 60 pd randpc randfc randfs randps
    make "size (10 + random 90) / 100
    run {pick [star1 star2 star3 star4 star5] :size}
  ]
  
END

Type STARS and press Enter to see the stars!

FRAG’s sister, SHARD creates a three-dimensional FRAG with depth beneath it. This depth is supplied as a parameter, in turtle-units, eg. SHARD 5. Try replacing FRAG with SHARD 5 in one of your star procedures and see what happens! (You’ll need to drag the camera around to see the sides of the star)

Myrtlebot: A turtleSpaces Twitter Bot

Don’t want to download the turtleSpaces client just yet? Well, you can take turtleSpaces for a bit of a spin using Myrtlebot, our turtleSpaces Twitter Bot! Myrtlebot executes whatever Logo code (not procedures yet) you tweet at her, and then returns an image of the results. In the future, we plan to allow for the recording of movies, but for now it’s just a still image. If your code runs for more than 60 seconds, it will be cut off at the 60 second mark.

Head on over to Twitter and check it out!

We’ve created a number of ‘short codes’ for various graphics primitives so that you can put more into a tweet. Here are the new ‘short codes’ (along with the typical logo rt, lt, fd, bk, up, dn etc.) See the documentation for a fuller description of each primitive:

AB = AMIGABALL
ABO = AMIGABALLOID
CAM = CURRENT CAMERA TURTLE
CB = CUBE
CBO = CUBOID
CC = CUTCONE
CCO = CUTCONOID
CCOS = CUTCONOIDSLICE
CCS = CUTCONESLICE
CF = CUTFUNNEL
CFO = CUTFUNNELOID
CFOS = CUTFUNNELOIDSLICE
CFS = CUTFUNNELSLICE
CIR = CIRCLE
CN = CONE
CNO = CONOID
COSL = CONOIDSLICE
CSL = CONESLICE
CSO = CUTSPHEROID
CSOS = CUTSPHEROIDSLICE
CSP = CUTSPHERE
CSS = CUTSPHERESLICE
CY = CYLINDER
CYA = CYLINDERARC
CYAS = CYLINDERARCSLICE
CYO = CYLINDROID
CYOA = CYLINDROIDARC
CYOAS = CYLINDROIDARCSLICE
CYOS = CYLINDROIDSLICE
CYS = CYLINDERSLICE
DCC = DUOCUTCONOID
DCFO = DUOCUTFUNNELOID
DCO = DUOCYLINDROID
DIVP = DIVISORP
DM = DOME
DMO = DOMOID
DOD = DODECAHEDRON
DODO = DODECAHEDROID
DTO = DUOTUBOID
ELL = ELLIPSE
FIX = FIXATE
FU = FUNNEL
FUO = FUNNELOID
FUOS = FUNNELOIDSLICE
FUS = FUNNELSLICE
HD = HEADING
ICD = ICOSPHEROID
IT = ITEM
NTWS = NOTWOSIDED
OCT = OCTAHEDRON
OCTO = OCTAHEDROID
PK = PICK
POPT = POPTURTLE
PRI = PRISM
PS = POLYSPOT
PT = PITCH
PUSHT = PUSHTURTLE
PY = PYRAMID
PYO = PYRAMOID
QD = QUAD
QUO = QUOTIENT
RBG = RANDBG
RBS = RANDBS
RCT = REPCOUNT
RD = RANDOM
RE = REMAINDER
RFC = RANDFC
RFS = RANDFS
RO = ROLL
RP = ROPE
RPA = REPABOVE
RPC = RANDPC
RPS = RANDPS
RPT = REPEAT
SBDS = SETBOUNDS
SBG = SETBG
SBS = SETBS
SFC = SETFC
SFS = SETFS
SHD = SETHEADING
SISI = SETICOSPHEREITERATIONS
SKF = SKEWFISO
SKI = SKEWISO
SKP = SKEWPYRAMID
SKPO = SKEWPYRAMOID
SKQ = SKEWQUAD
SKR = SKEWRECT
SKT = SKEWTRAPEZOID
SKTR = SKEWTRAPERECT
SKV = SKEWVOXELOID
SKVO = SKEWTRAPEVOXELOID
SMW = SETMARKERWIDTH
SP = SPOT
SPC = SETPC
SPD = SPHEROID
SPDS = SPHEROIDSLICE
SPH = SPHERE
SPHS = SPHERESLICE
SPI = SETPITCH
SPN = SETPOSITION
SPO = SETPOS
SPS = SETPS
SPW = SETPENWIDTH
SSA = SETSPHEROIDAXIS
SQ = SQUARE
SRO = SETROLL
SSPD = SETSPEED
STD = SETTYPEDEPTH
STDE = SETTYPEDELAY
STF = SETTYPEFONT
STFI = SETTYPEFILLED
STR = SETTYPESTRETCH
STS = SETTYPESIZE
TB = TUBE
TBA = TUBEARC
TBAS = TUBEARCLICE
TBO = TUBOID
TBOA = TUBOIDARC
TBOAS = TUBOIDARCSLICE
TBOS = TUBOIDSLICE
TBS = TUBESLICE
TH = TETRAHEDRON
THO = TETRAHEDROID
TR = TORUS
TRE = TRAPERECT
TRI = TRIANGLE
TRO = TOROID
TROS = TOROIDSLICE
TRS = TORUSSLICE
TVO = TRAPEVOXELOID
TWS = TWOSIDED
TZ = TRAPEZOID
VX = VOXEL
VXO = VOXELOID